10.1 Certificate Application (New CA System)
IHEP CA (Chinese High Energy Physics Grid Computing Certification Authority) is an accredited member of the European Policy Management Authority for Grid Authentication in e-Science (EUGridPMA) and the Asia Pacific Grid Policy Management Authority for Grid Authentication in the Asia Pacific region. It is operated by the Computing Center of IHEP as part of the Large Hadron Collider Computing Grid (LCG) project, has been running at the IHEP Computing Center in Beijing since 2004, and issues X.509 certificates for Grid computing.
This section describes how to apply for, download, renew and revoke User certificates, Robot certificates and Host certificates issued by the new IHEP PKI system (based on OpenXPKI), as well as EST automatic renewal for host certificates. Unless otherwise stated, the WebUI URL is: https://gridca.ihep.ac.cn/webui/ihepca/.
WebUI, EST and login must all use HTTPS; the public download URLs of CA certificates, CRLs and CP/CPS are also accessible over HTTP.
UI conventions
Button and menu names in this section follow the English WebUI. On every page, Continue only saves and moves to the next page; Submit is what submits the current request to the system or RA. Review the page summary before submitting.
The manual for the legacy CA (OpenCA, cagrid.ihep.ac.cn) is kept in 10.4 Certificate Application (Legacy CA System) for historical reference only.
10.1.1 Certificate Types and Application Methods
| Type | Purpose | Key generation & custody | Common application method |
|---|---|---|---|
| User Certificate | Grid user authentication, browser/CLI client authentication | Generated by the system, downloaded as PKCS#12 by the user | WebUI |
| Robot Certificate | Experiment tasks, pilots, service robots (non-human identity) | Generated by the system, downloaded as PKCS#12 by the responsible person | WebUI |
| Host Certificate | Host server authentication, also controlled client authentication | Generated and kept by the site admin on the target host | WebUI first issue; EST auto renewal |
- The Subject of a user certificate contains the English name, short account, organization and unit. Do not put a Chinese name directly into the Subject.
- The Subject and SAN of a host certificate contain the host DNS names and the applicant's LDAP email; do not reuse a personal certificate private key as a host private key.
- Information in the certificate itself (Subject DN, SAN, Issuer, CRL URL, etc.) cannot be modified by users and should stay consistent across renewals; Requester, Email, Owner contact and Comment in the WebUI are system metadata used for review, search, notification and accountability.
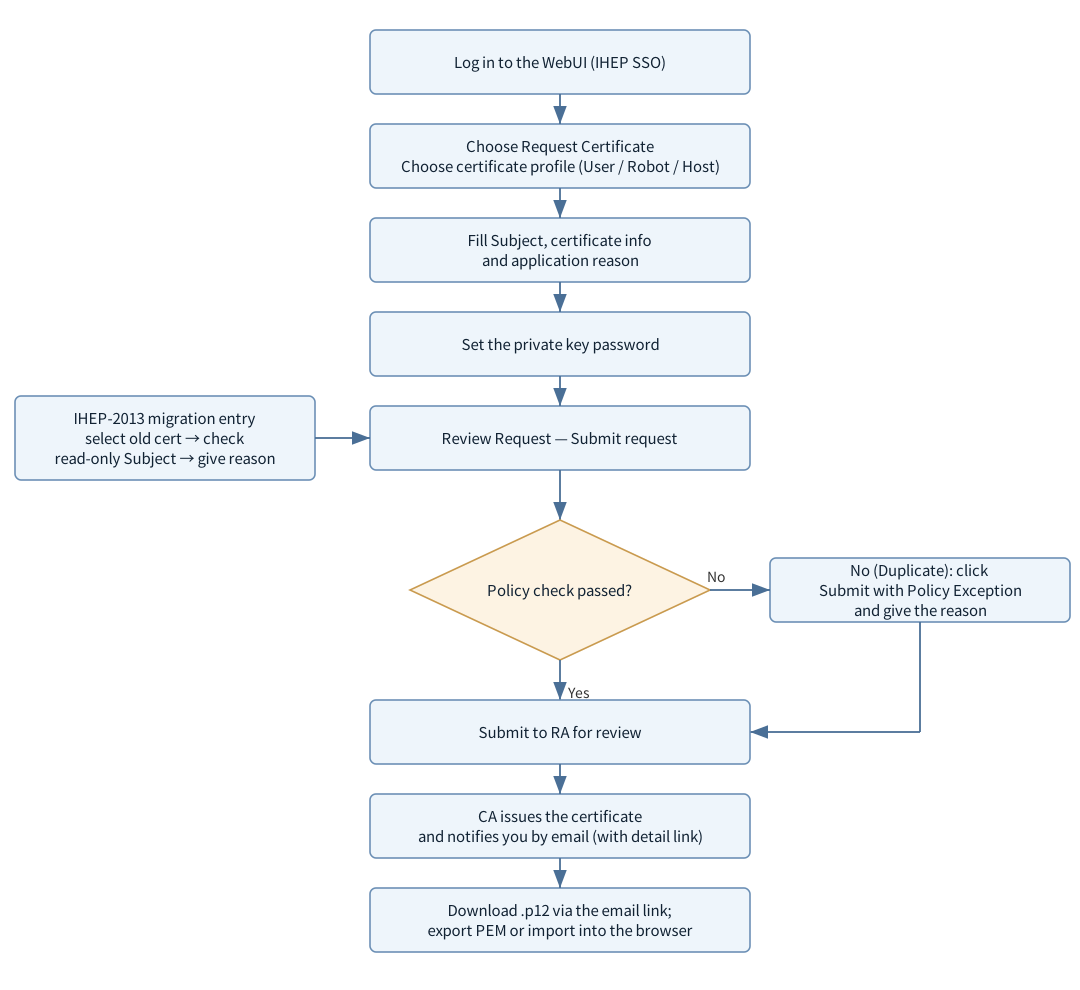
The overall application workflow is shown below (the flow is the same for User, Robot and Host certificates; the IHEP-2013 migration entry joins from the left):
10.1.2 Preparation
- Make sure your IHEP SSO account can log in normally (unified authentication: https://login.ihep.ac.cn).
- Make sure the email in LDAP is correct. It becomes the email SAN of your user or host certificate and is used for ownership and notifications.
- If you are applying for a host certificate, confirm all DNS names in advance; host names are lowercased into the certificate, and names added later require a new application or CA process.
- Install the trust chain: the IHEP computing platform's compute nodes and servers already have the new Root and Issuing CA public-key certificates and a CRL update mechanism deployed, so users normally do not need to install them; if you use the certificate on your own machine or an external Grid client/server, install those public-key certificates and the CRL update mechanism yourself.
10.1.3 Logging in to the WebUI
Log in with IHEP SSO
-
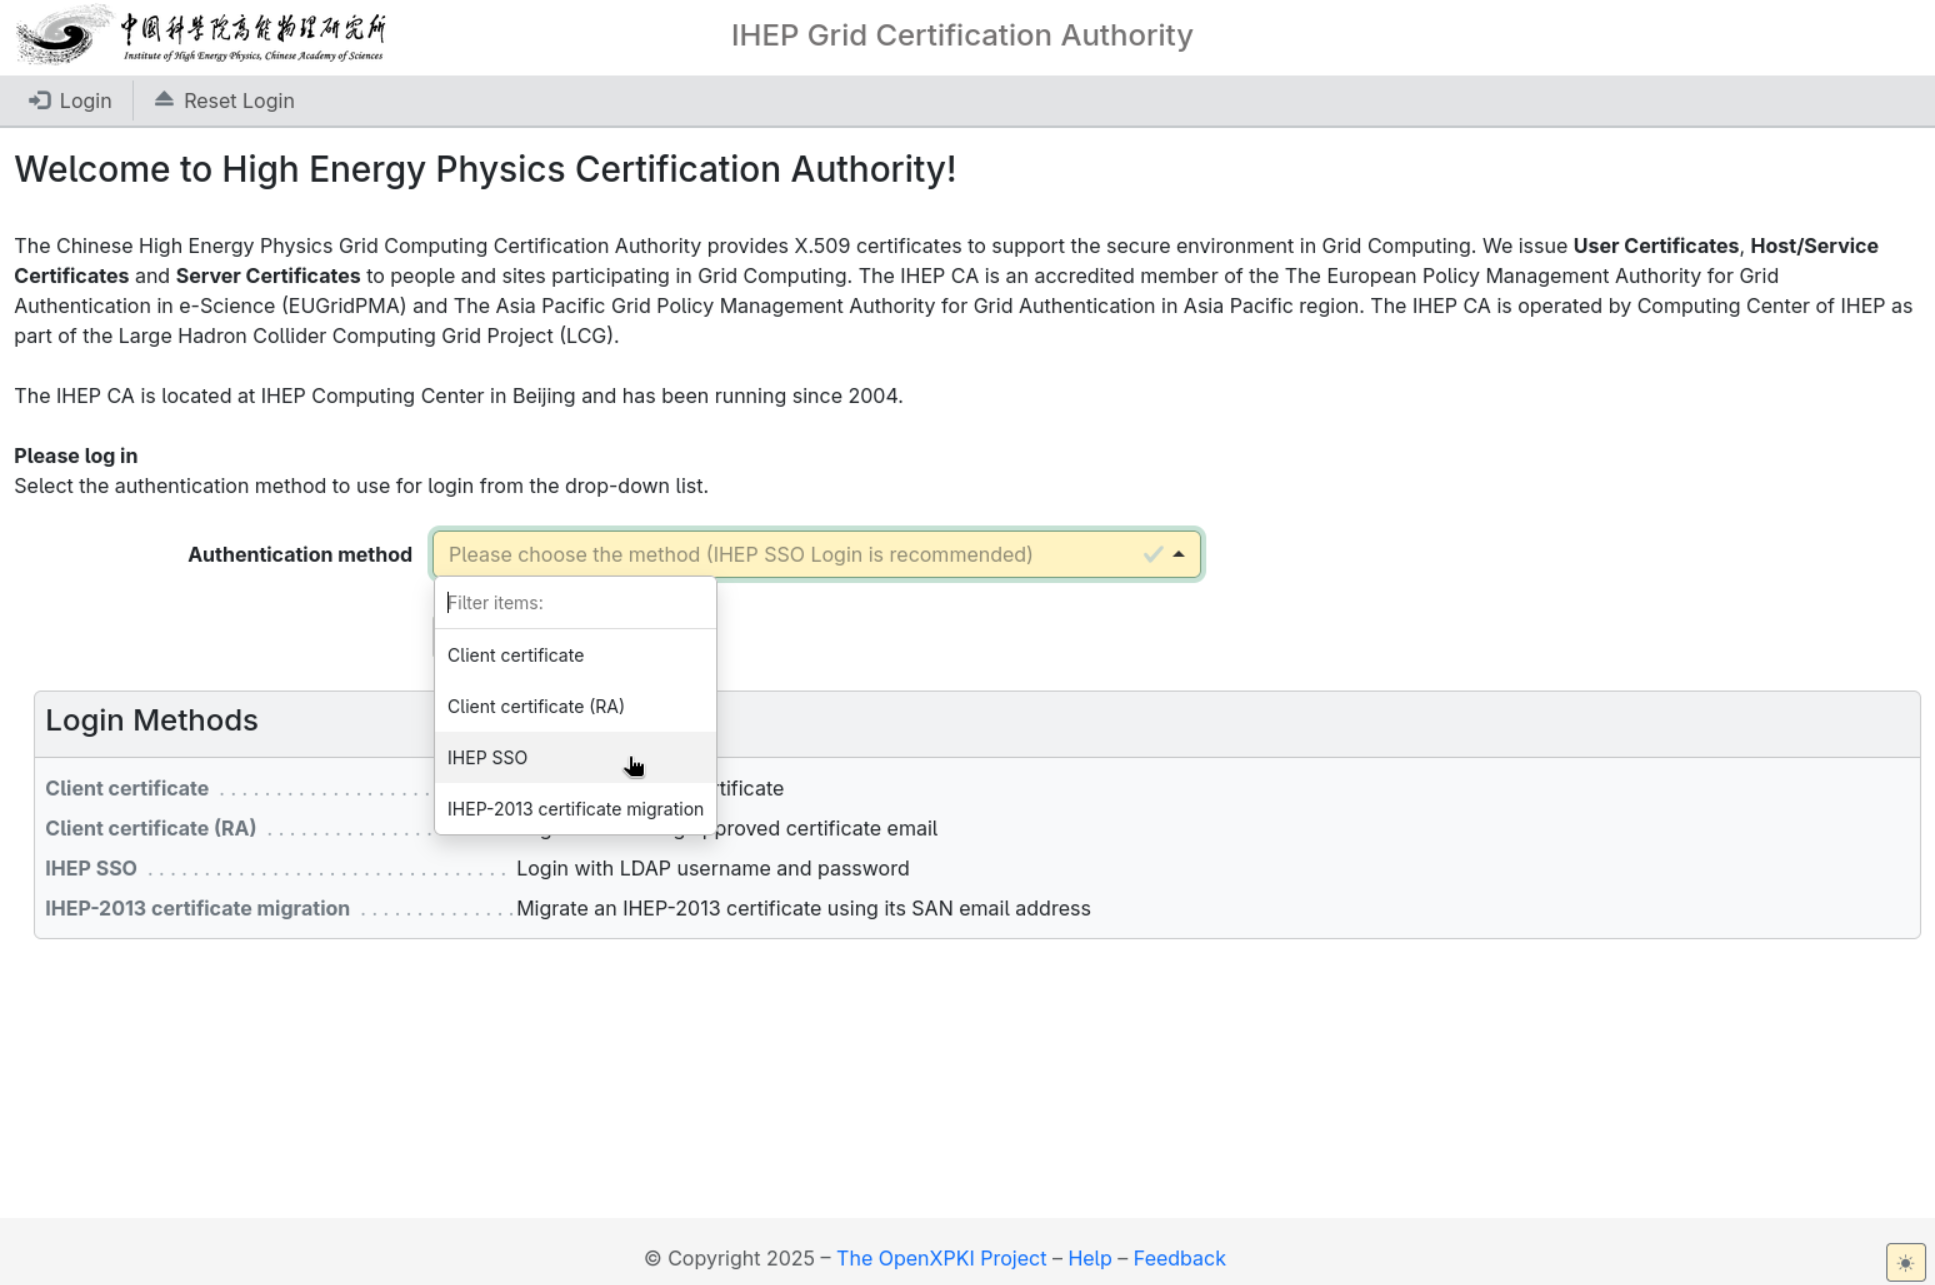
Open the WebUI URL and choose IHEP SSO as the Authentication method.
-
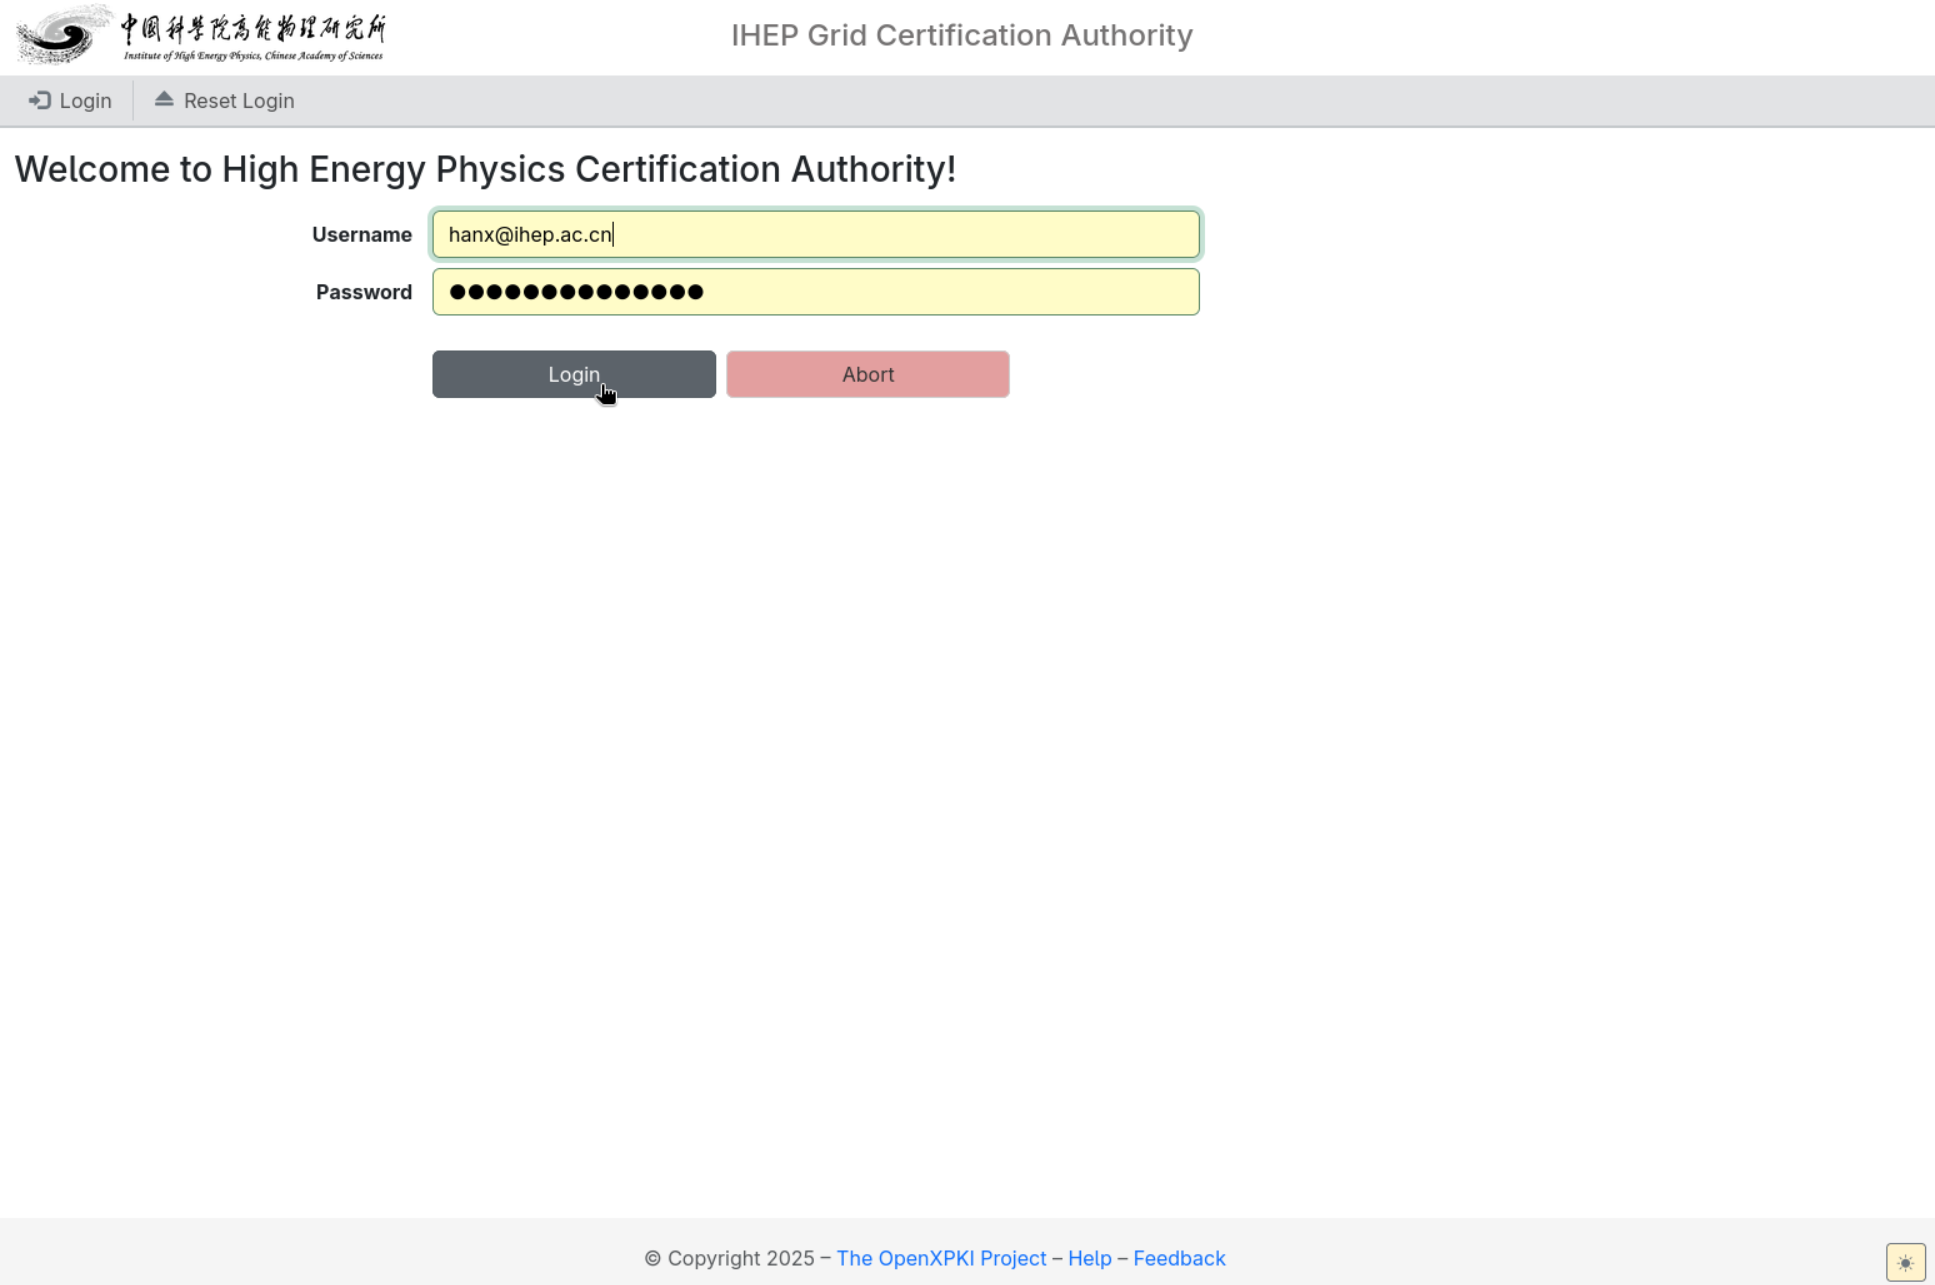
Enter your LDAP username and password, then click Login.
-
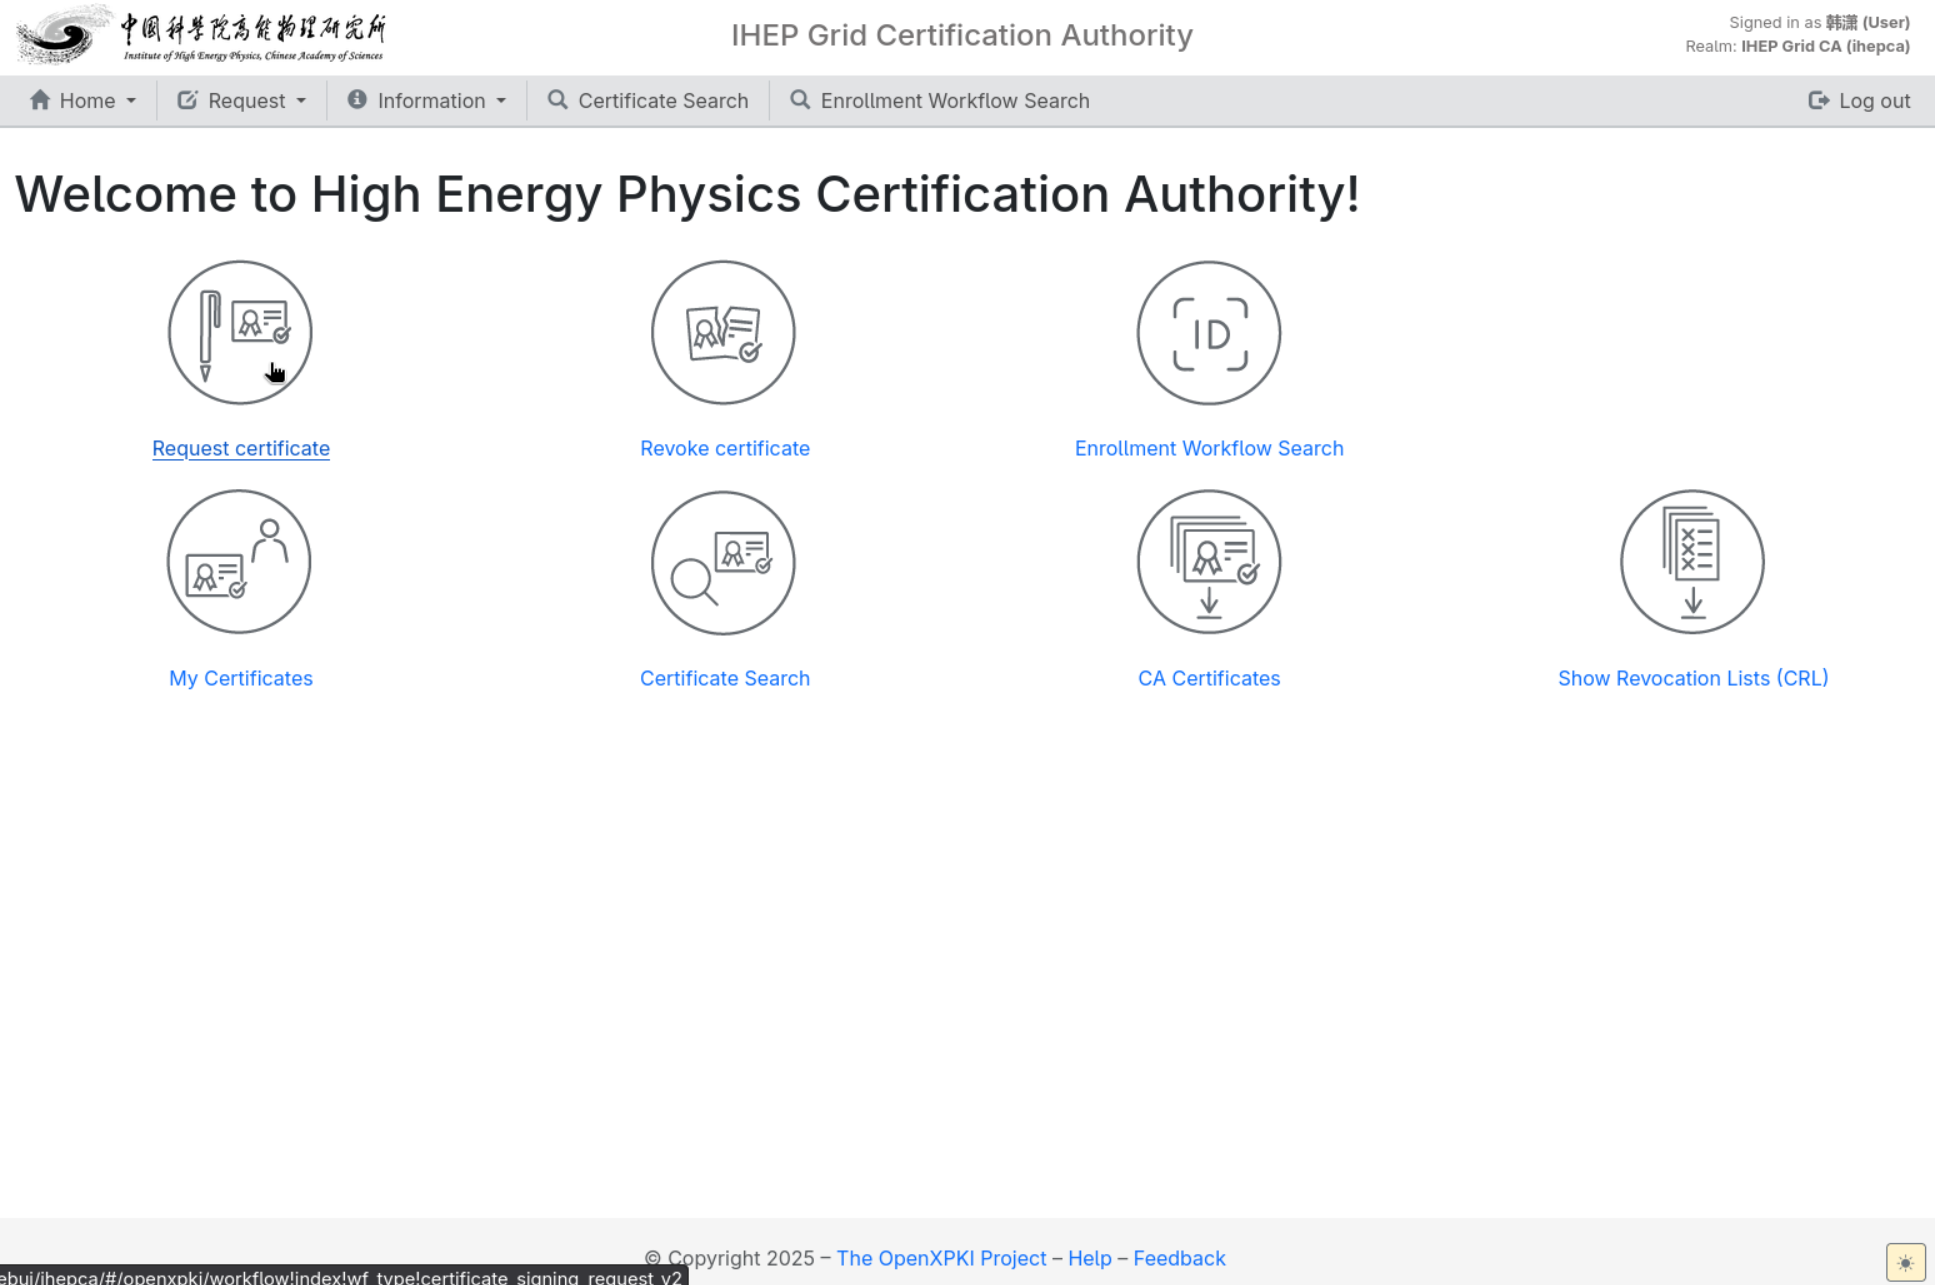
After login, confirm the account shown at the top-right corner is yours; do not keep a login session in a shared browser.
If you see Login with the given credentials failed!, first verify the LDAP account and password instead of trying different accounts repeatedly; contact CA support to check the LDAP mapping. After login, it is recommended to open Home → My Certificates (certificates owned by the current account) and Home → My Workflows (workflows you created that are unfinished or recently finished). Use the on-page Logout to exit; closing the tab does not necessarily destroy the session immediately.
Migrate an IHEP-2013 personal certificate
This entry is only for users who still hold a valid, unrevoked IHEP-2013 personal certificate, and whose certificate email matches their IHEP unified authentication (IHEP SSO) email:
- Install the old personal certificate and its private key in the browser or OS certificate store.
-
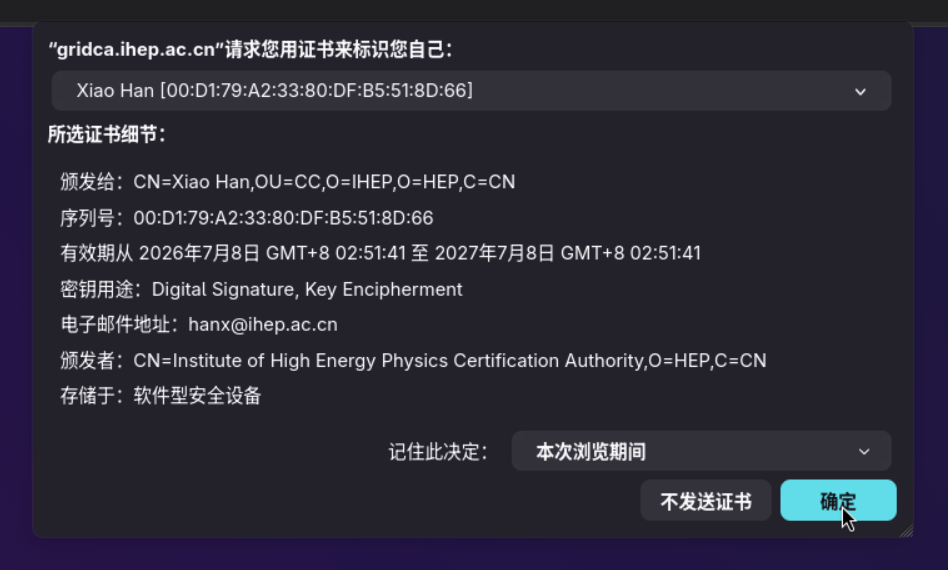
After you open the WebUI, the browser pops up the certificate chooser; select your IHEP-2013 personal certificate (not a Host certificate) and confirm:
-
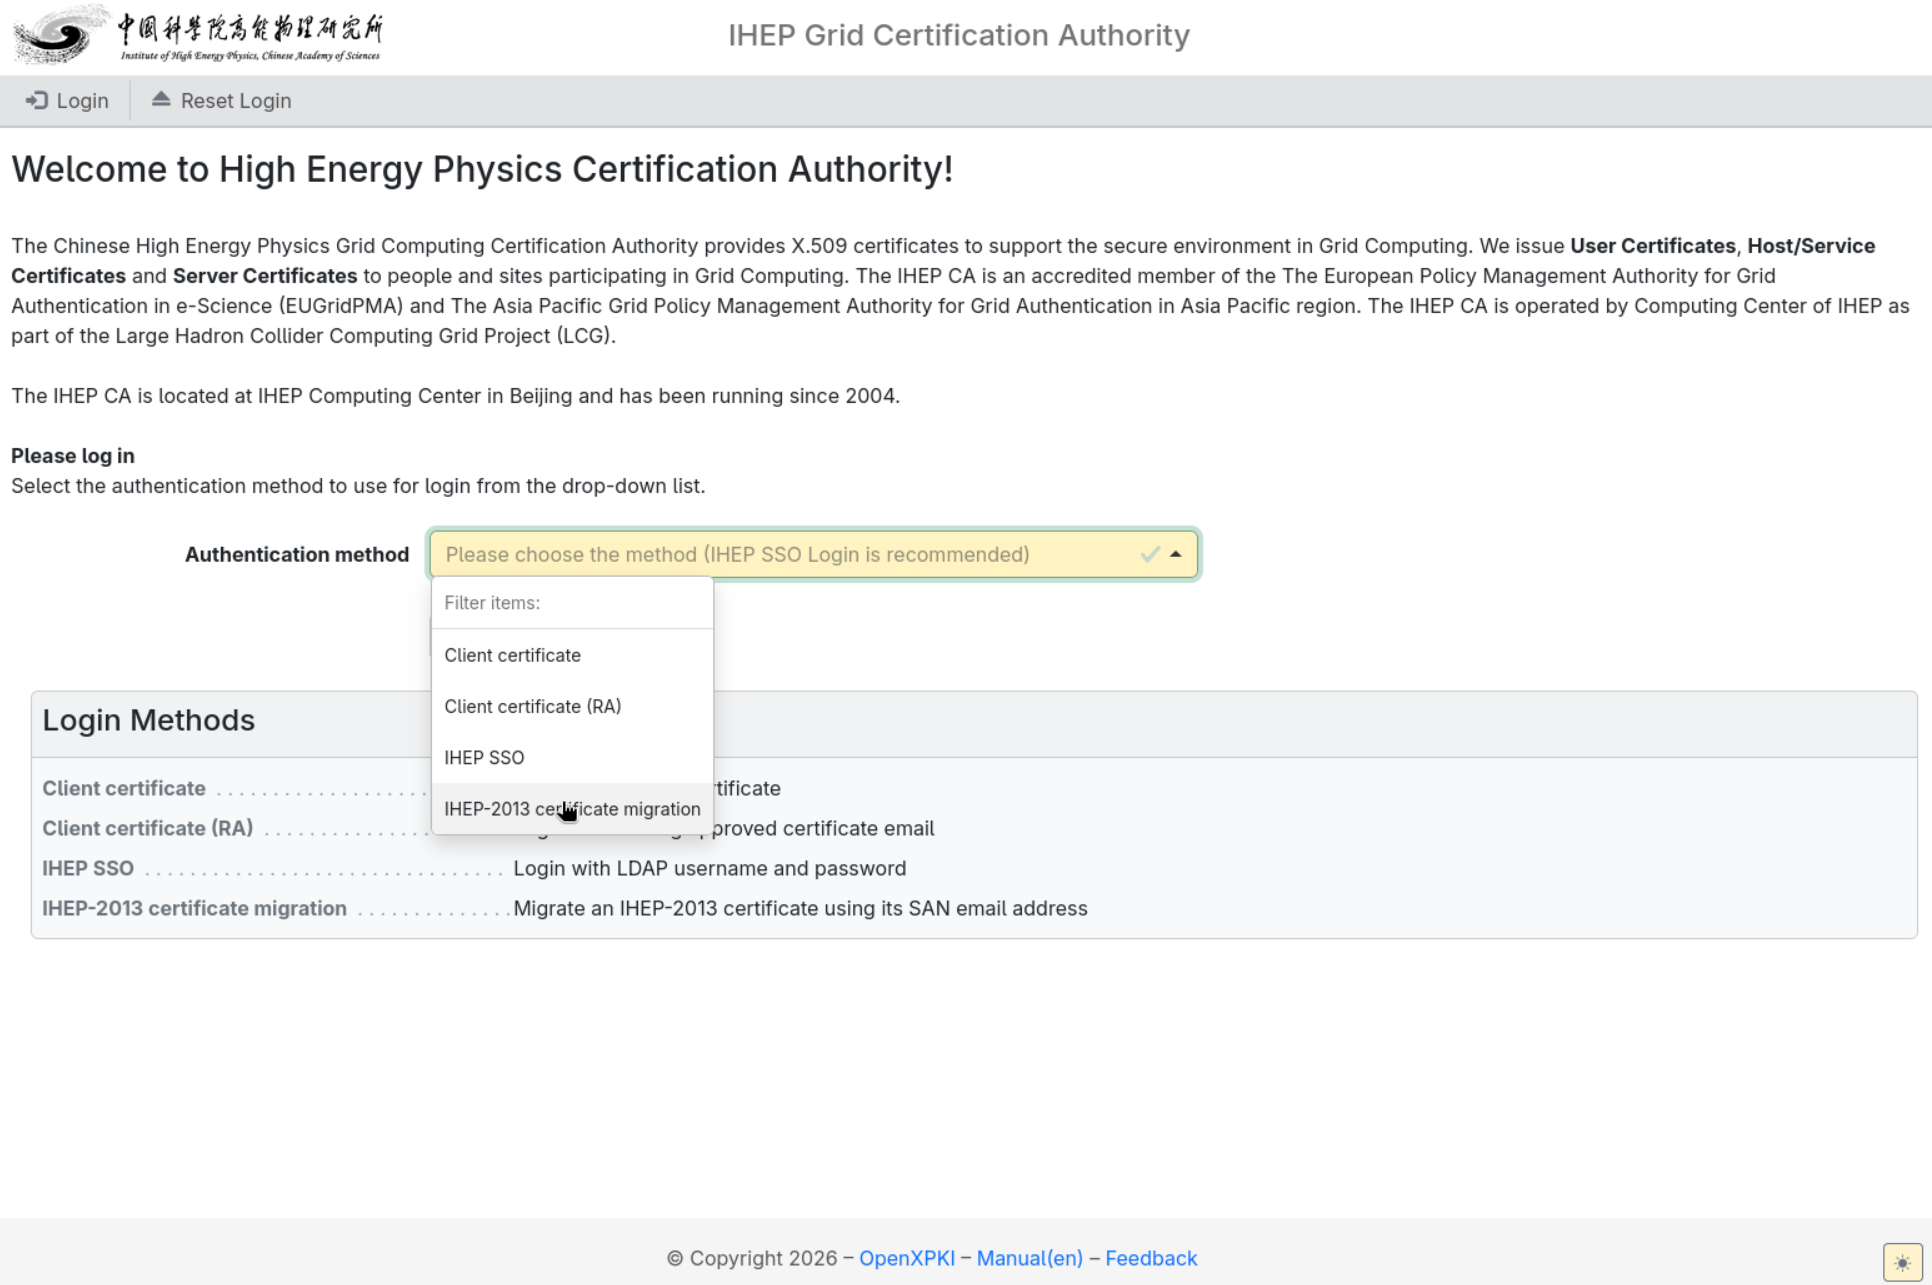
On the login page, choose IHEP-2013 certificate migration from the Authentication method dropdown and click Login to finish the migration login:
-
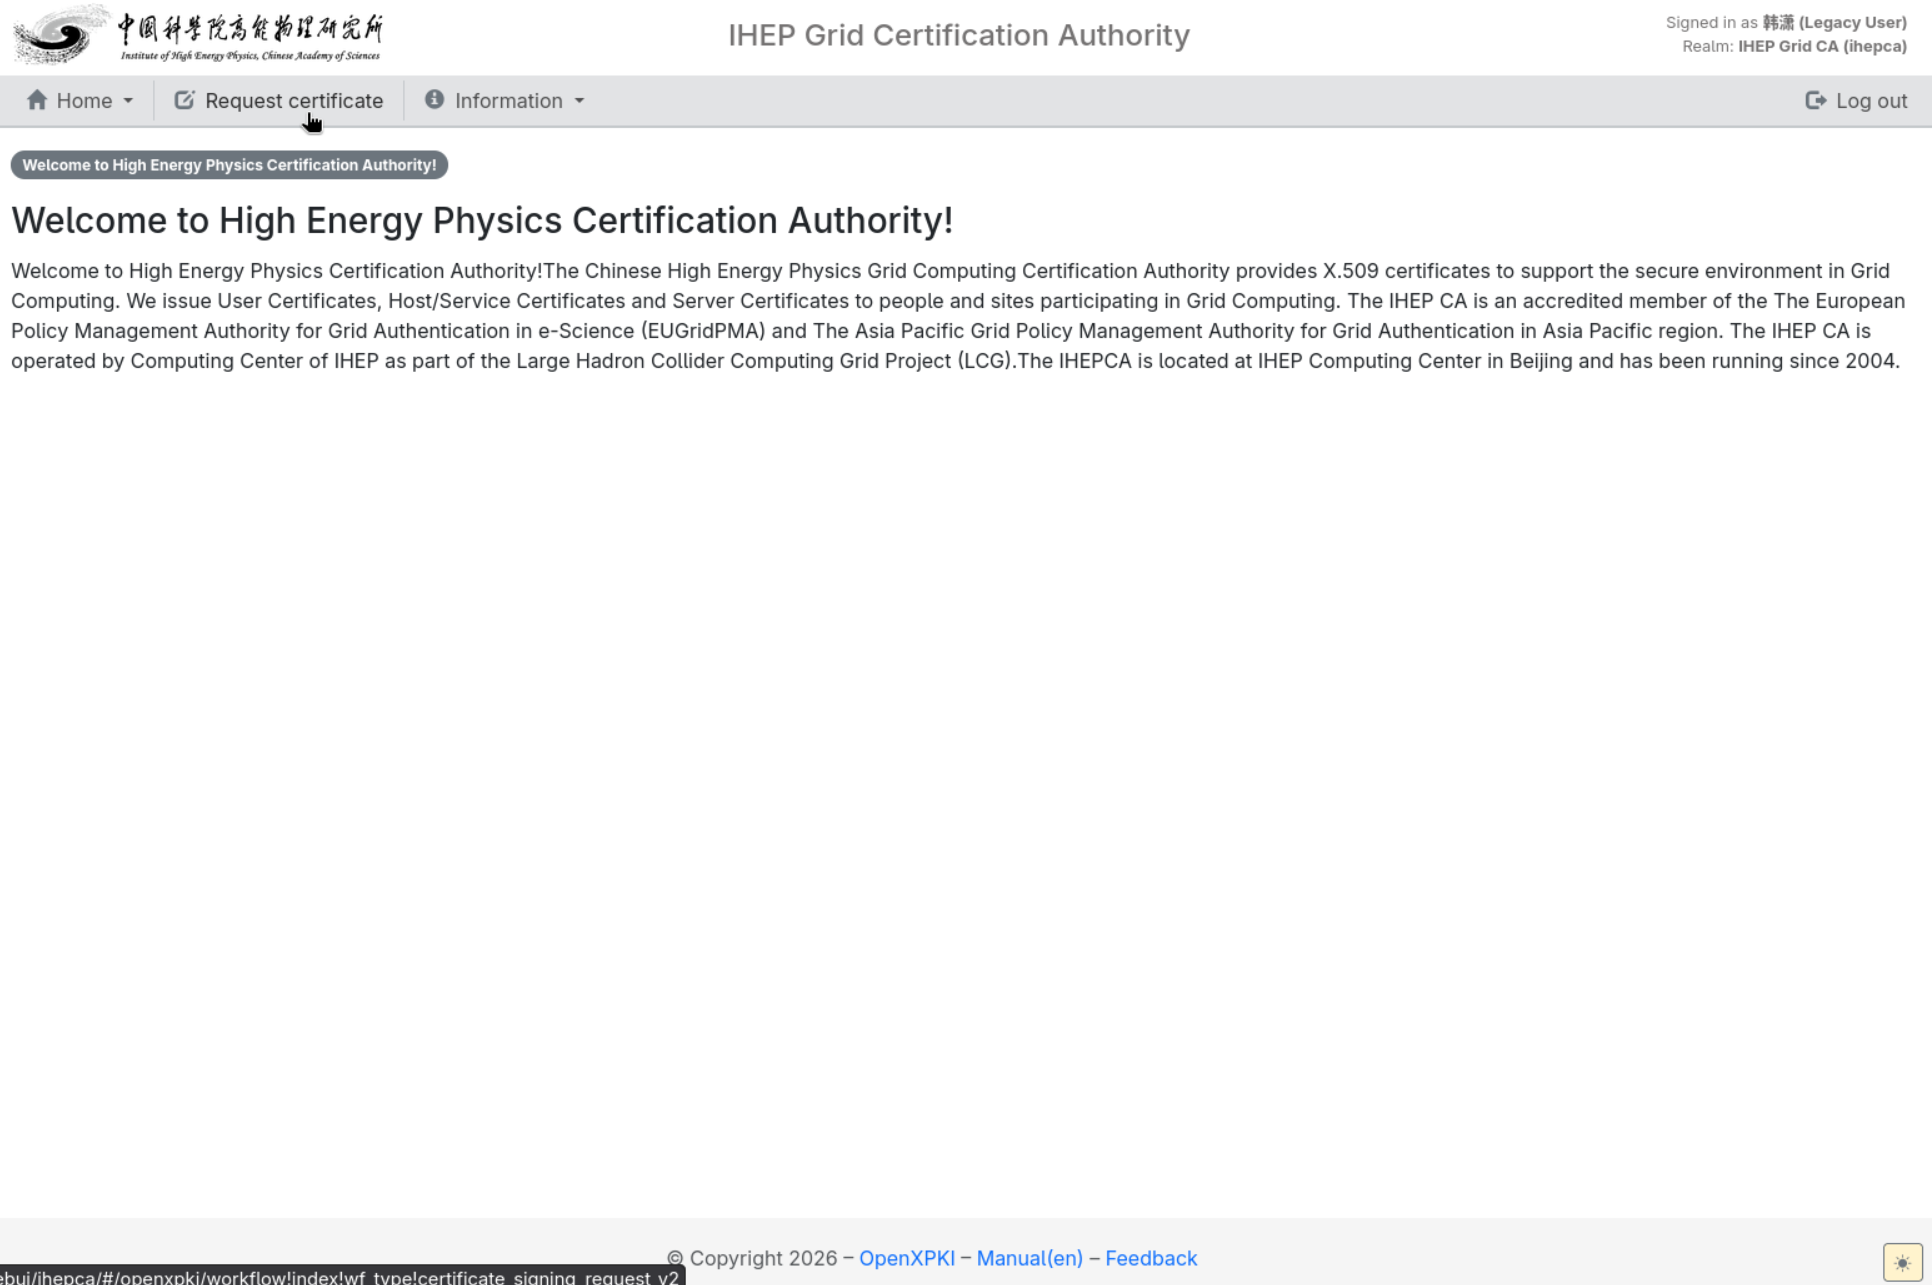
The system checks the old chain, old CA CRL, the certificate email SAN against the LDAP identity; after passing you reach the home page — click Request certificate in the top menu:
-
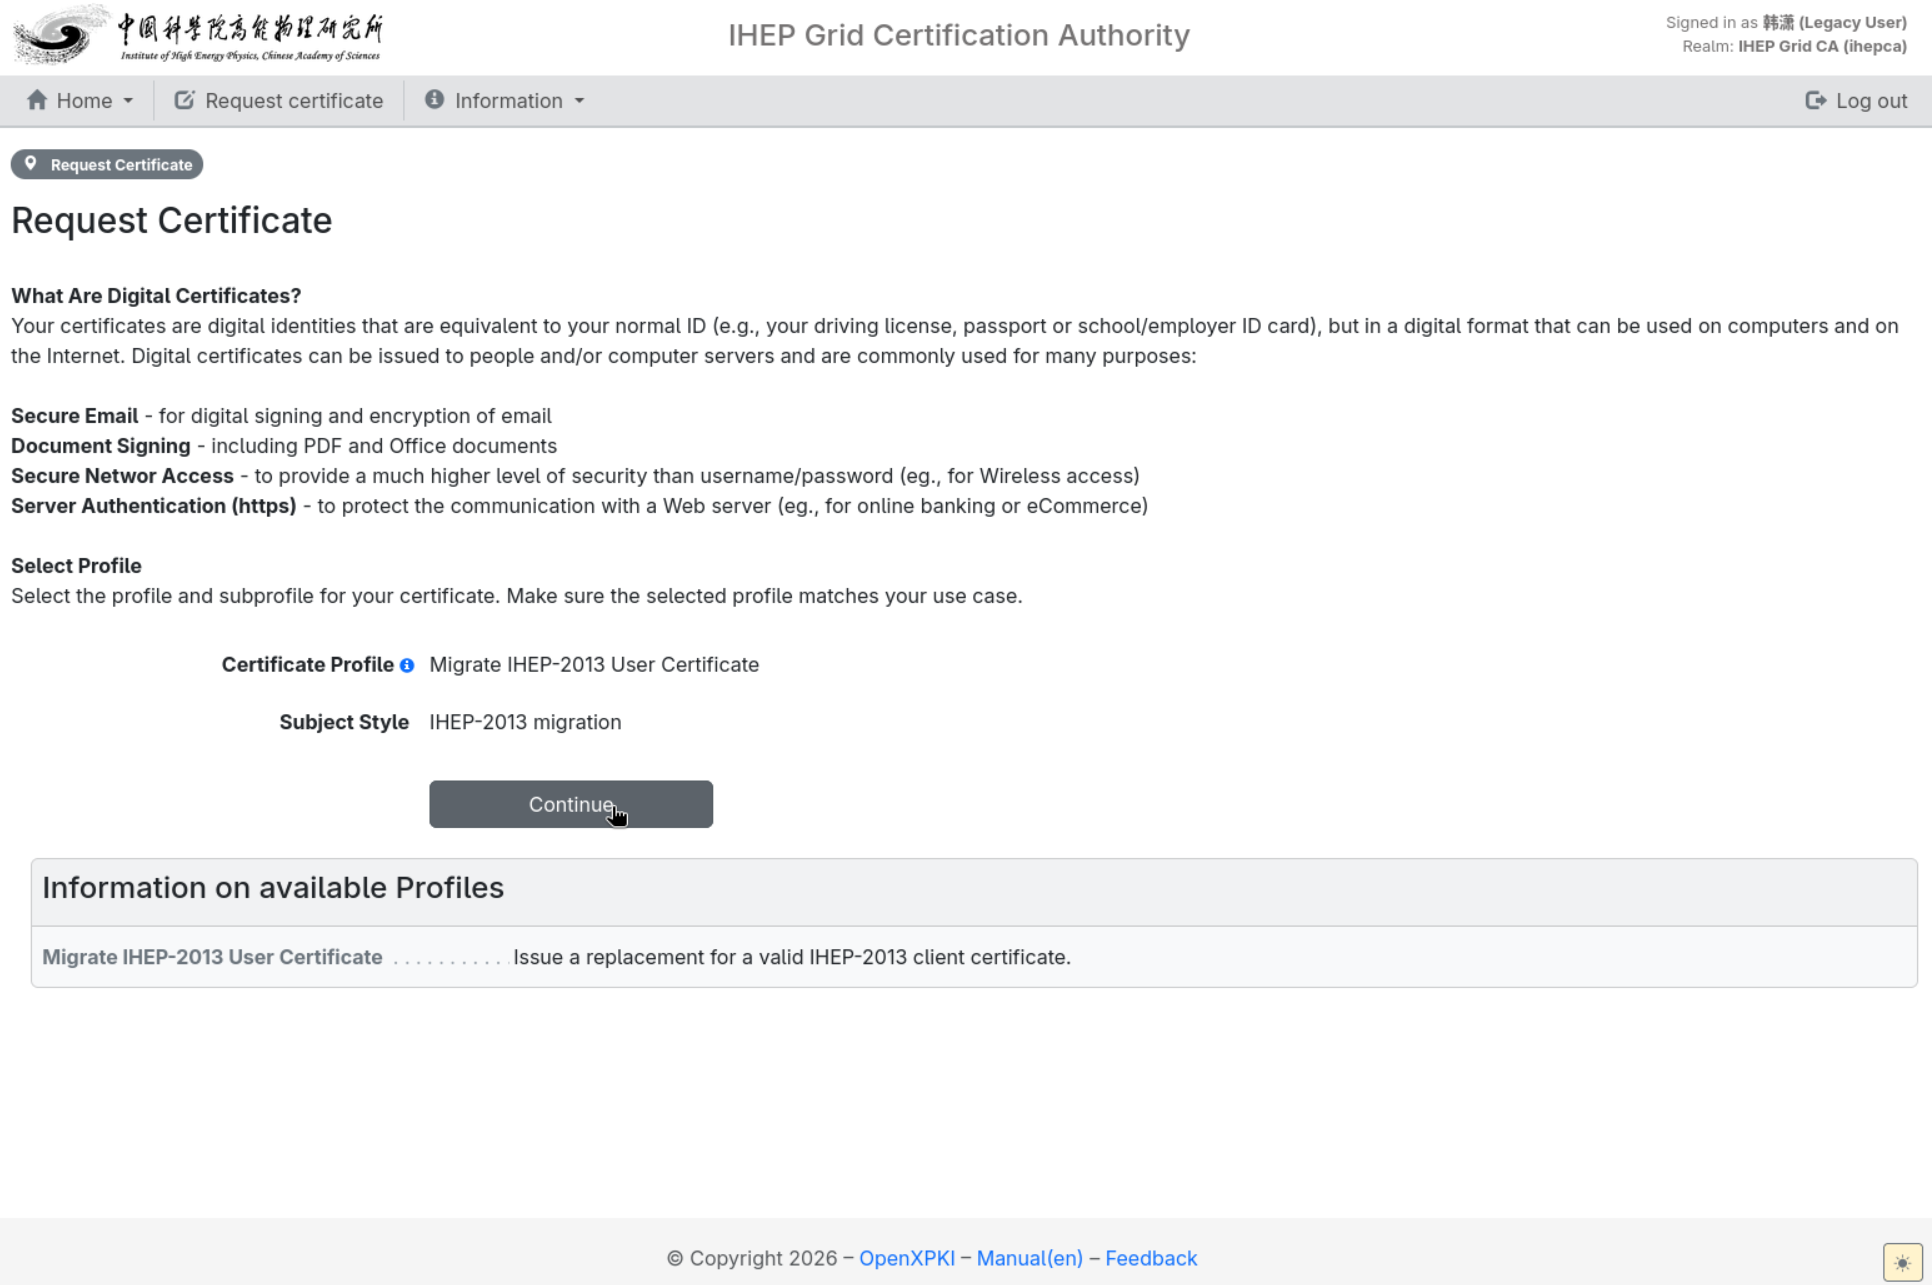
The personal-certificate migration profile (Migrate IHEP-2013 User Certificate) is selected automatically; confirm it and click Continue:
-
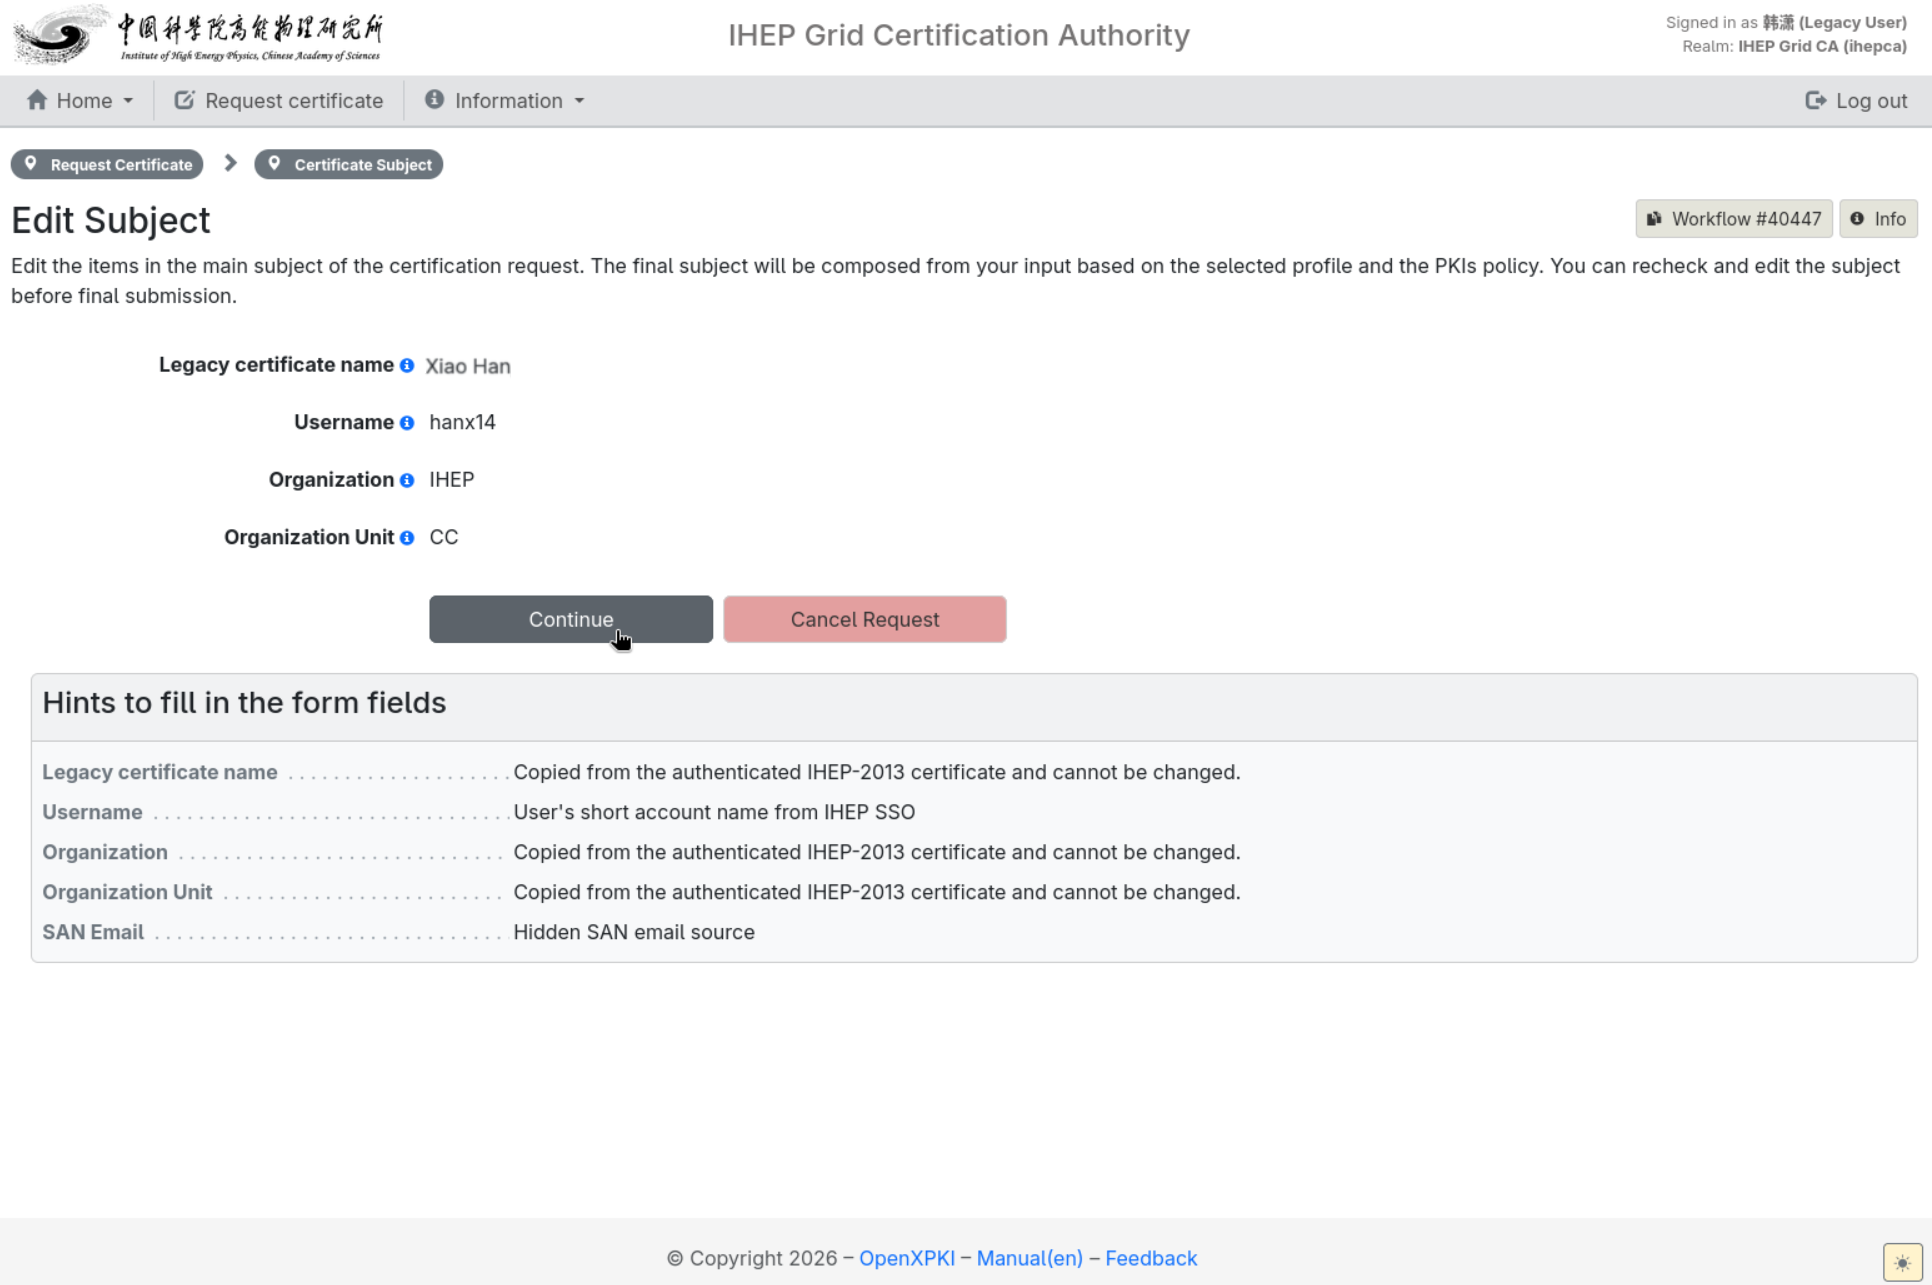
On the Edit Subject page check Legacy certificate name, Username, Organization, Organization Unit and SAN Email (all copied from the old certificate and LDAP and cannot be changed), then click Continue:
-
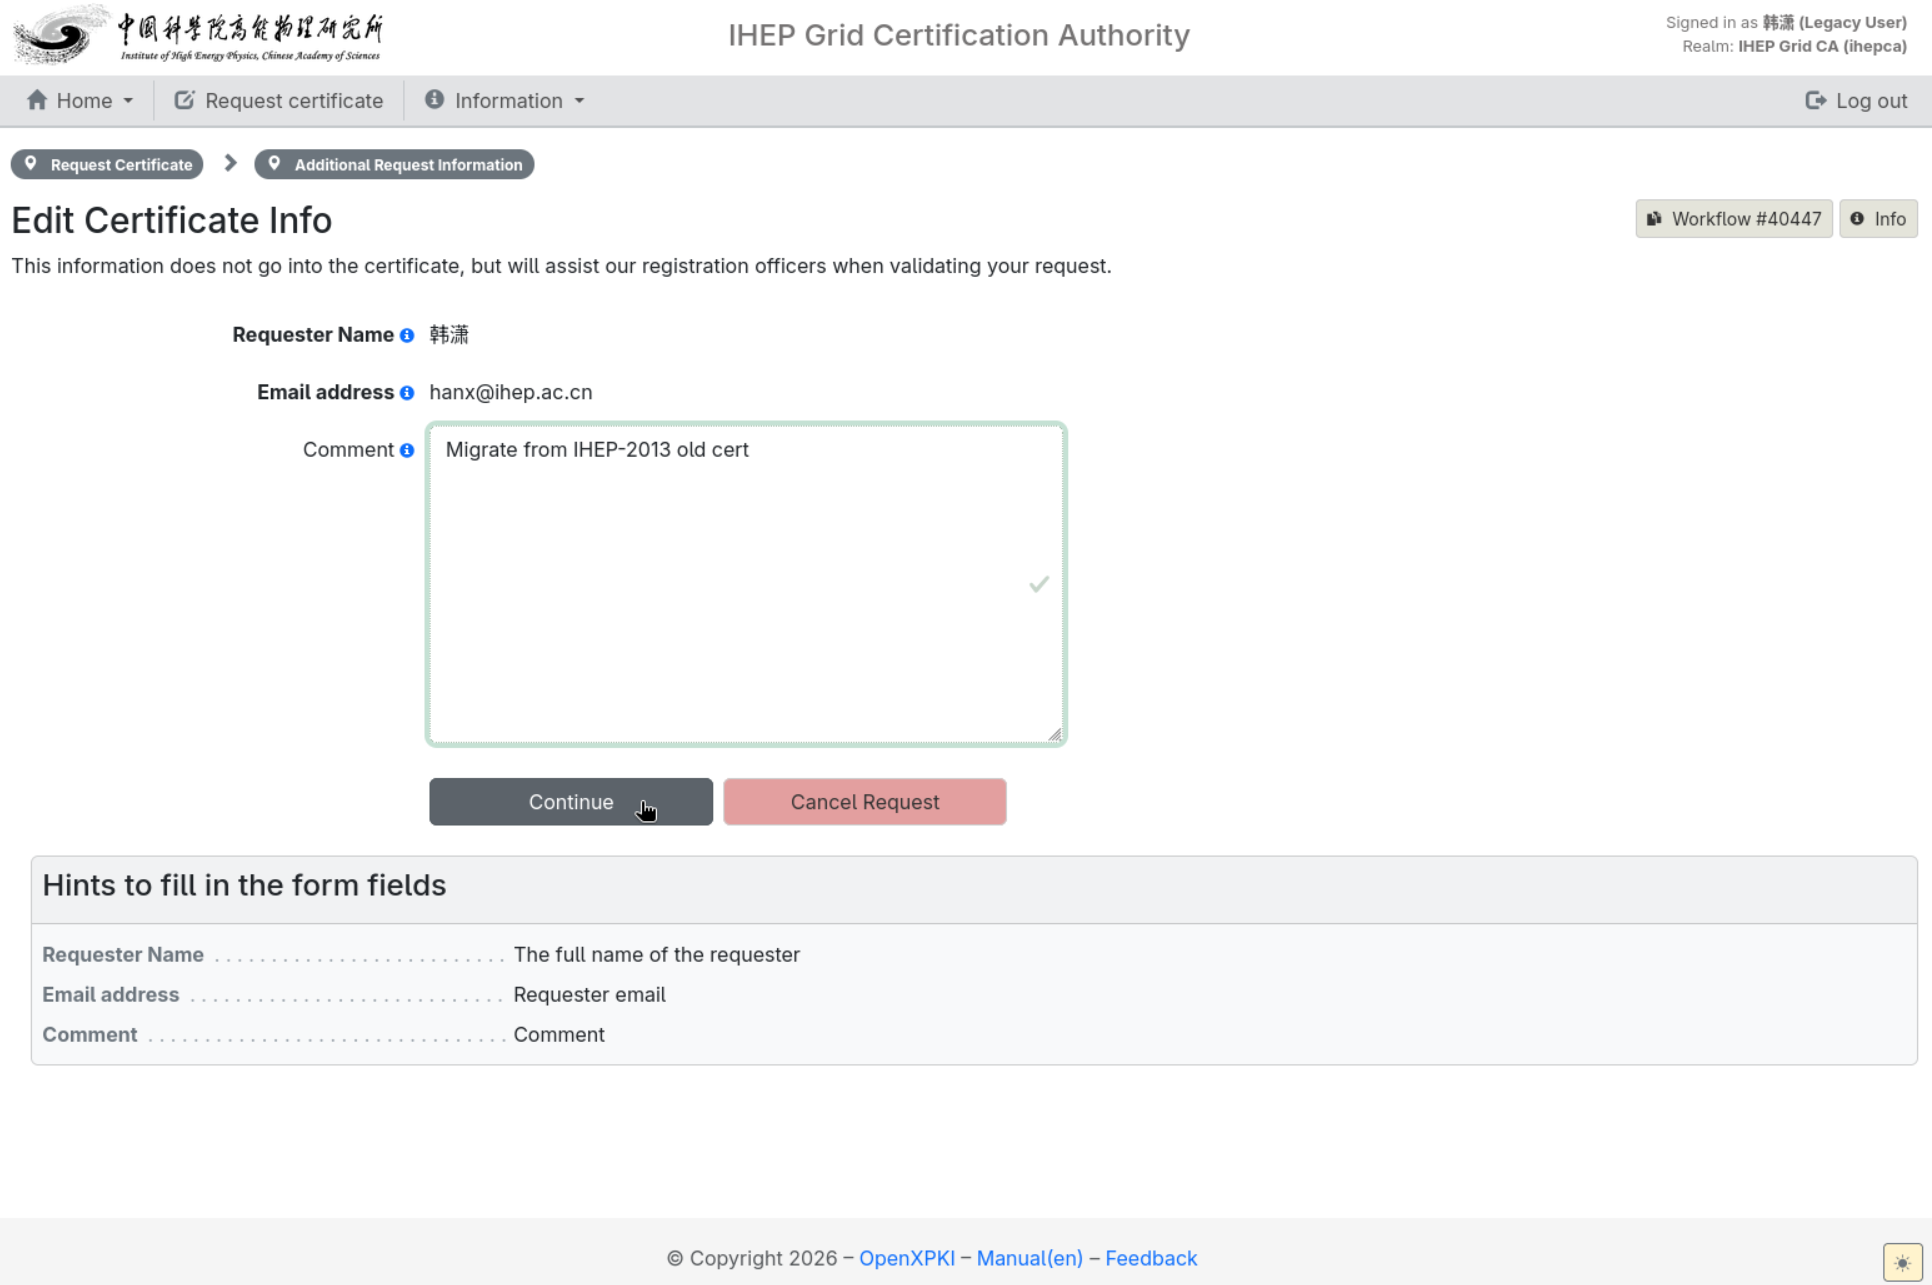
On the Edit Certificate Info page, fill in the Comment with the reason for this migration request and click Continue:
-
The remaining steps are exactly the same as for a user certificate application: reach the Review Request page, review and submit it, handle a duplicate request via the policy exception, then set the private key password and wait for review. See 10.1.4 Applying for a User Certificate from step 5 onward.
Each LDAP account can complete the old personal-certificate migration only once. If the page says it has already been migrated, look for the issued certificate in Home → My Certificates instead of creating workflows repeatedly. If migration fails, first check that the old certificate is still valid, the browser selected the personal certificate, and the SAN contains an email; a missing/expired old CA CRL, a revoked old certificate or an LDAP email mismatch must be handled by the CA administrators.
10.1.4 Applying for a User Certificate
During the process two passwords known only to yourself are set: the private key password (Password) set at application time (it protects the private key and is entered when downloading the certificate) and the export password (Export Password) set when downloading the .p12 (it encrypts the exported key bundle; if left empty, the private key password is used). Neither is your LDAP password, and neither can be recovered by the CA.
- Log in with IHEP SSO and choose Request → Request Certificate from the top menu.
-
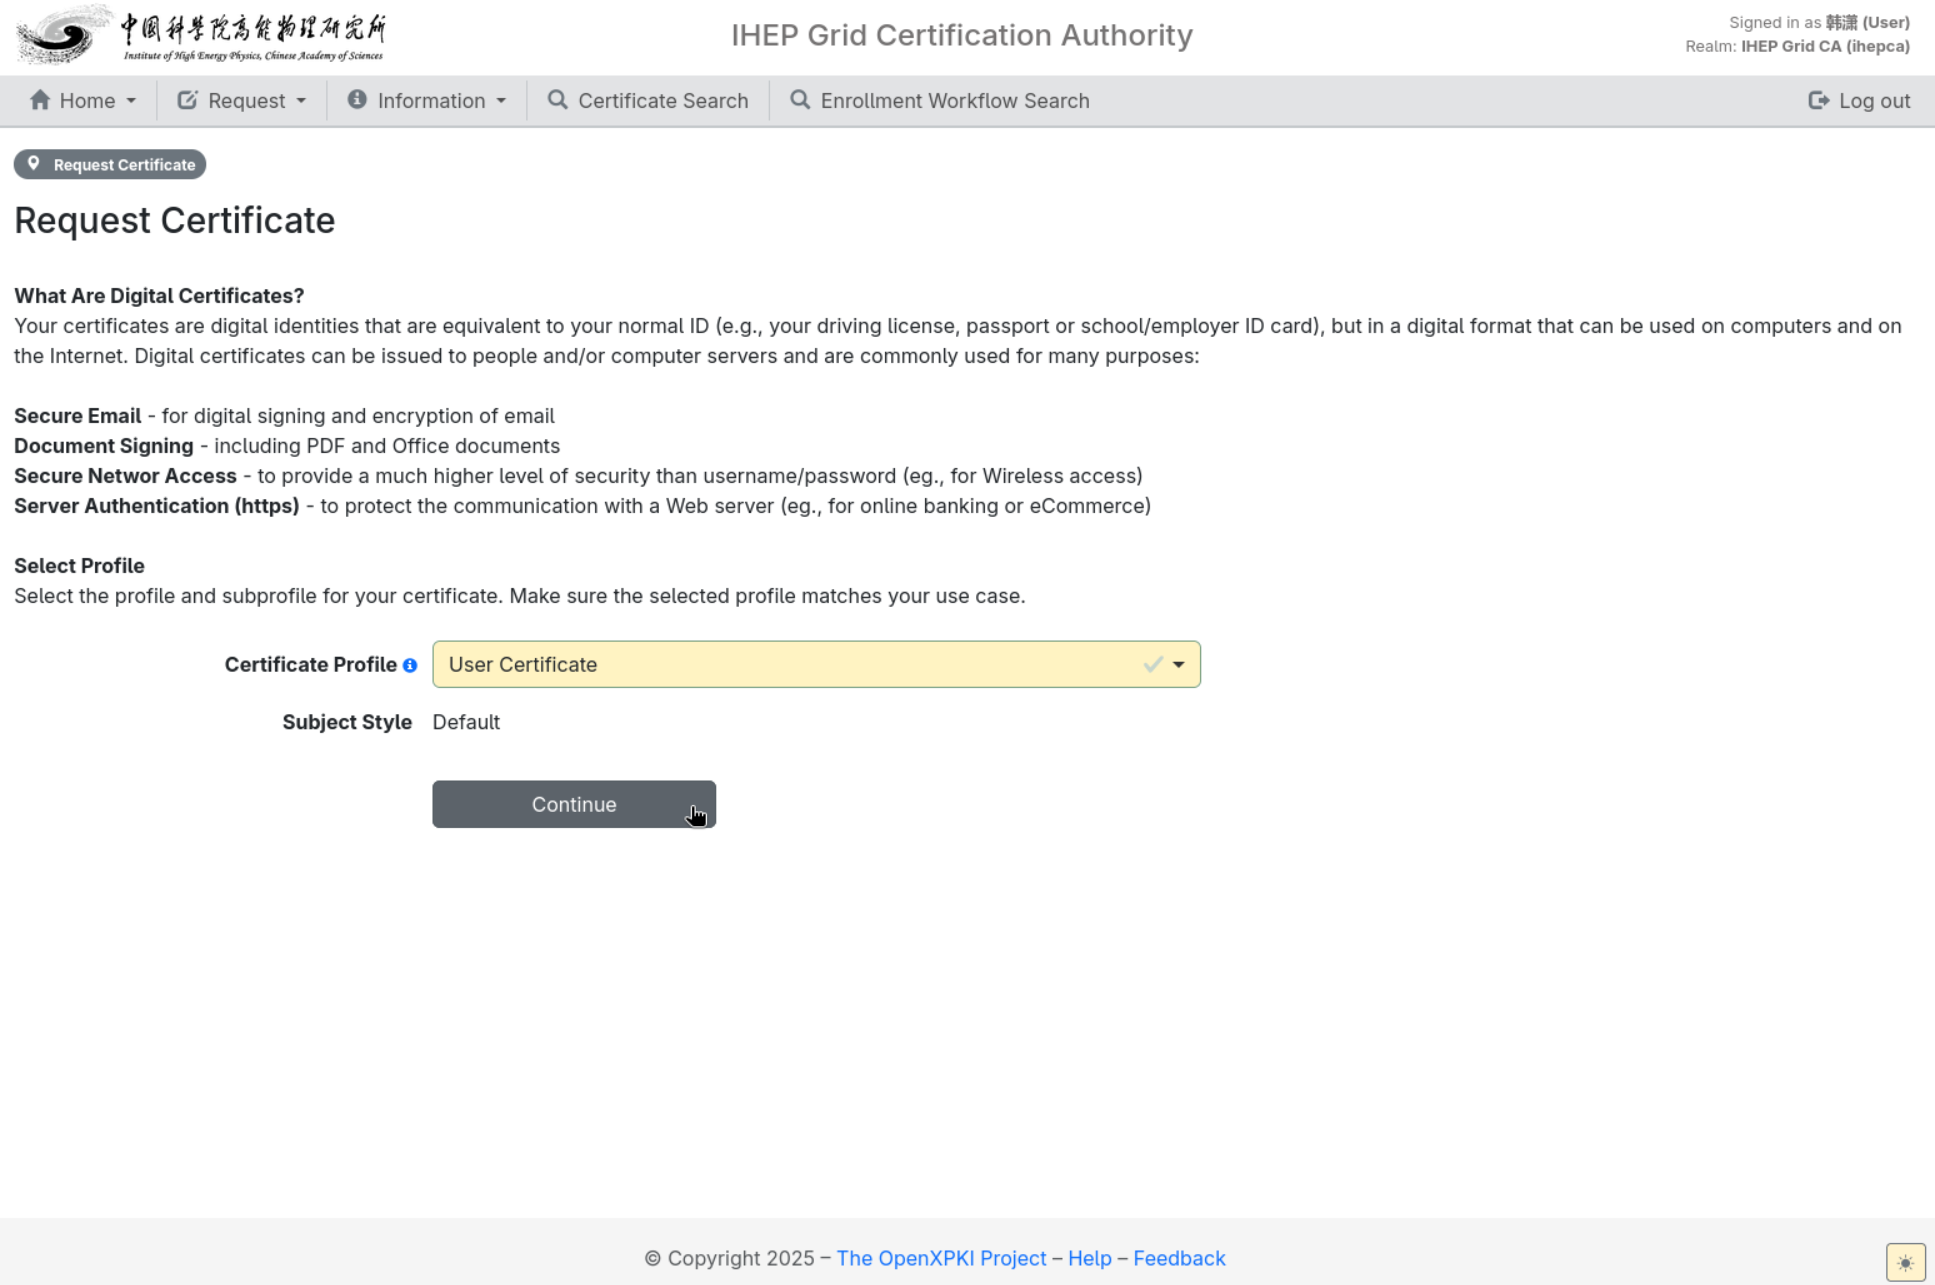
In Select Profile, choose User Certificate (the default) and click Continue.
-
A user certificate needs the English name for the certificate plus the correct organization and unit; fill in the Edit Subject page:
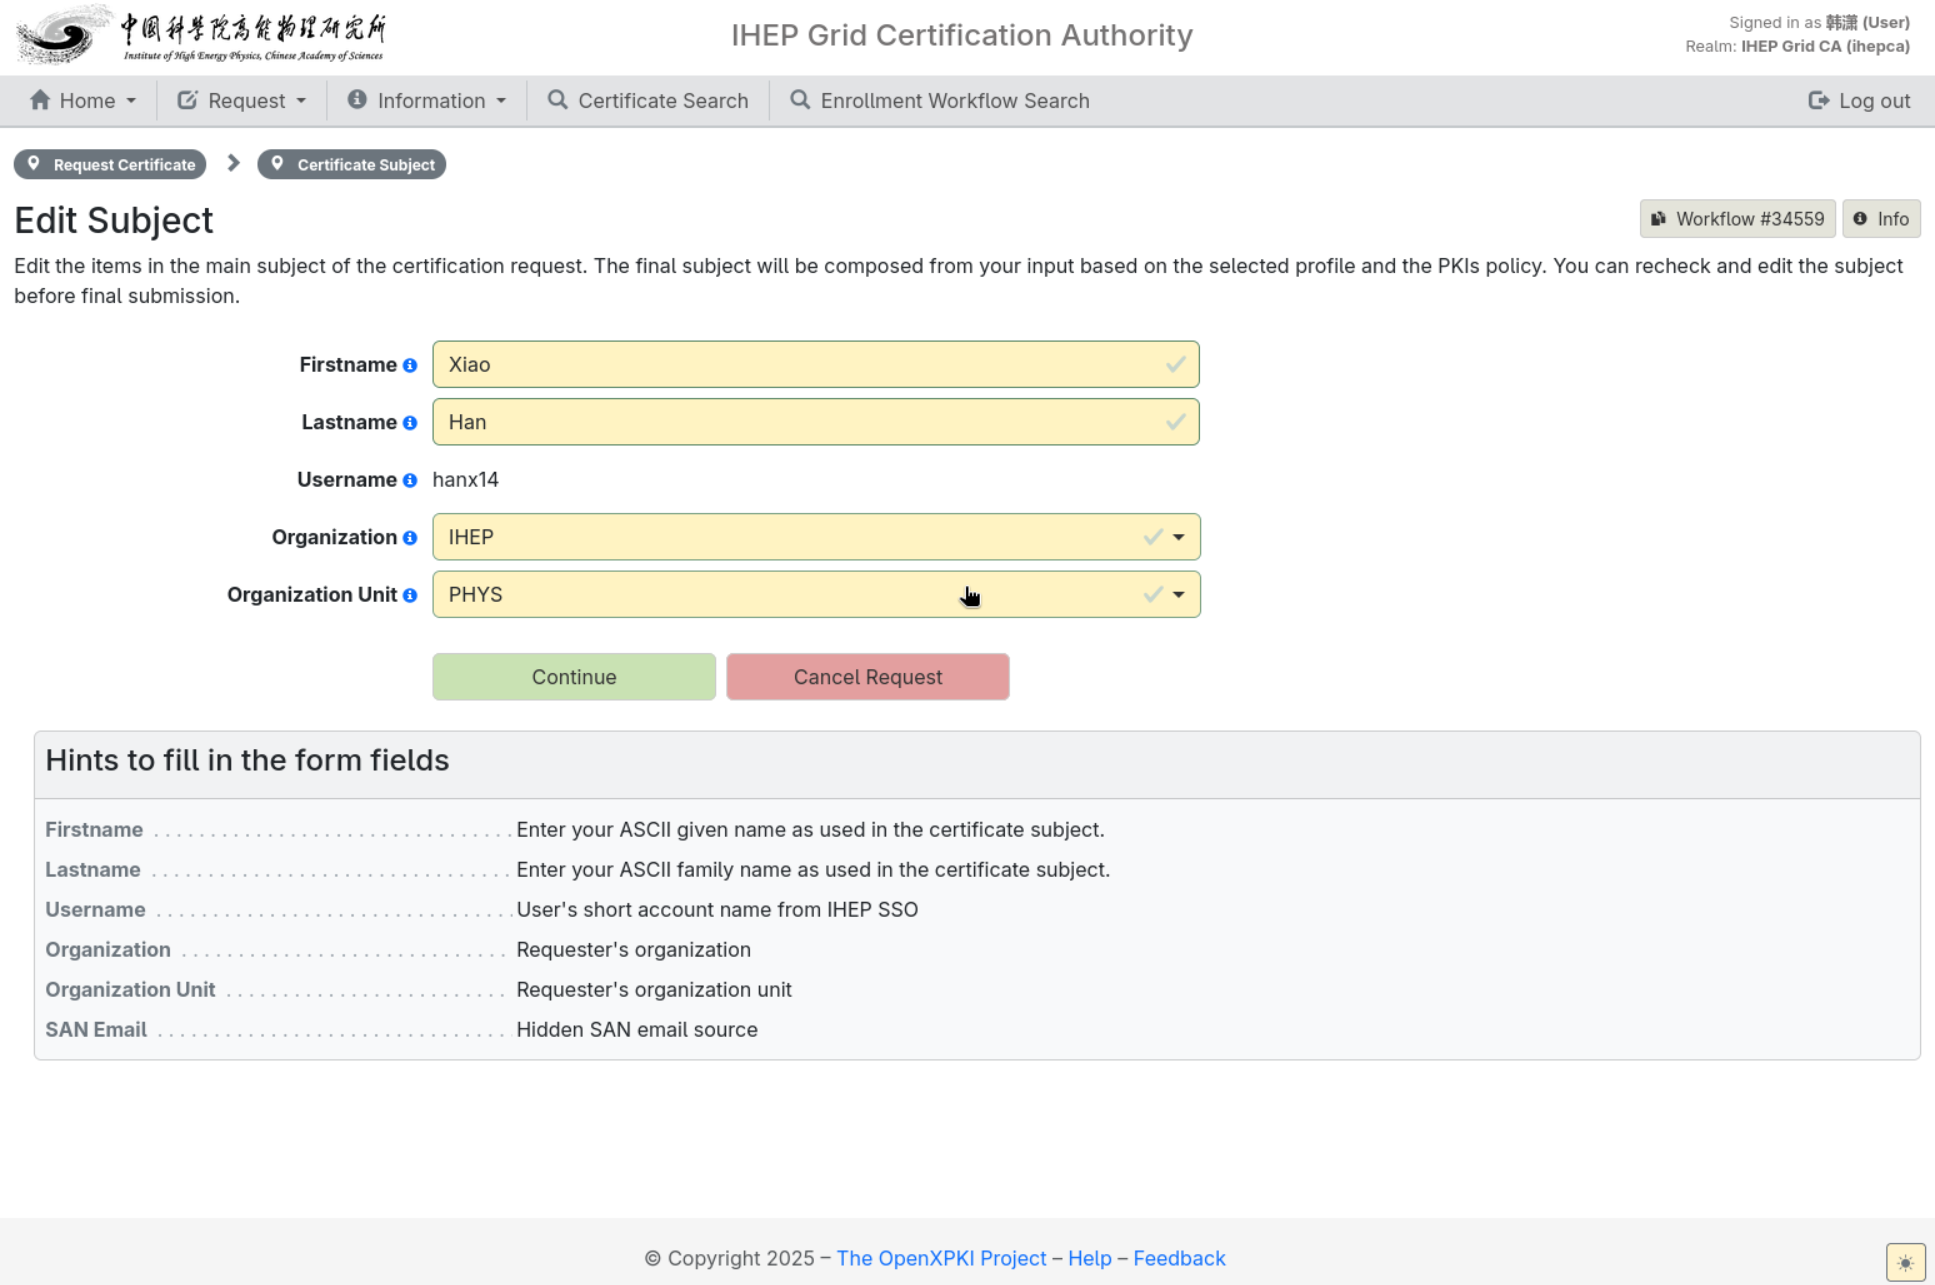
- First name / Last name: the ASCII name for the certificate (e.g.
Xiao/Han). Only letters, spaces, dots, hyphens and apostrophes are accepted; if LDAP returns a Chinese name, enter the English spelling you use long-term and keep it identical across renewals. - Username: pre-filled from LDAP and cannot be modified.
- Organization Unit / Organization: choose your unit and organization from the dropdowns; required at first application.
- SAN Email: provided by LDAP; no need to fill in or modify. Username, LDAP email and the hidden SAN email are identity-binding fields and cannot be changed by editing the page.
- First name / Last name: the ASCII name for the certificate (e.g.
-
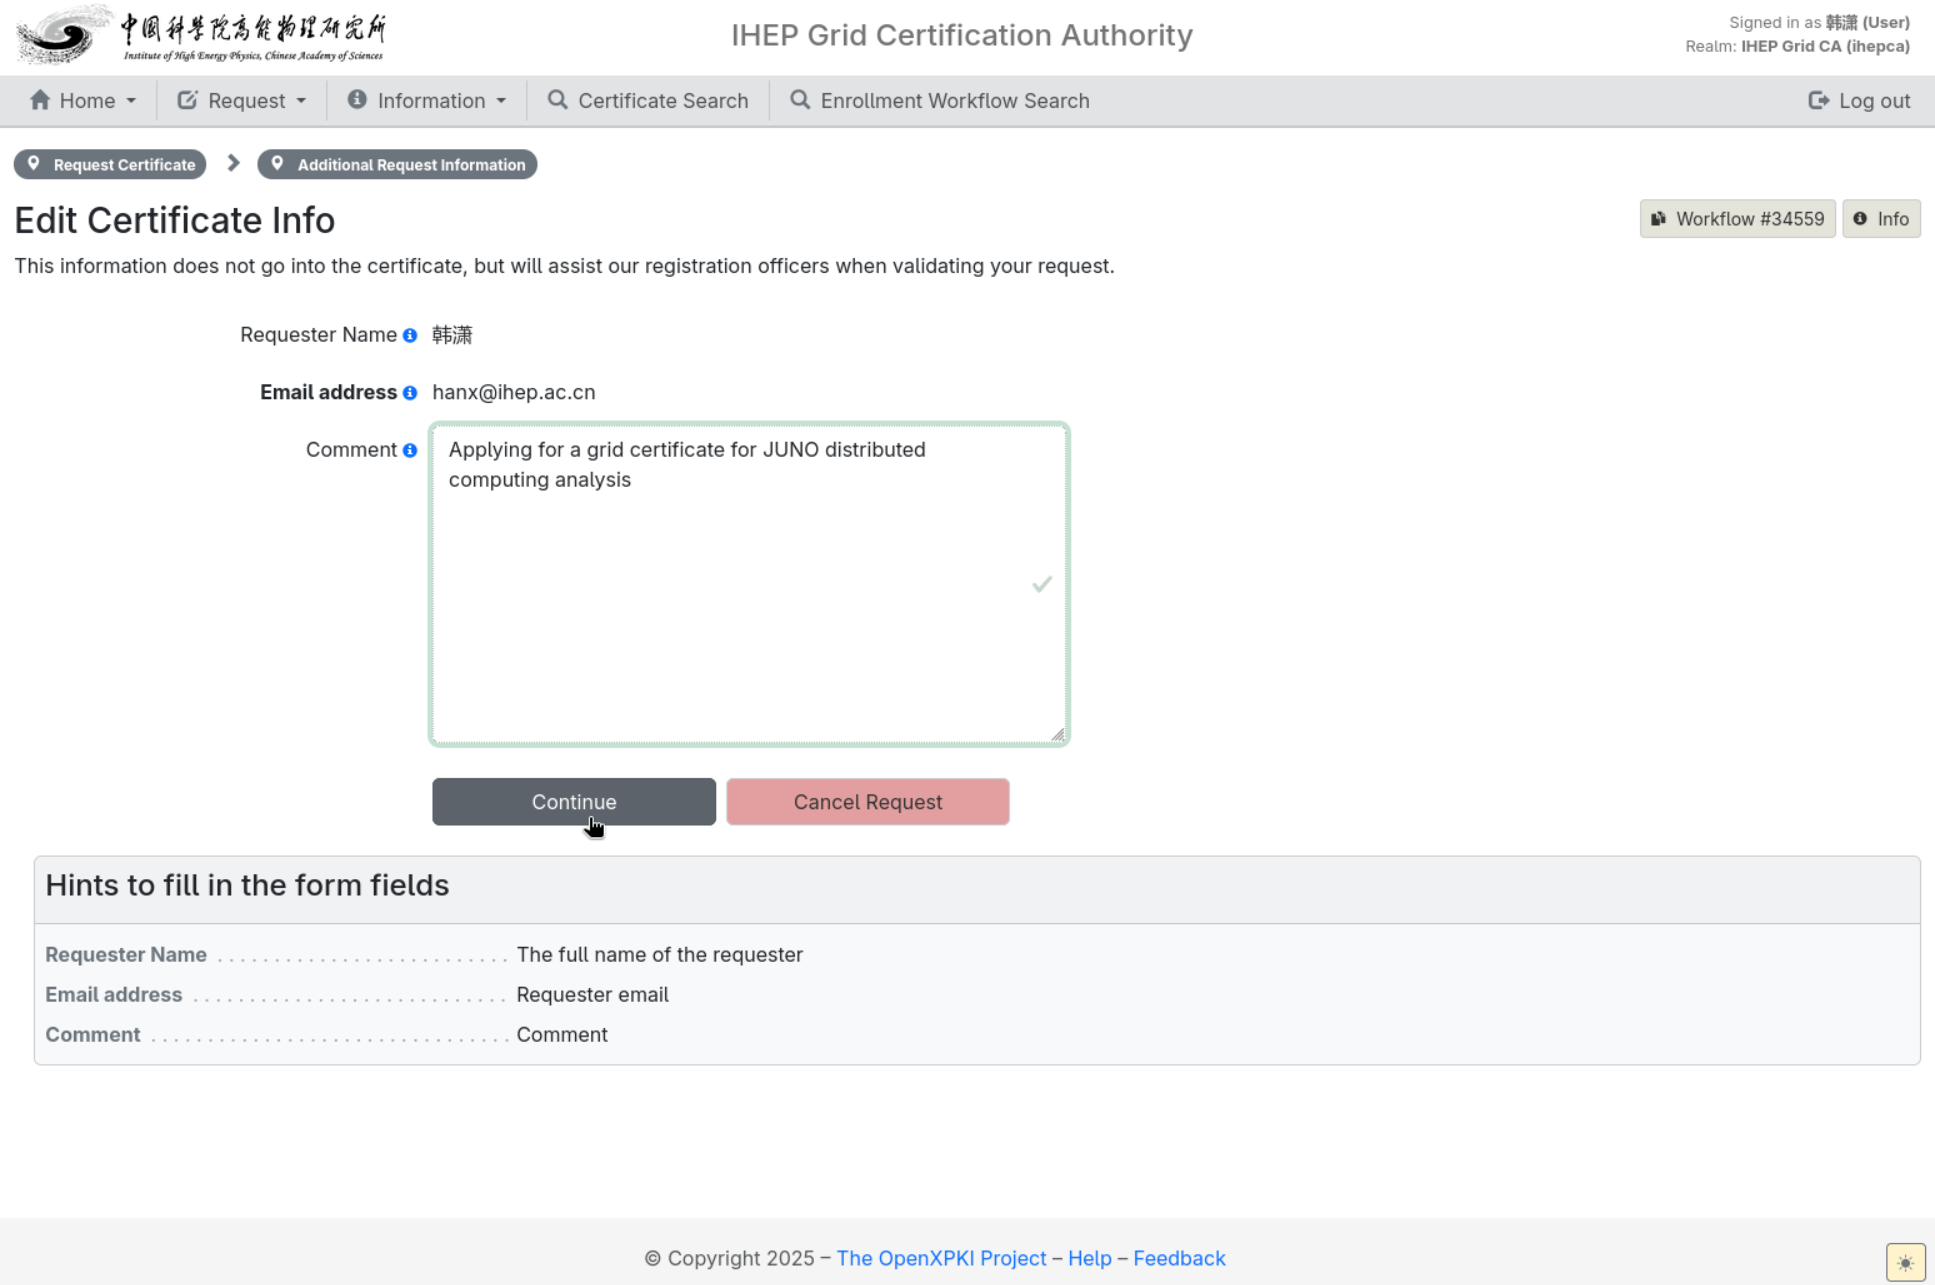
Click Continue. On the Edit Certificate Info page check that the Email address is the LDAP email (used for ownership and notifications) and Requester is the applicant; fill in the Comment with the application reason (state the purpose of the certificate). Never put passwords or key material in it:
-
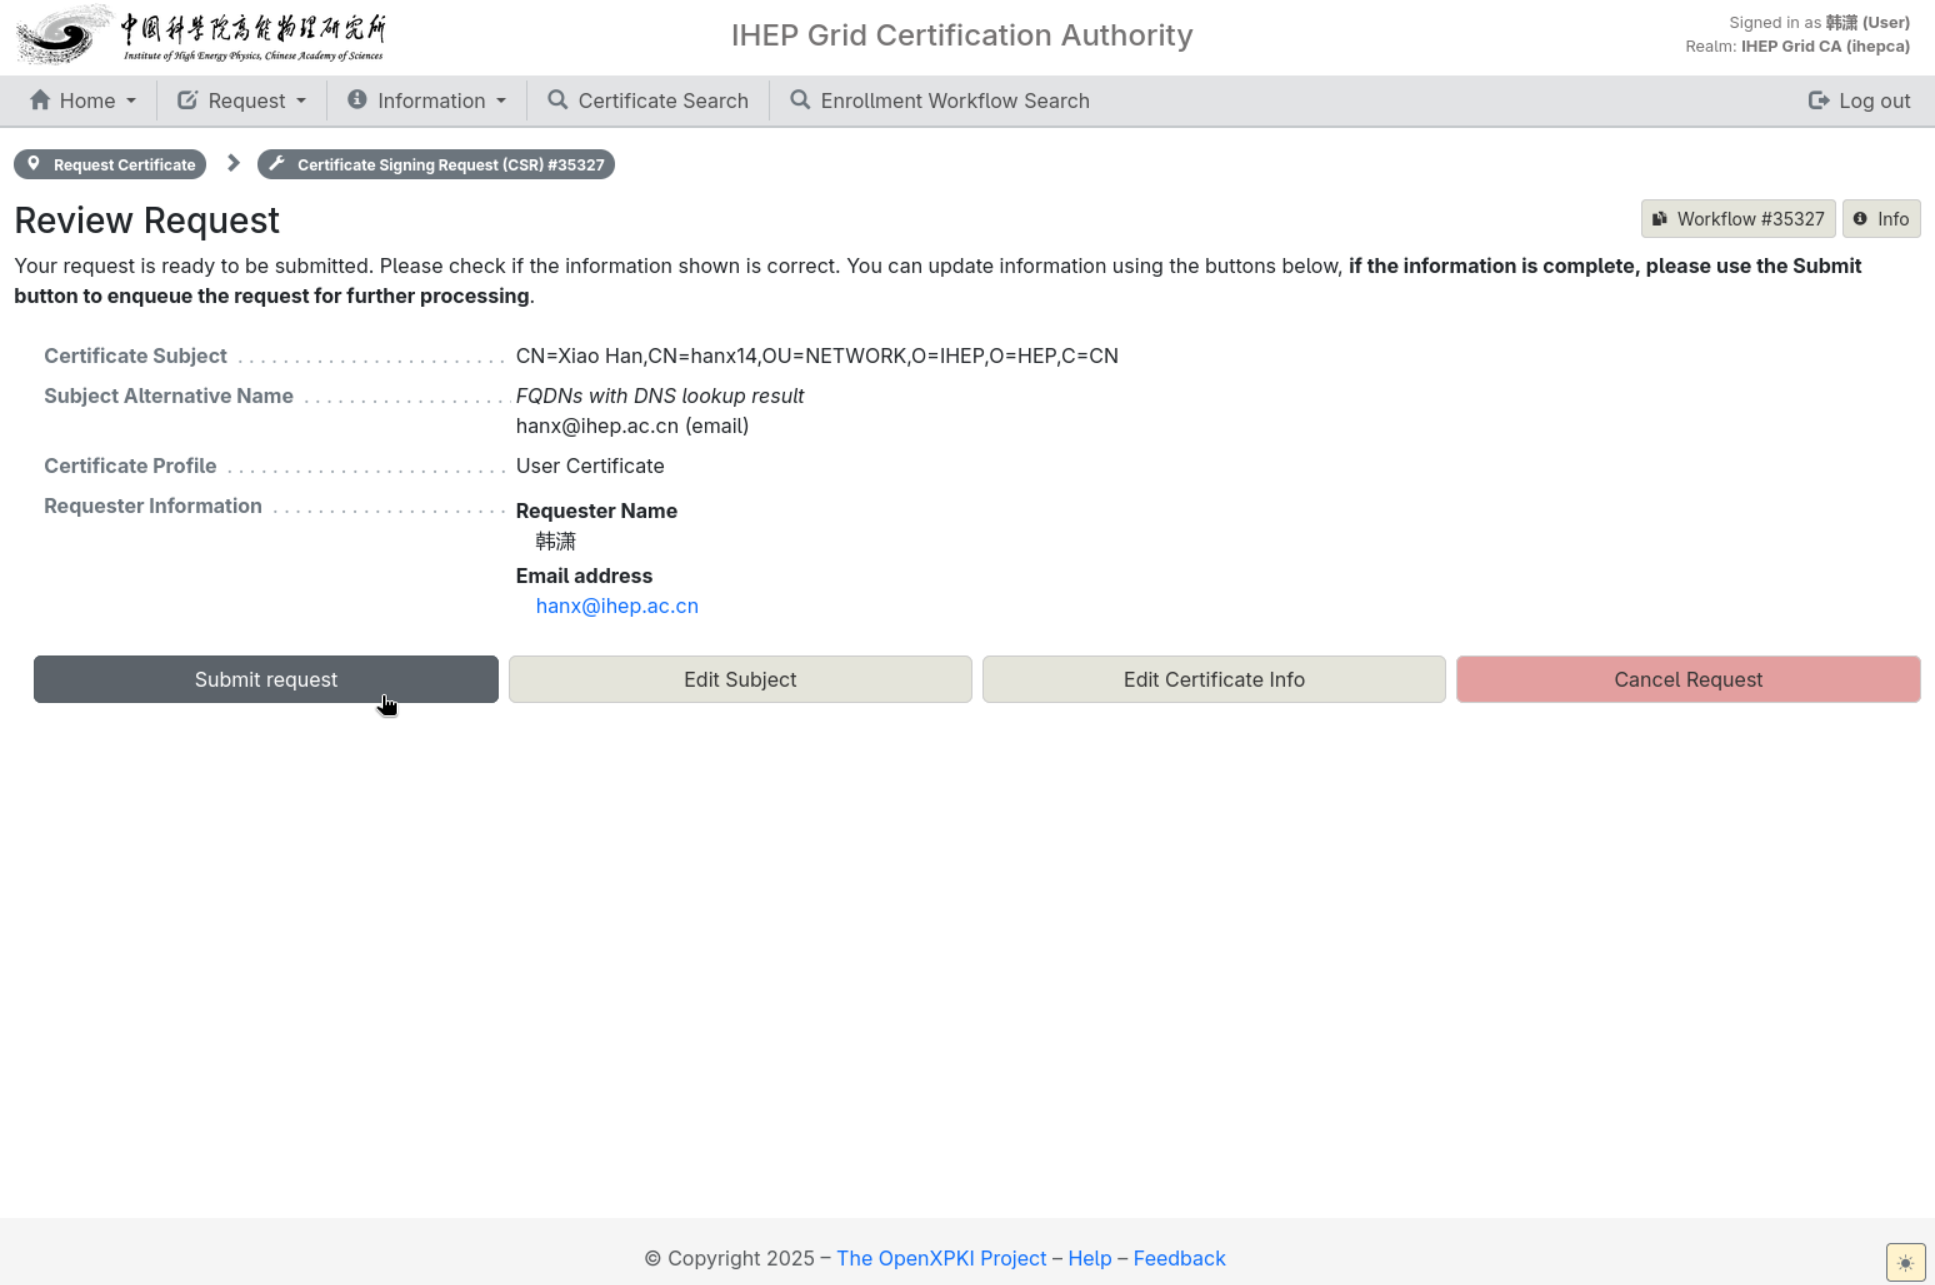
Click Continue to reach the Review Request page. Check Certificate Subject, Subject Alternative Name, Certificate Profile and Requester Information; if something is wrong, use Edit Subject or Edit Certificate Info to go back, and when correct click Submit request:
-
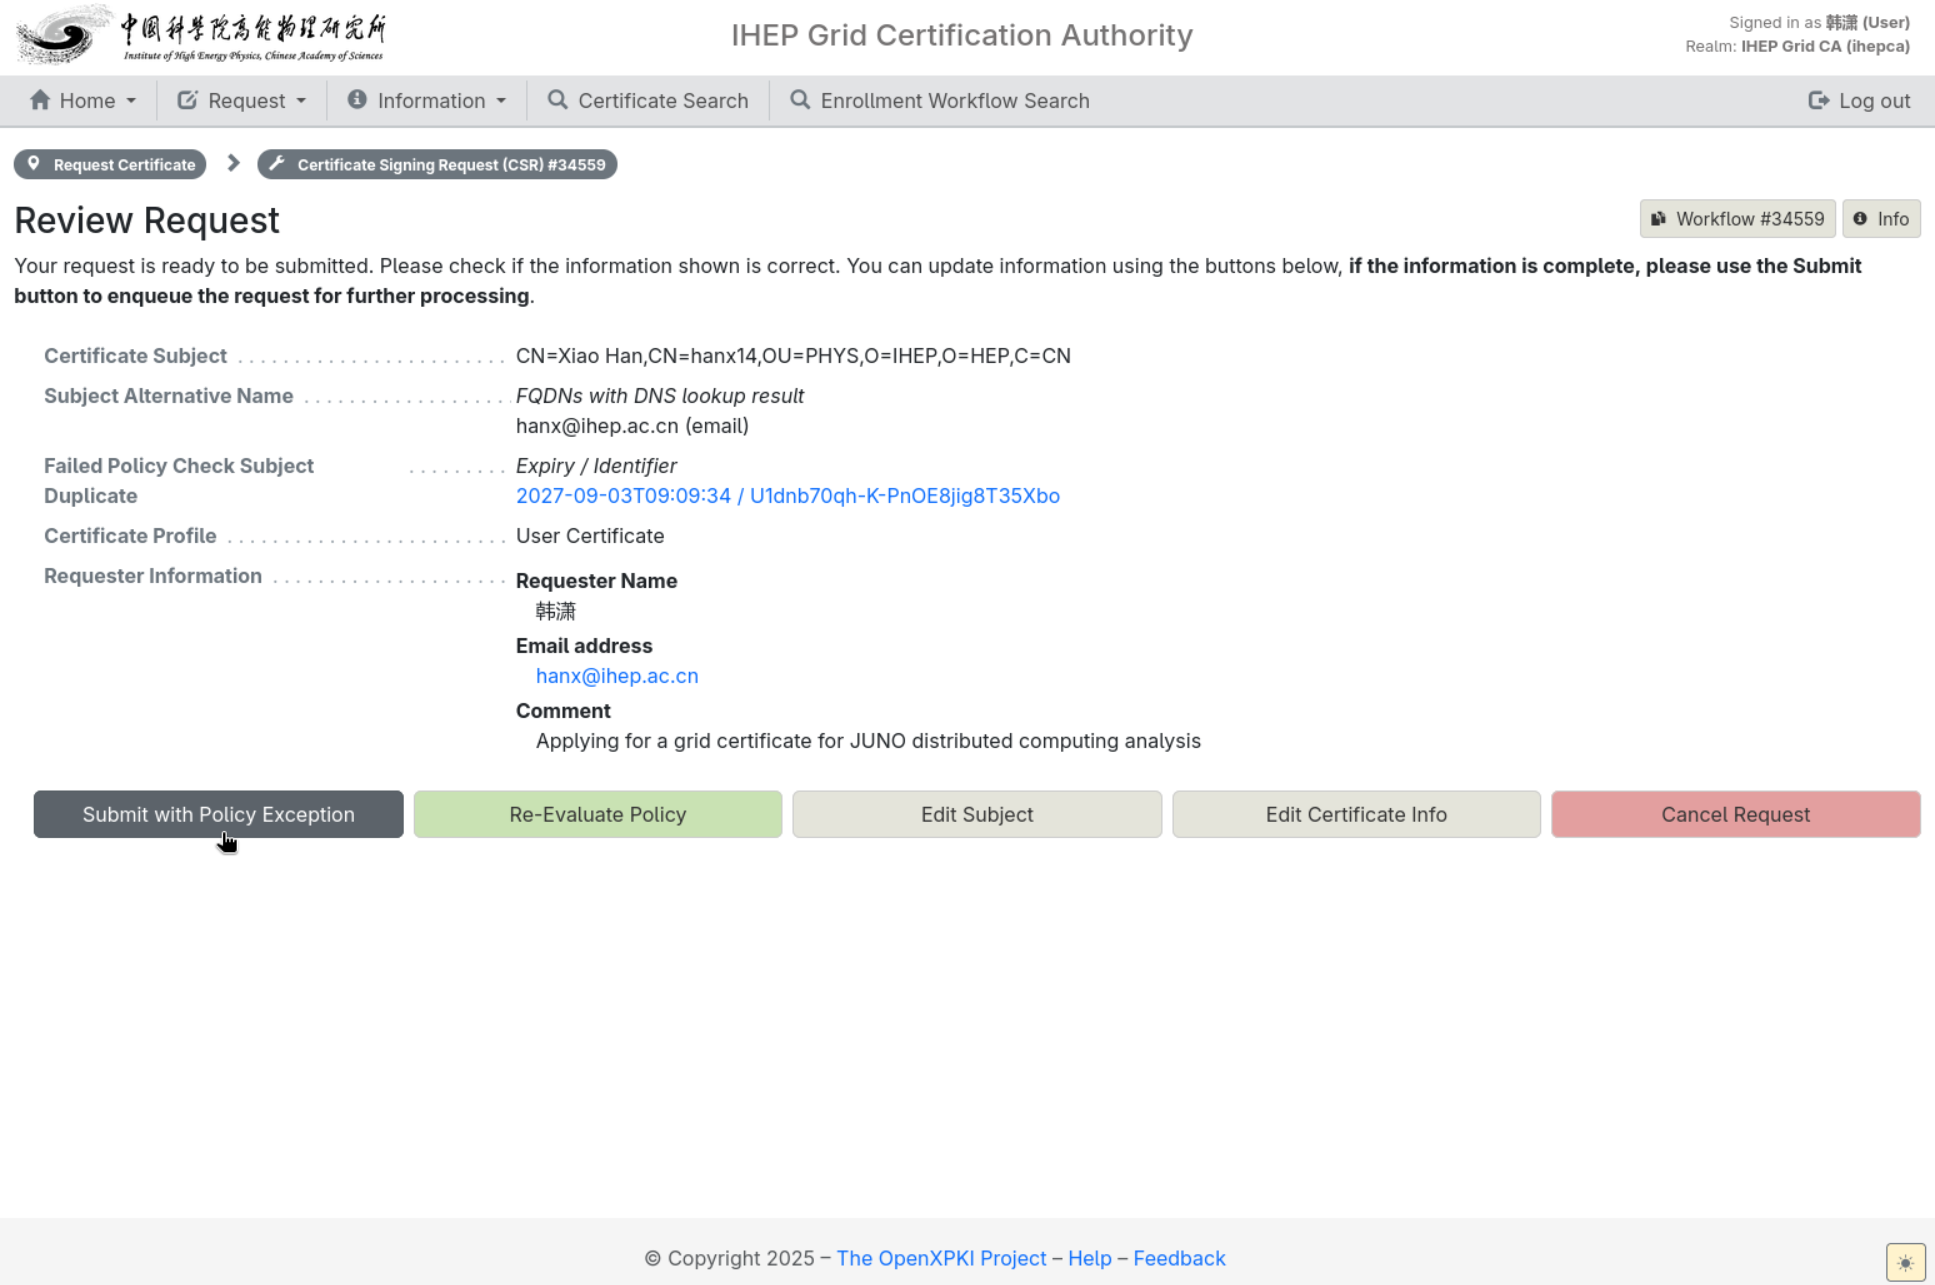
If a Duplicate (Failed Policy Check) is reported, a duplicate request already exists. Click Submit with Policy Exception on the Review Request page:
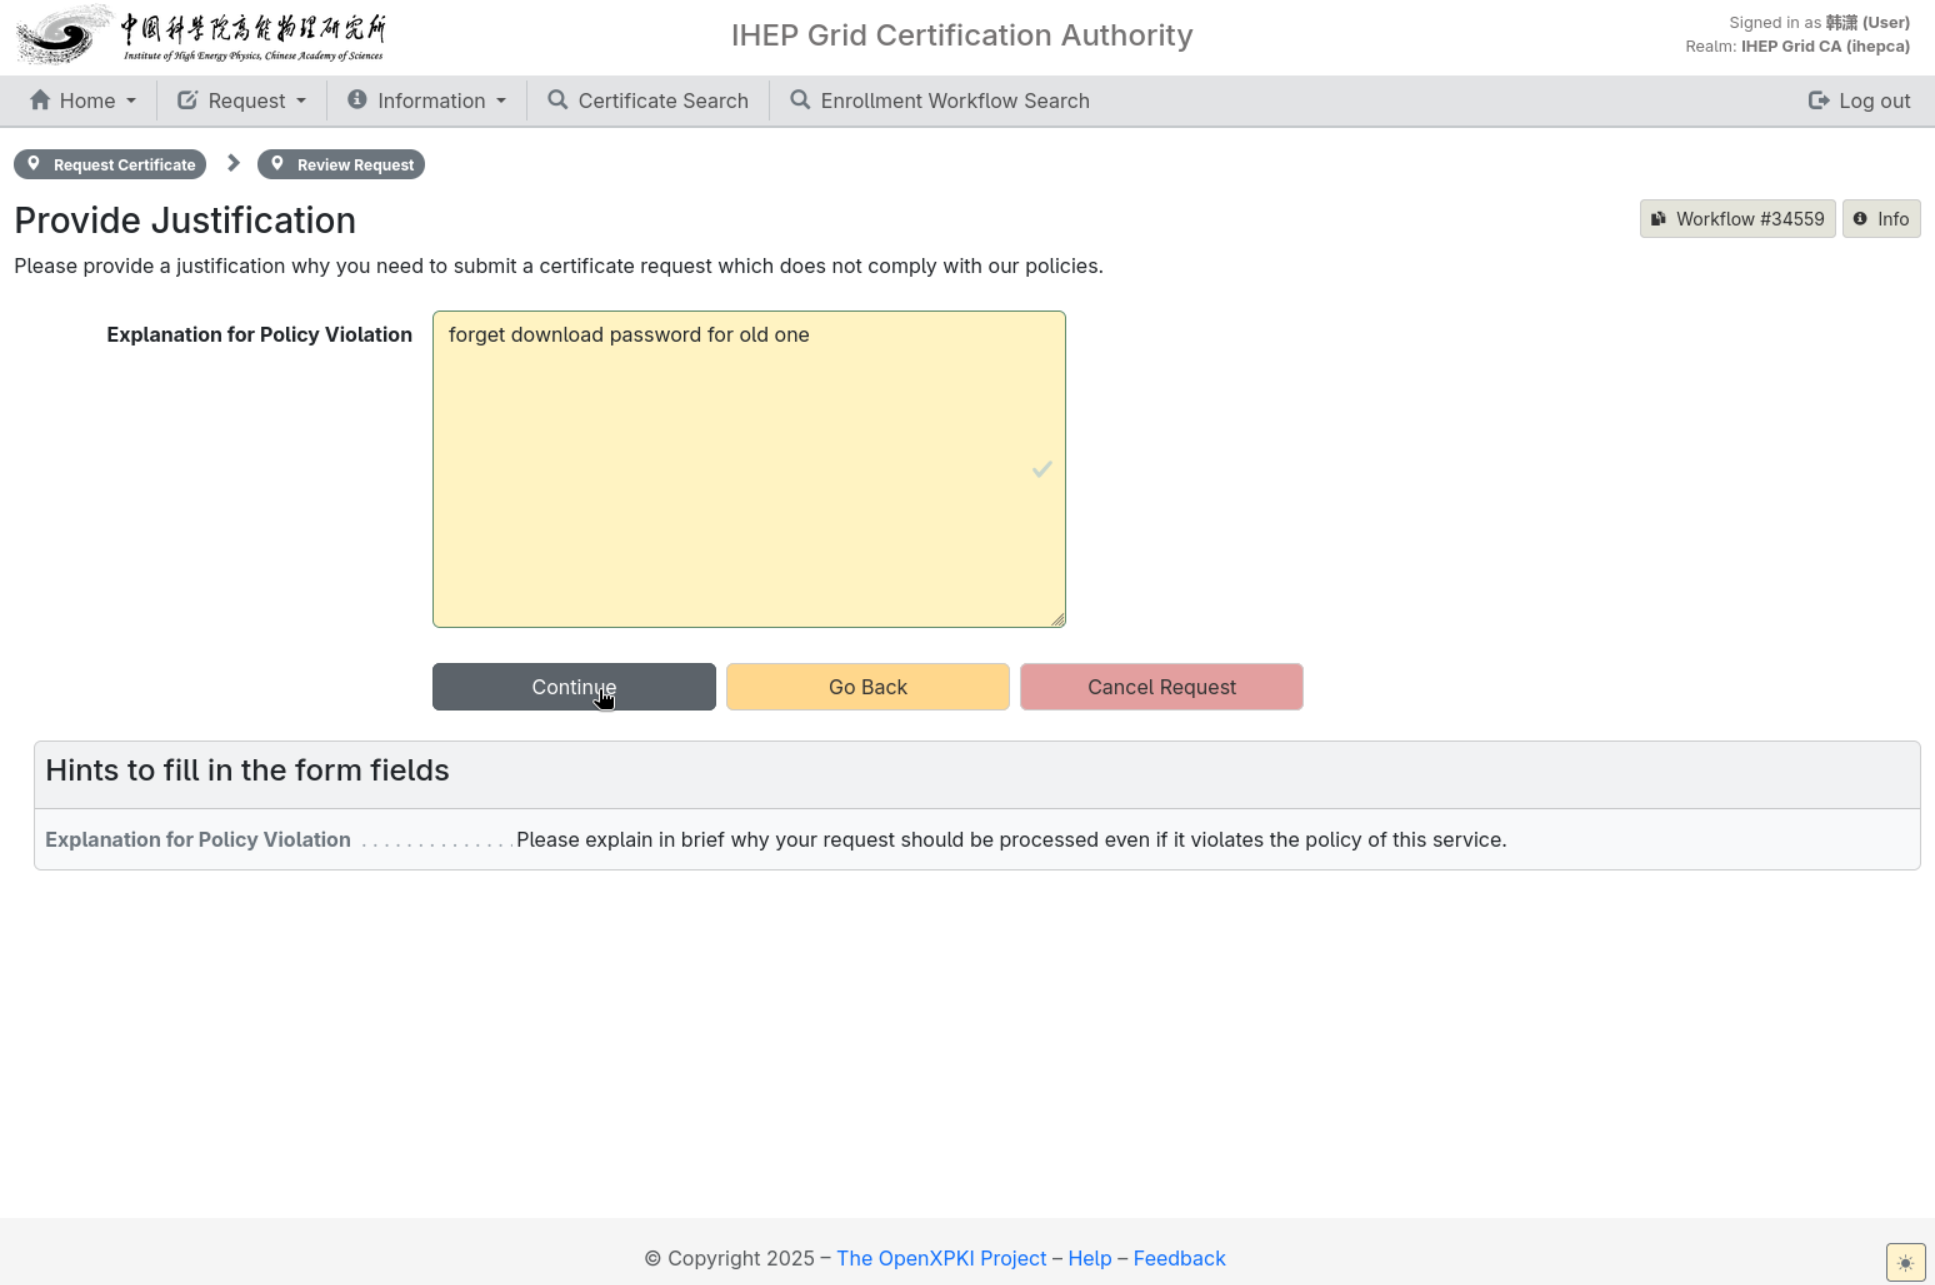
Then on the Provide Justification page, fill in the Explanation for Policy Violation with the reason for the duplicate request (e.g. a previous certificate's key password was lost and it must be reissued) and click Continue:
-
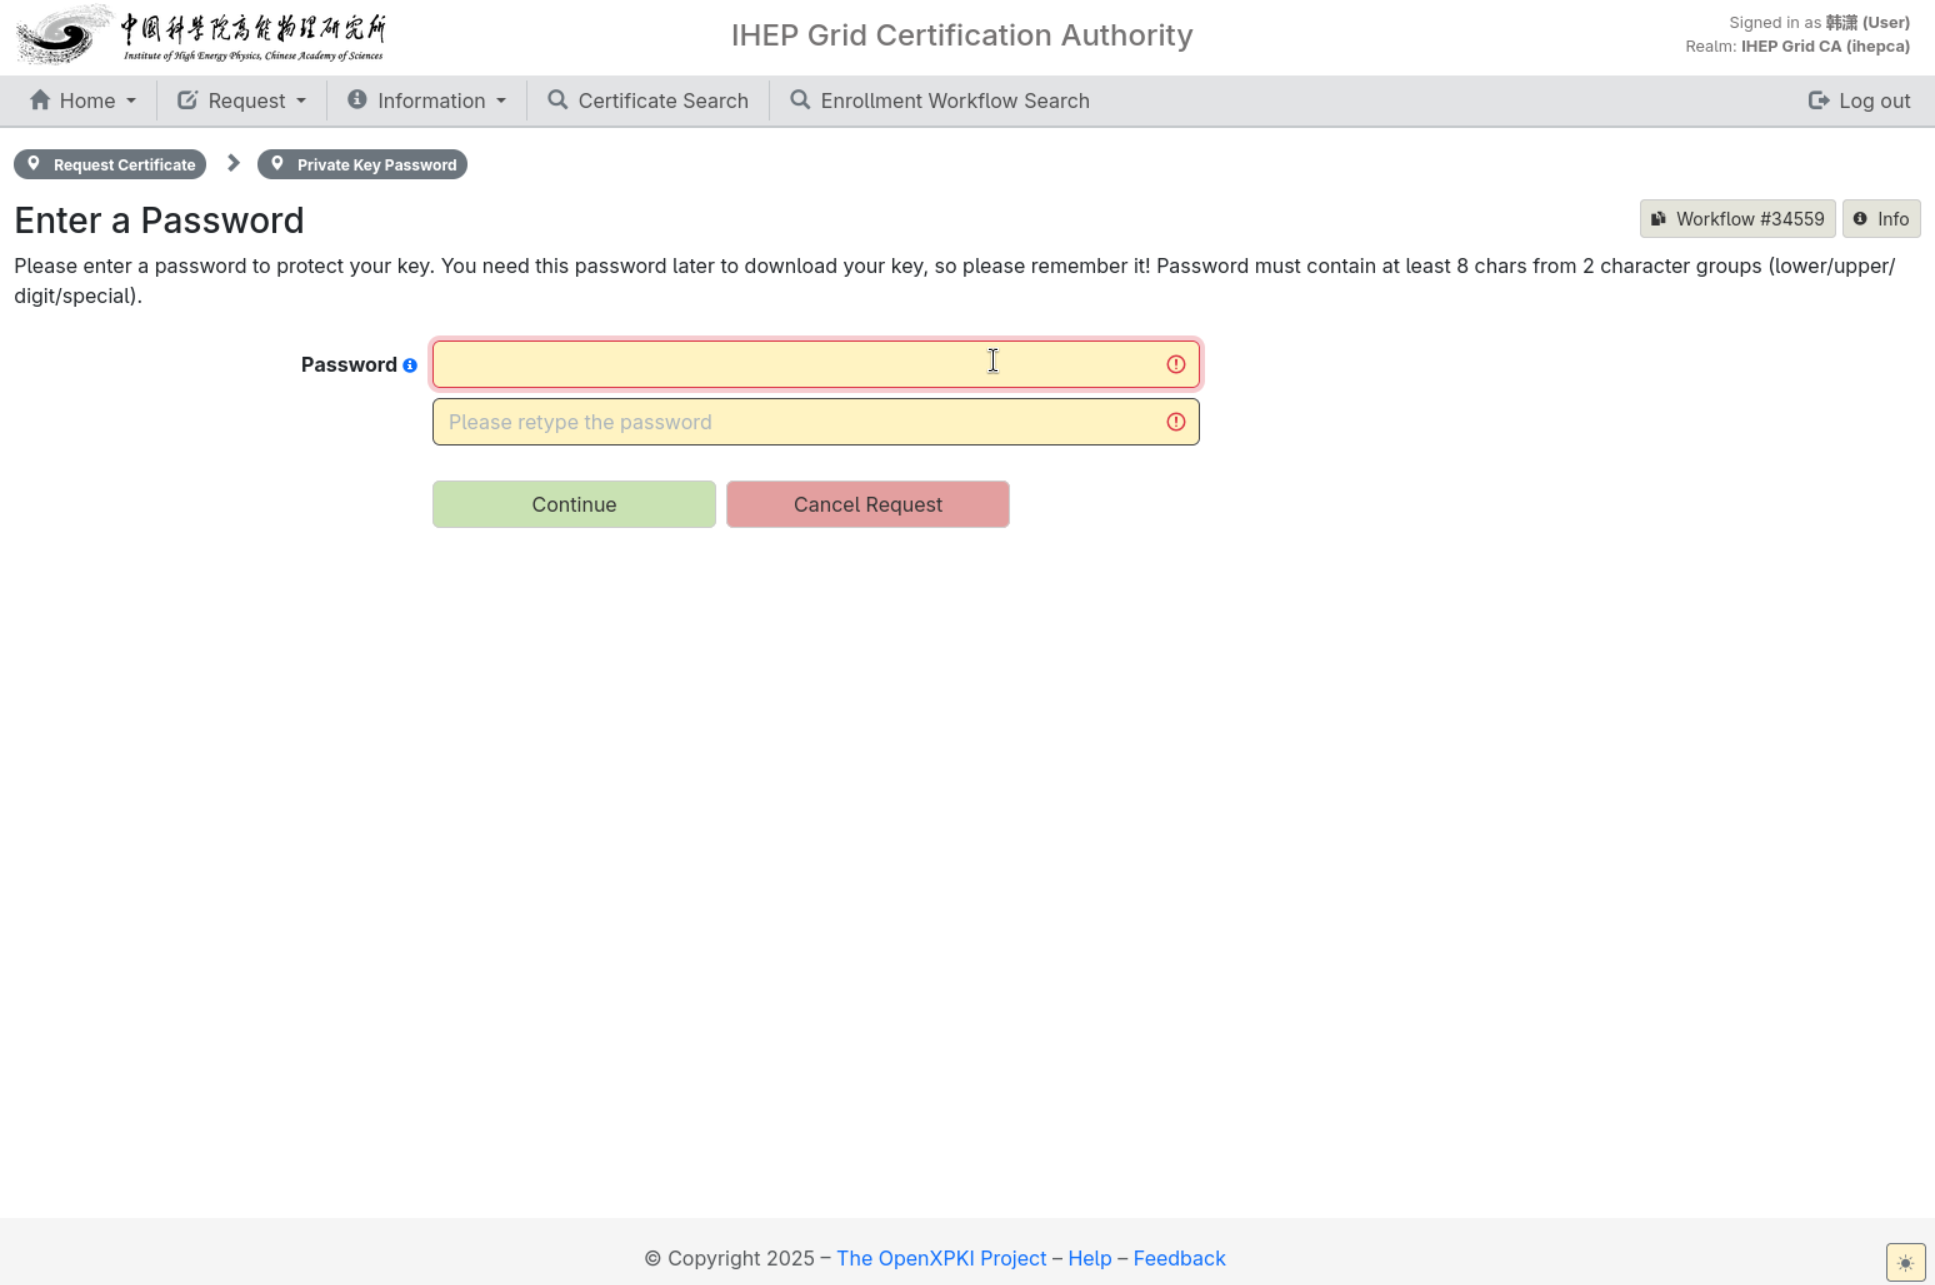
On the Enter a Password (Private Key Password) page, set the private key password. It protects the private key and is required when downloading the certificate — remember it. It must be at least 8 characters and contain at least two of: upper case, lower case, digits, special characters. The CA cannot recover this password.
-
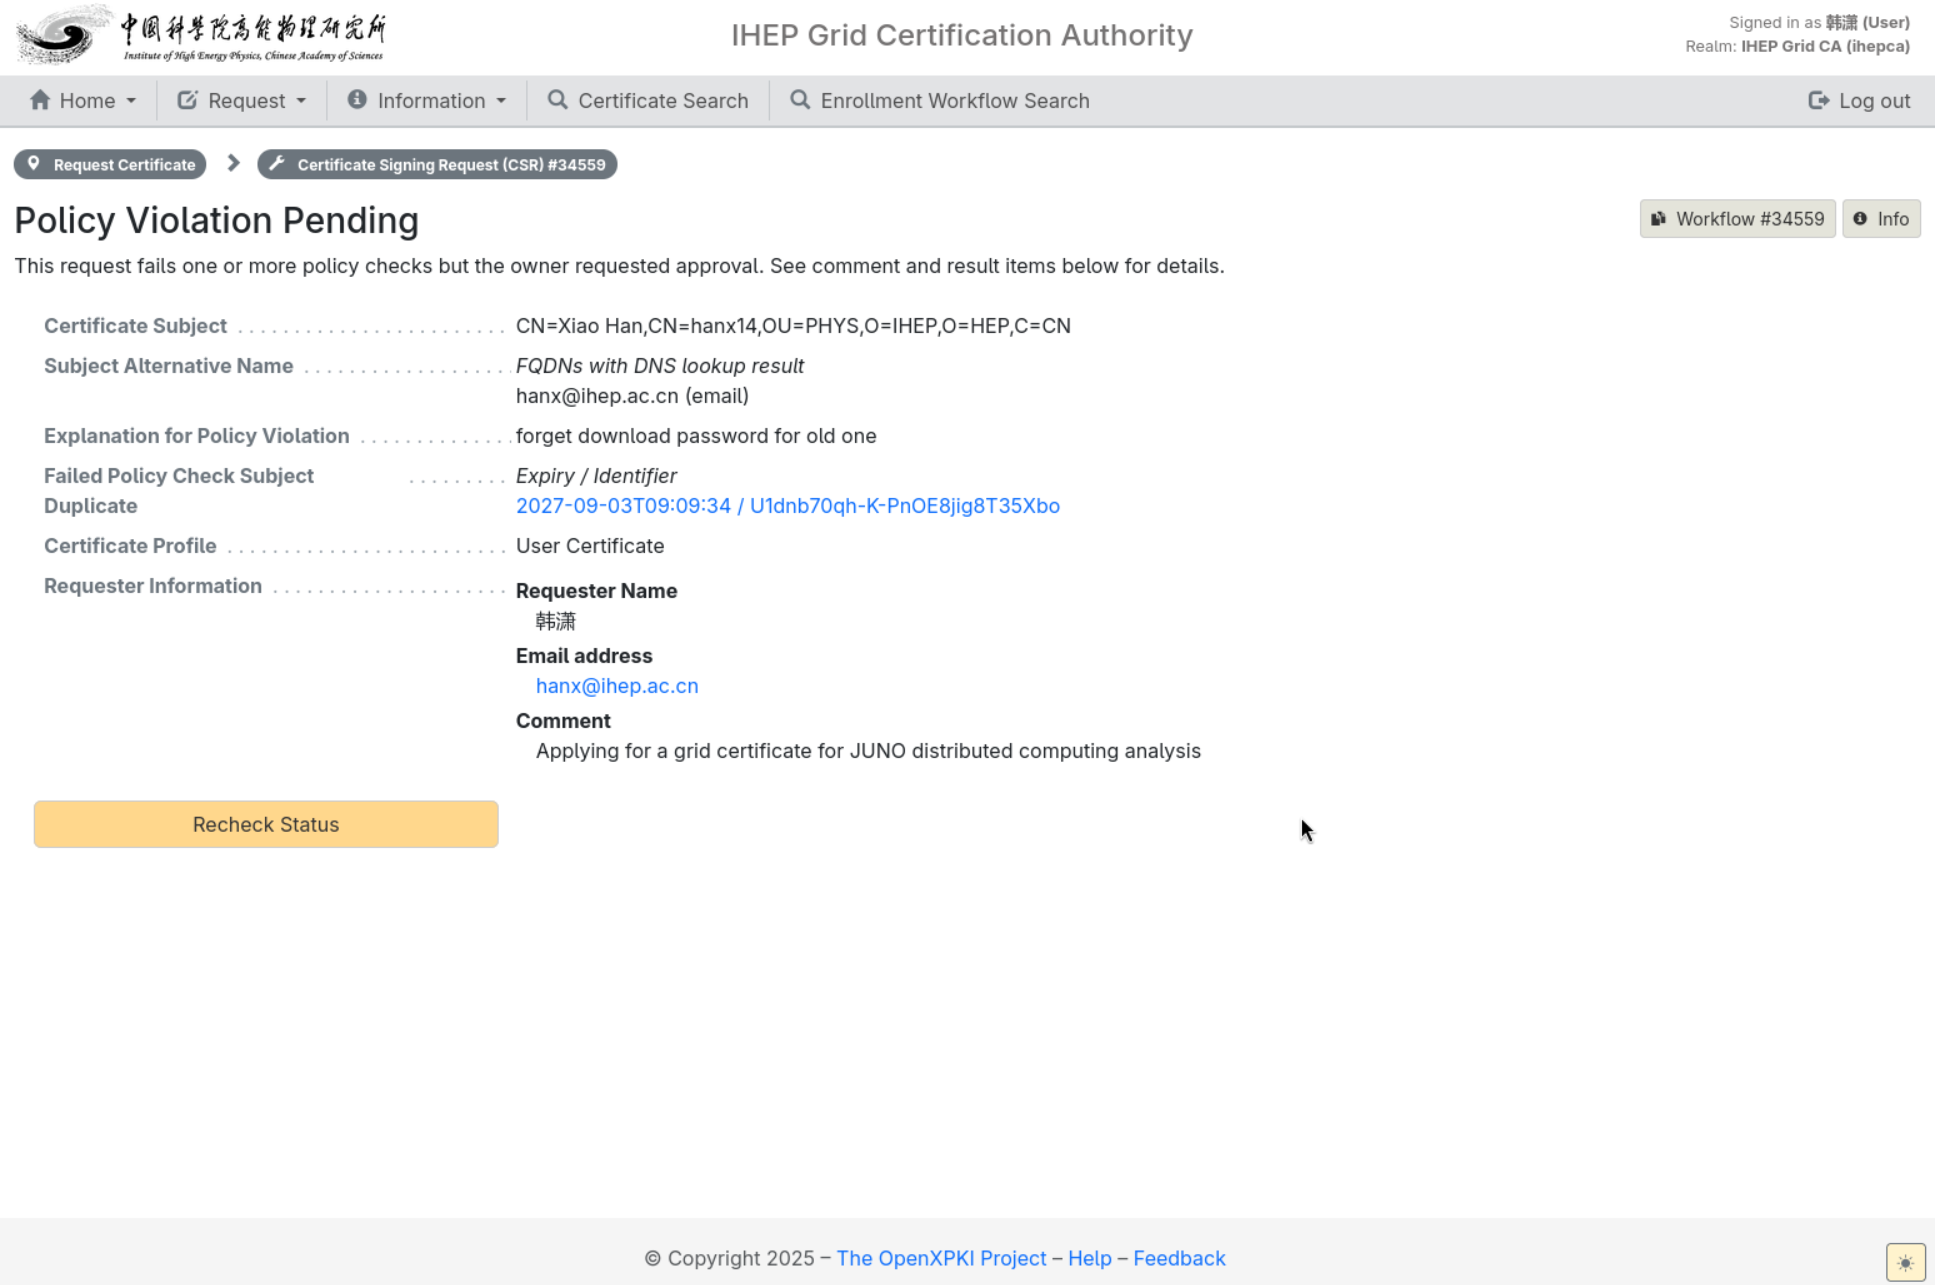
After submission the request enters pending RA review; for a policy-exception request it shows Policy Violation Pending, where you can click Recheck Status to refresh:
-
Track the status in Home → My Workflows; once issued, the certificate also appears under Home → My Certificates.
Track progress as follows after submission:
| Status shown | Meaning | Next step |
|---|---|---|
PENDING or ONHOLD |
Waiting for RA review or more material | Open the workflow and read the hints; do not create duplicate requests |
SUCCESS or success page |
Issued | Go to My Certificates to download, verify and install |
REJECTED |
Rejected by RA | Read the review notes, fix the issues and re-apply |
FAILURE / Unexpected error |
Workflow error | Record the workflow ID and full error text; contact support |
To view a workflow: go to Home → My Workflows, click the workflow ID in the list, then read Last Update, State, History and any error/note shown on the page. Do not treat the browser back button as cancelling a request; use the on-page Cancel action when available.
10.1.5 Applying for a Robot Certificate
A Robot certificate represents an experiment service, pilot or automated task — not a human. Every Robot certificate must have a clear responsible person; the system writes the current SSO user's LDAP email into the SAN and system metadata. The procedure is identical to a user certificate (see 10.1.4) except for the Edit Subject page:
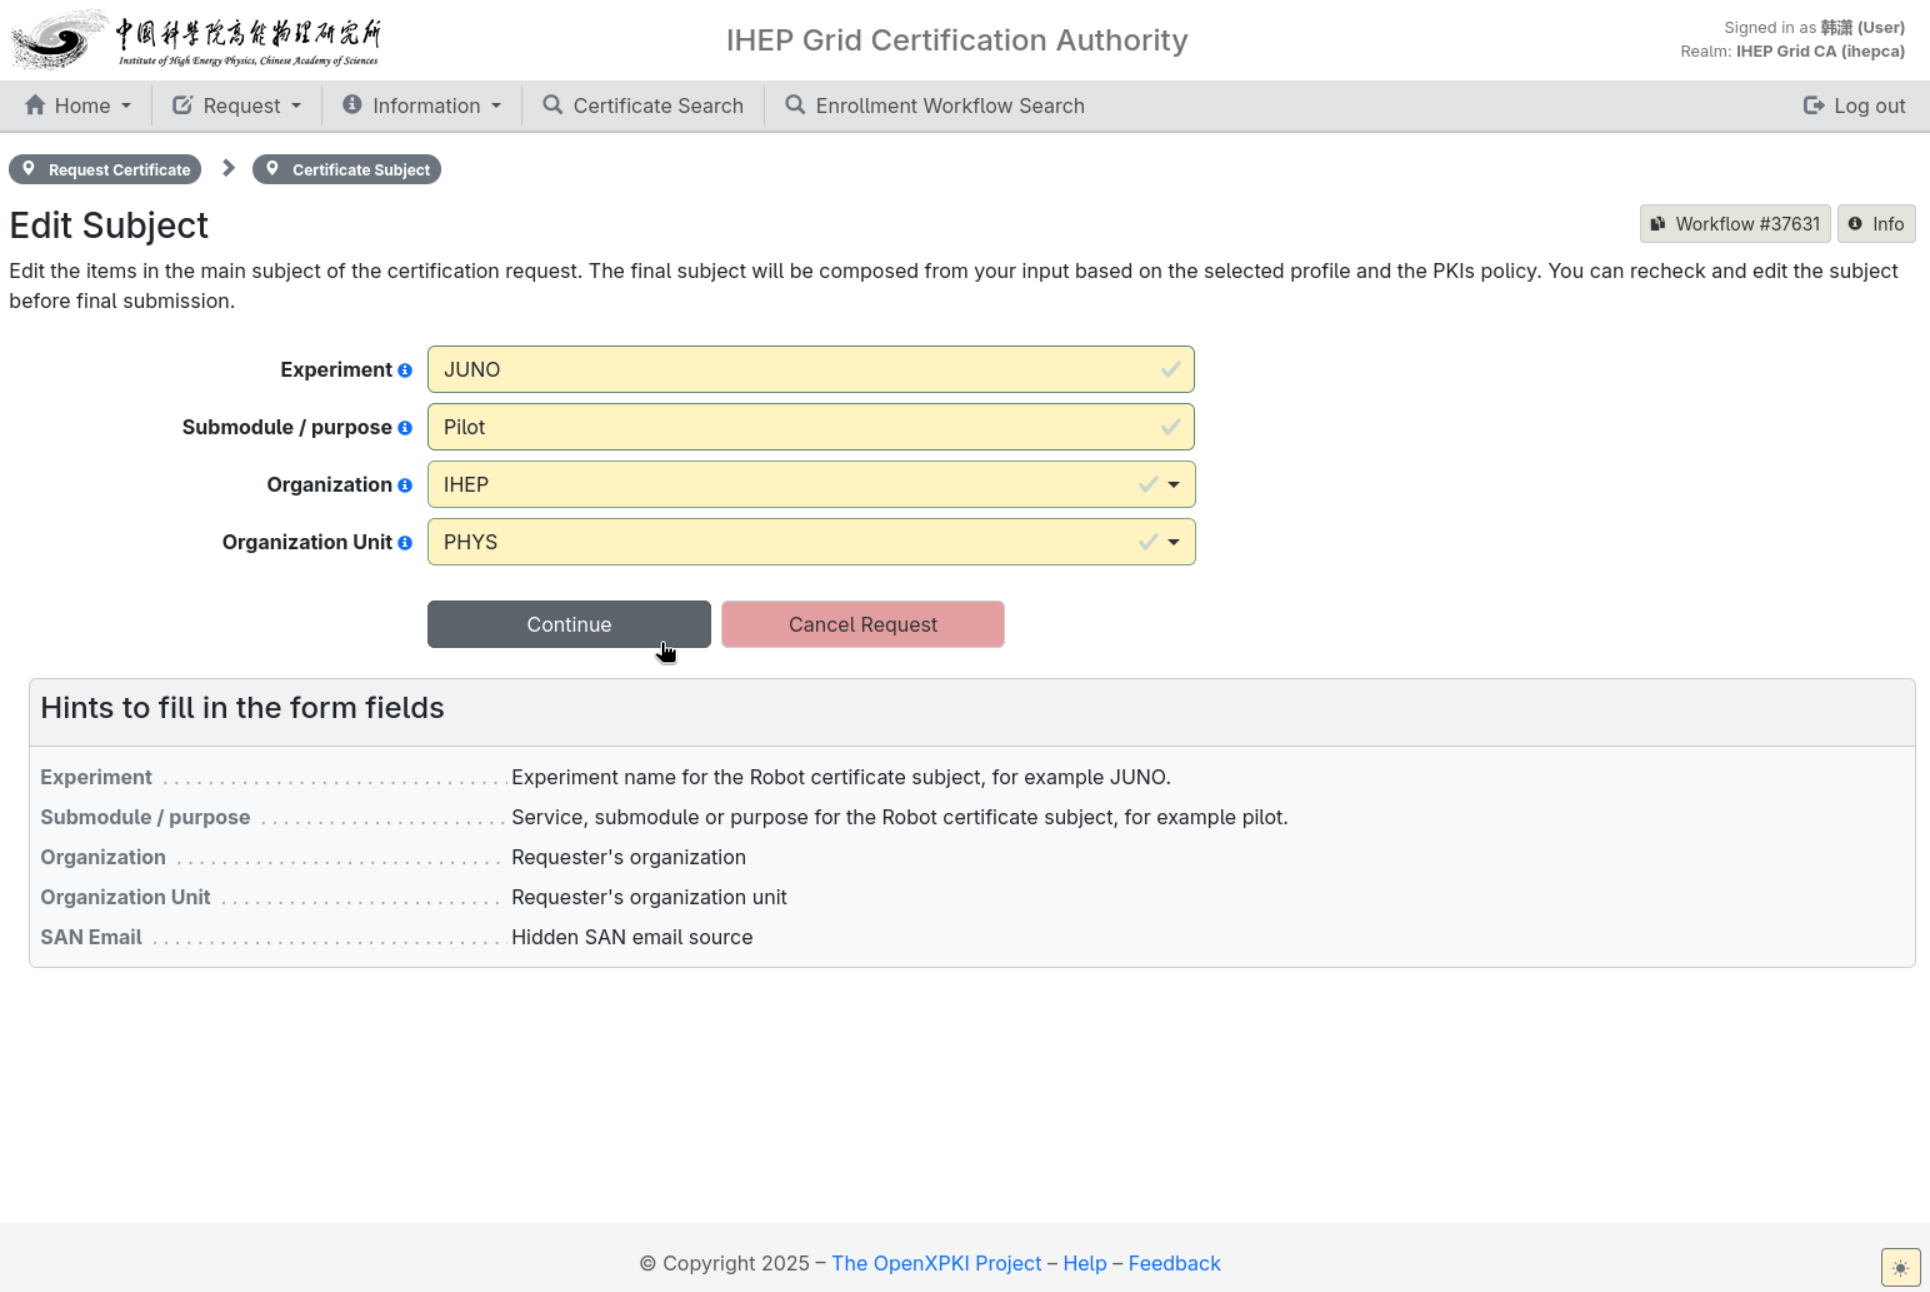
- Experiment: the experiment name, e.g.
JUNO. Only letters, digits, dots, underscores and hyphens. - Submodule / purpose: the submodule or purpose, e.g.
pilot. Letters, digits, spaces, dots, underscores and hyphens. - Organization Unit / Organization: choose the actual responsible unit and organization from the dropdowns.
- The second CN is fixed to
Robotautomatically; do not (and you cannot) enter a user short account.
Check the DN in the summary. With JUNO and pilot, the expected result is:
The remaining steps (private key password, submission, RA review, download) are exactly the same as for a user certificate. The SAN of a Robot certificate contains only the responsible person's email and no DNS names: do not deploy it as a Host certificate on a web service, and do not share it with people outside the experiment/service. When the responsible person, purpose changes or the key is compromised, request revocation and re-apply.
10.1.6 Applying for a Host Certificate
A host certificate should be requested by someone with administrative responsibility for the host. The applicant's LDAP email is written into the SAN and stored as owner/requester metadata. The procedure is identical to a user certificate (see 10.1.4) except for the Edit Subject page. A host certificate needs the primary DNS name, all additional DNS names, the host purpose and the responsible person; do not enter IP addresses, URLs, ports, https:// prefixes, wildcards like *.ihep.ac.cn, or a comma-separated list of names into a single hostname field:
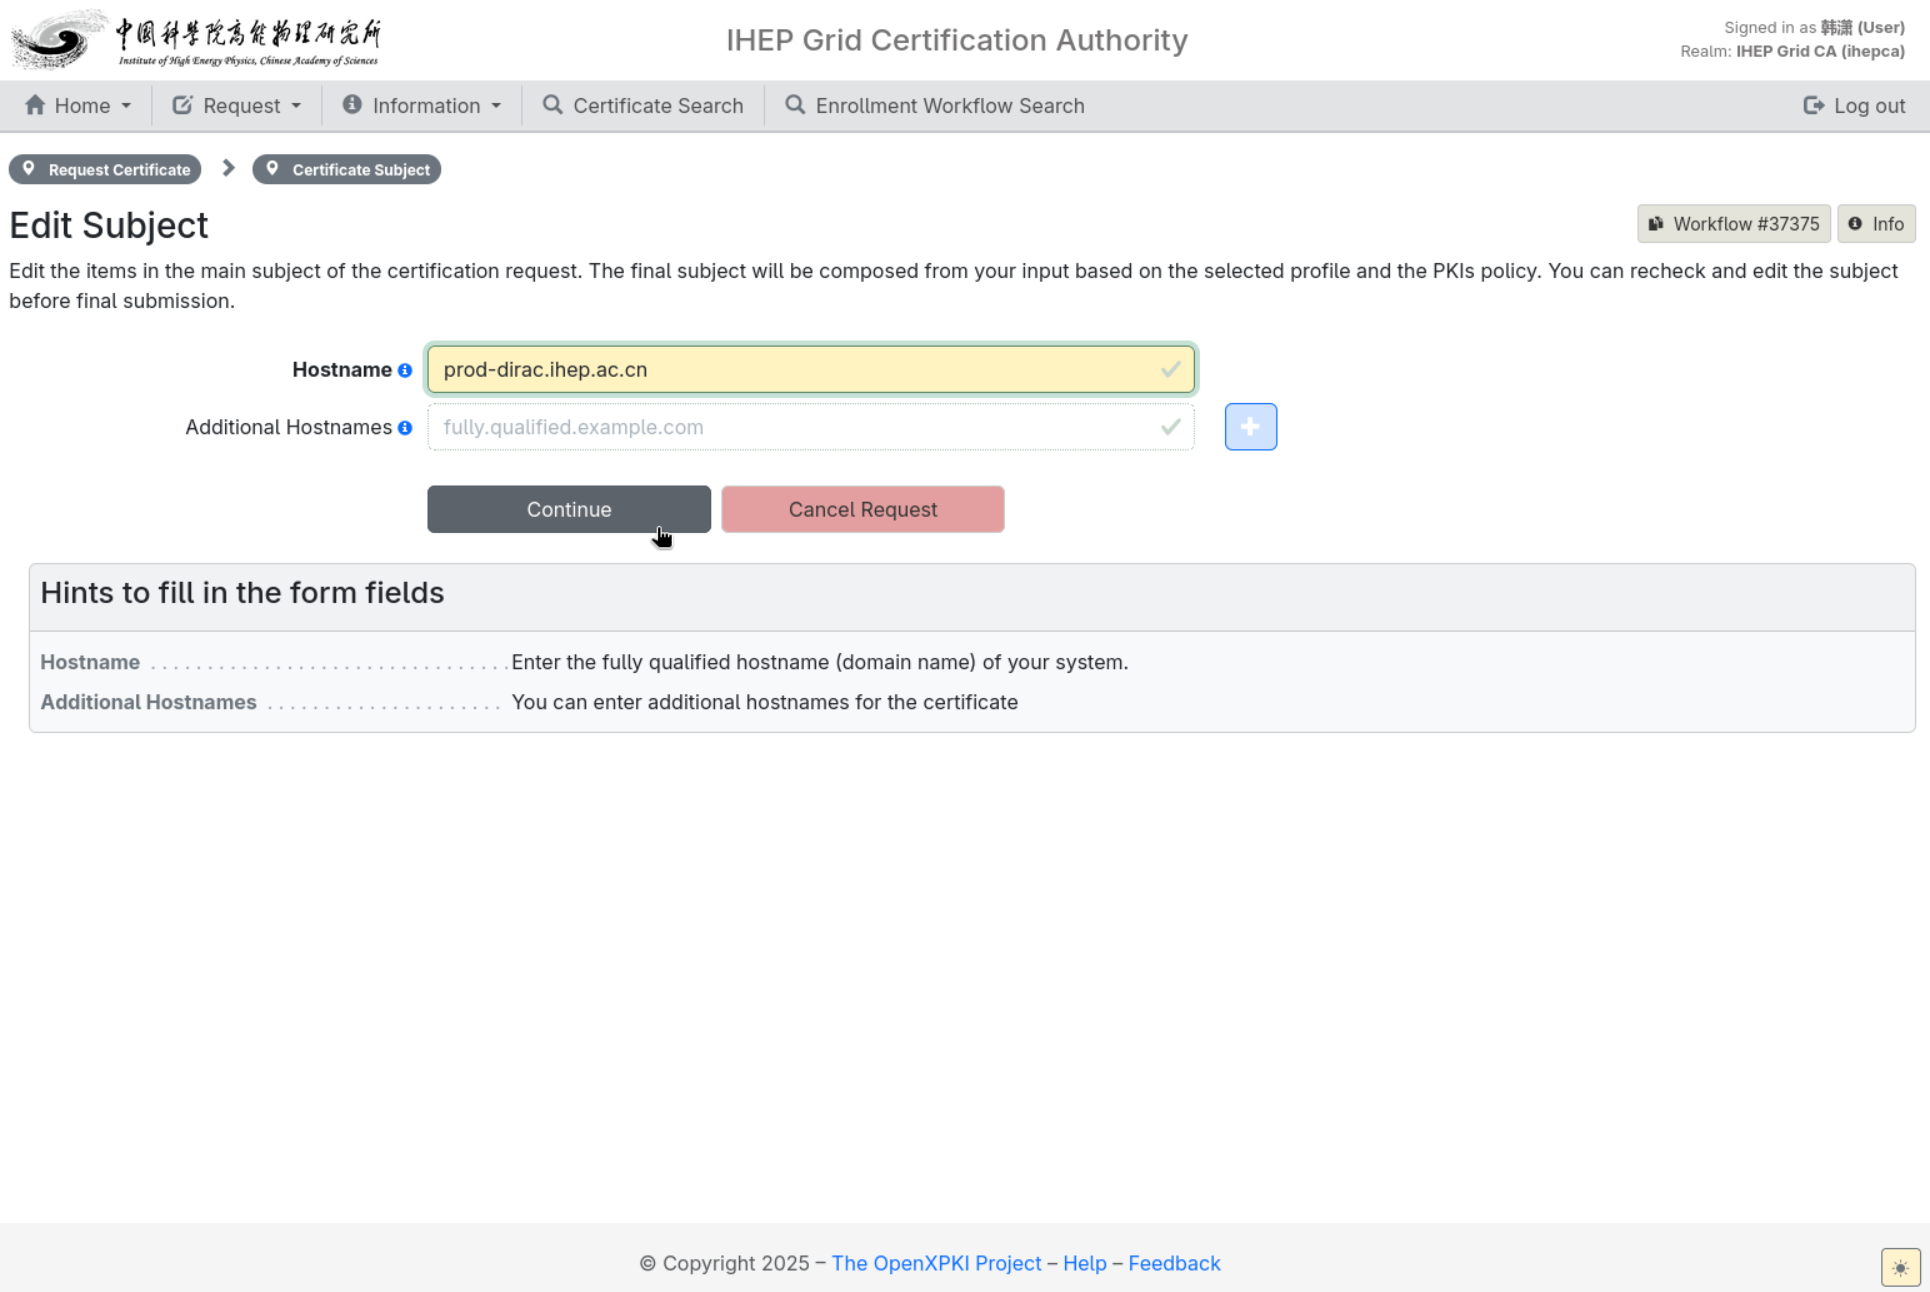
- Hostname: must be the primary FQDN of the host, e.g.
host01.ihep.ac.cn; do not enter the short namehost01. - Additional hostname: other DNS names may be added; each field takes one complete FQDN only, no wildcards; add multiple names one by one with the page control.
- DNS names are issued in lowercase; confirm DNS resolution and site responsibility before submitting.
- The email SAN comes from the logged-in user's LDAP email; do not enter someone else's email to bypass review.
Commentshould describe the service purpose, site and ticket, e.g.DIRAC Storage Element, IHEP CC, ticket #12345.
The remaining steps (confirm info, private key password, submission, RA review) are exactly the same as for a user certificate. Once issued, open the certificate in My Certificates, click Download private key/keystore (PKCS12/PKCS8/Java) in the Action area and choose PKCS12. The WebUI always generates an RSA 4096 private key encrypted with AES-256; there is no key type/length choice and no CSR upload.
Install the WebUI-issued host certificate on the target host
- Transfer the downloaded
.p12to the target host through a controlled channel; avoid email, public cloud drives or shared temporary directories. -
Create the key directory and restrict permissions:
-
Export the end-entity certificate and private key (the Export Password, i.e. the export password set when downloading the
.p12, will be requested): -
Verify that certificate and key match and check the DNS/email SAN:
test "$(sudo openssl x509 -in /etc/grid-security/hostcert.pem -noout -modulus | openssl sha256)" = \ "$(sudo openssl rsa -in /etc/grid-security/hostkey.pem -noout -modulus | openssl sha256)" \ && echo 'certificate and key match' sudo openssl x509 -in /etc/grid-security/hostcert.pem -noout \ -subject -issuer -dates -ext subjectAltName -ext extendedKeyUsage -
If the service runs under a dedicated account (e.g.
dirac), set controlled owner/group and permissions only when the service truly needs to read the key; the private key must never be world-readable. - Verify the service configuration, reload the service, then delete
/root/host01.p12. Keep a securely protected offline backup; do not keep multiple plaintext keys on the host.
Do not mix
This procedure applies only to WebUI-issued Host certificates. The EST auto-renewal in 10.1.9 and the IHEP-2013 Host migration still generate a new private key/CSR on the target host; the encrypted private key exported from a WebUI .p12 must not be fed to the EST scripts.
10.1.7 Download and Install Certificates
After issuance, the applicant receives a notification email:
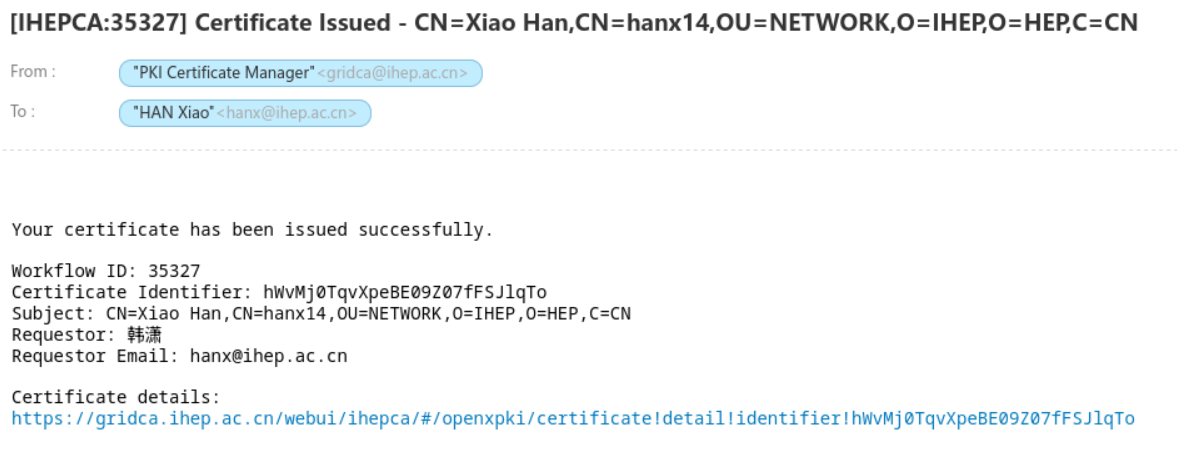
Download the PKCS#12
-
Open Home → My Certificates:
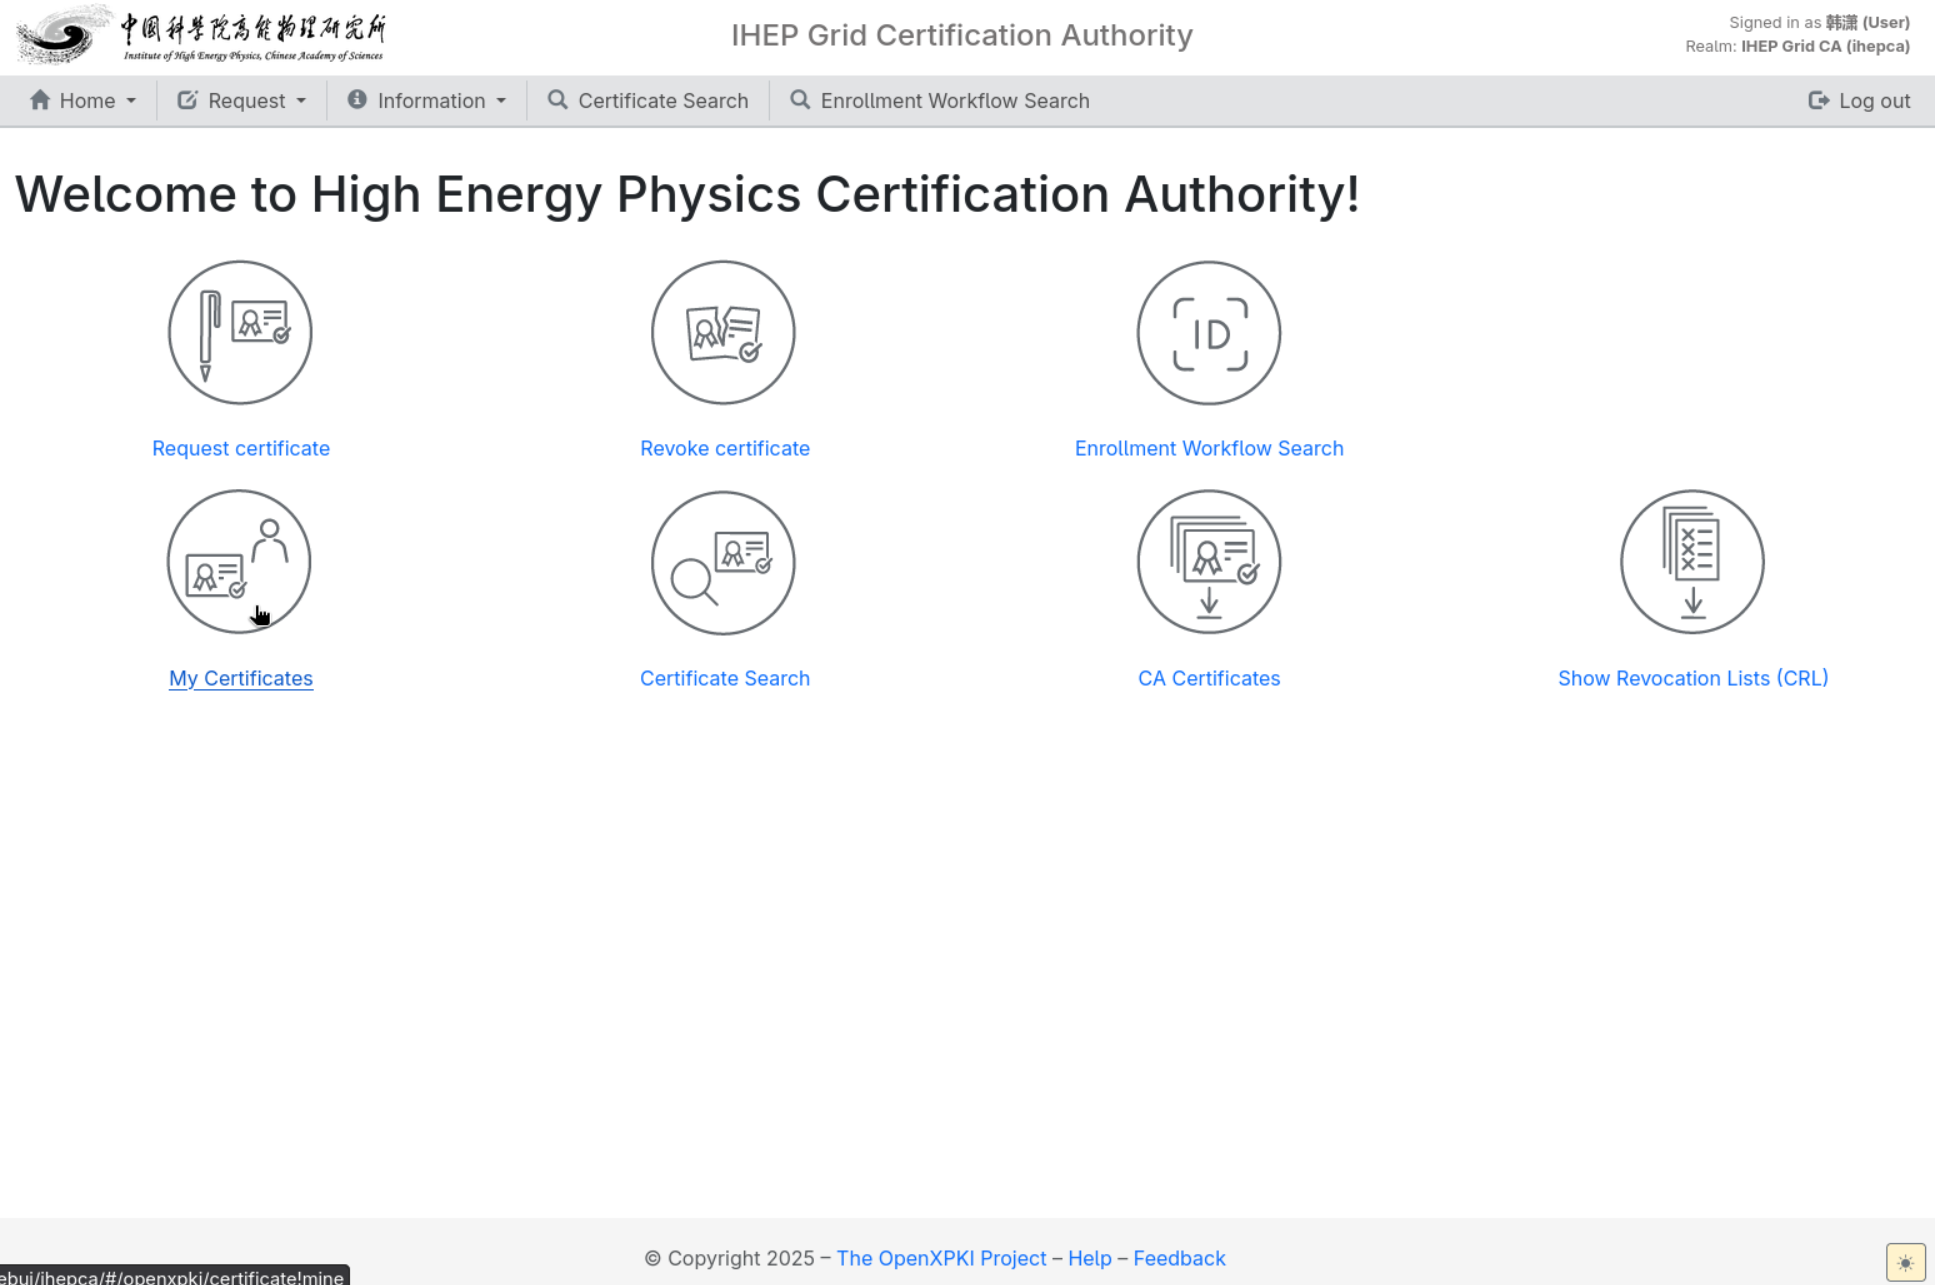
-
Click the Subject or serial number of the target certificate to open its details; alternatively, click the link in the issuance email and the system opens the certificate directly:
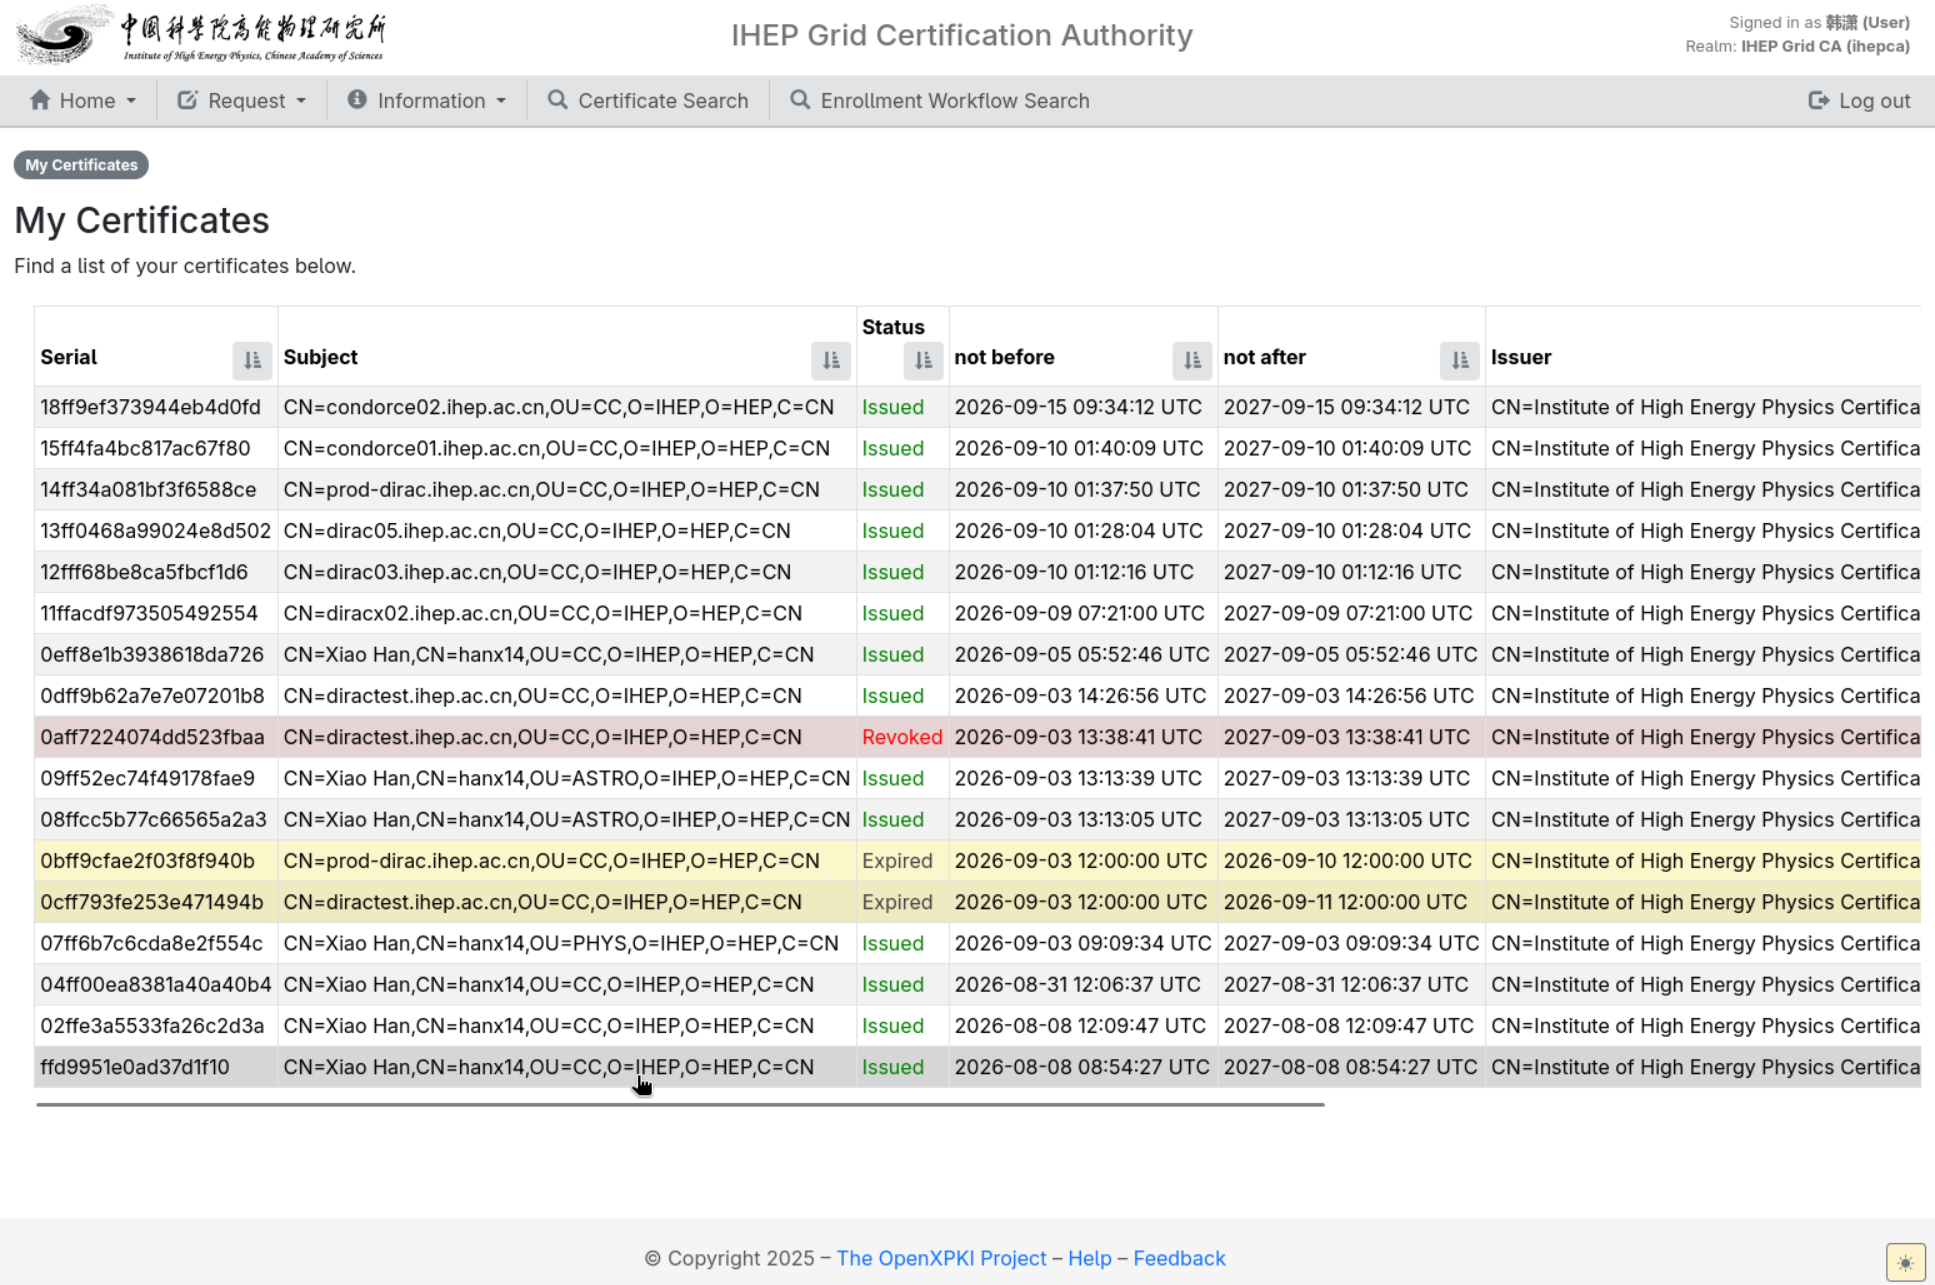
-
Click Download private key/keystore (PKCS12/PKCS8/Java) in the Action area (entering via the email link shows this download page directly):
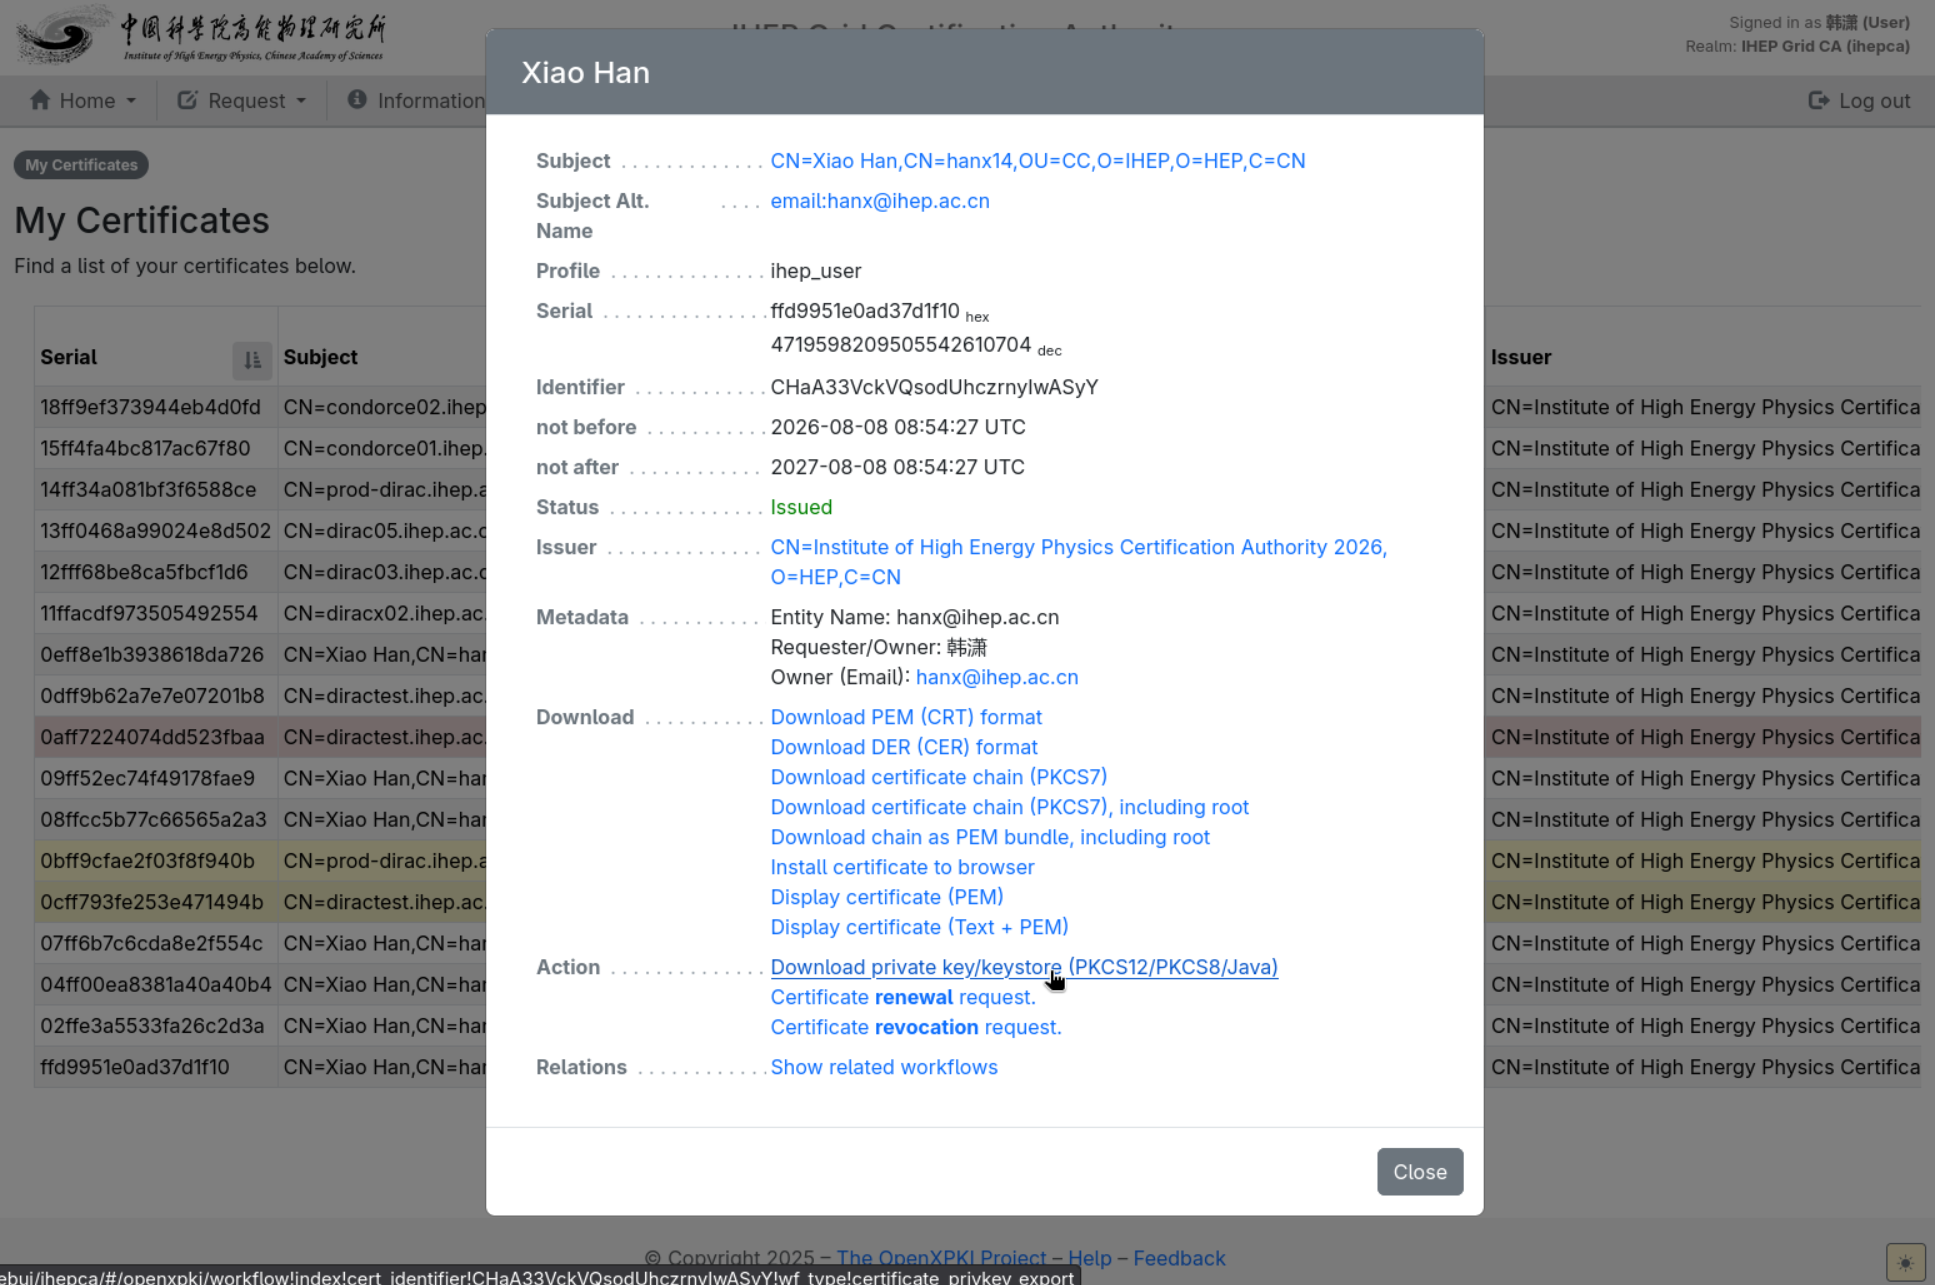
-
On the Specify Required Format page confirm Download Format is PKCS12; enter the private key password set at application time in Password; set the password for the exported private key (
.p12) in Export Password (if left empty, the application-time private key password is used):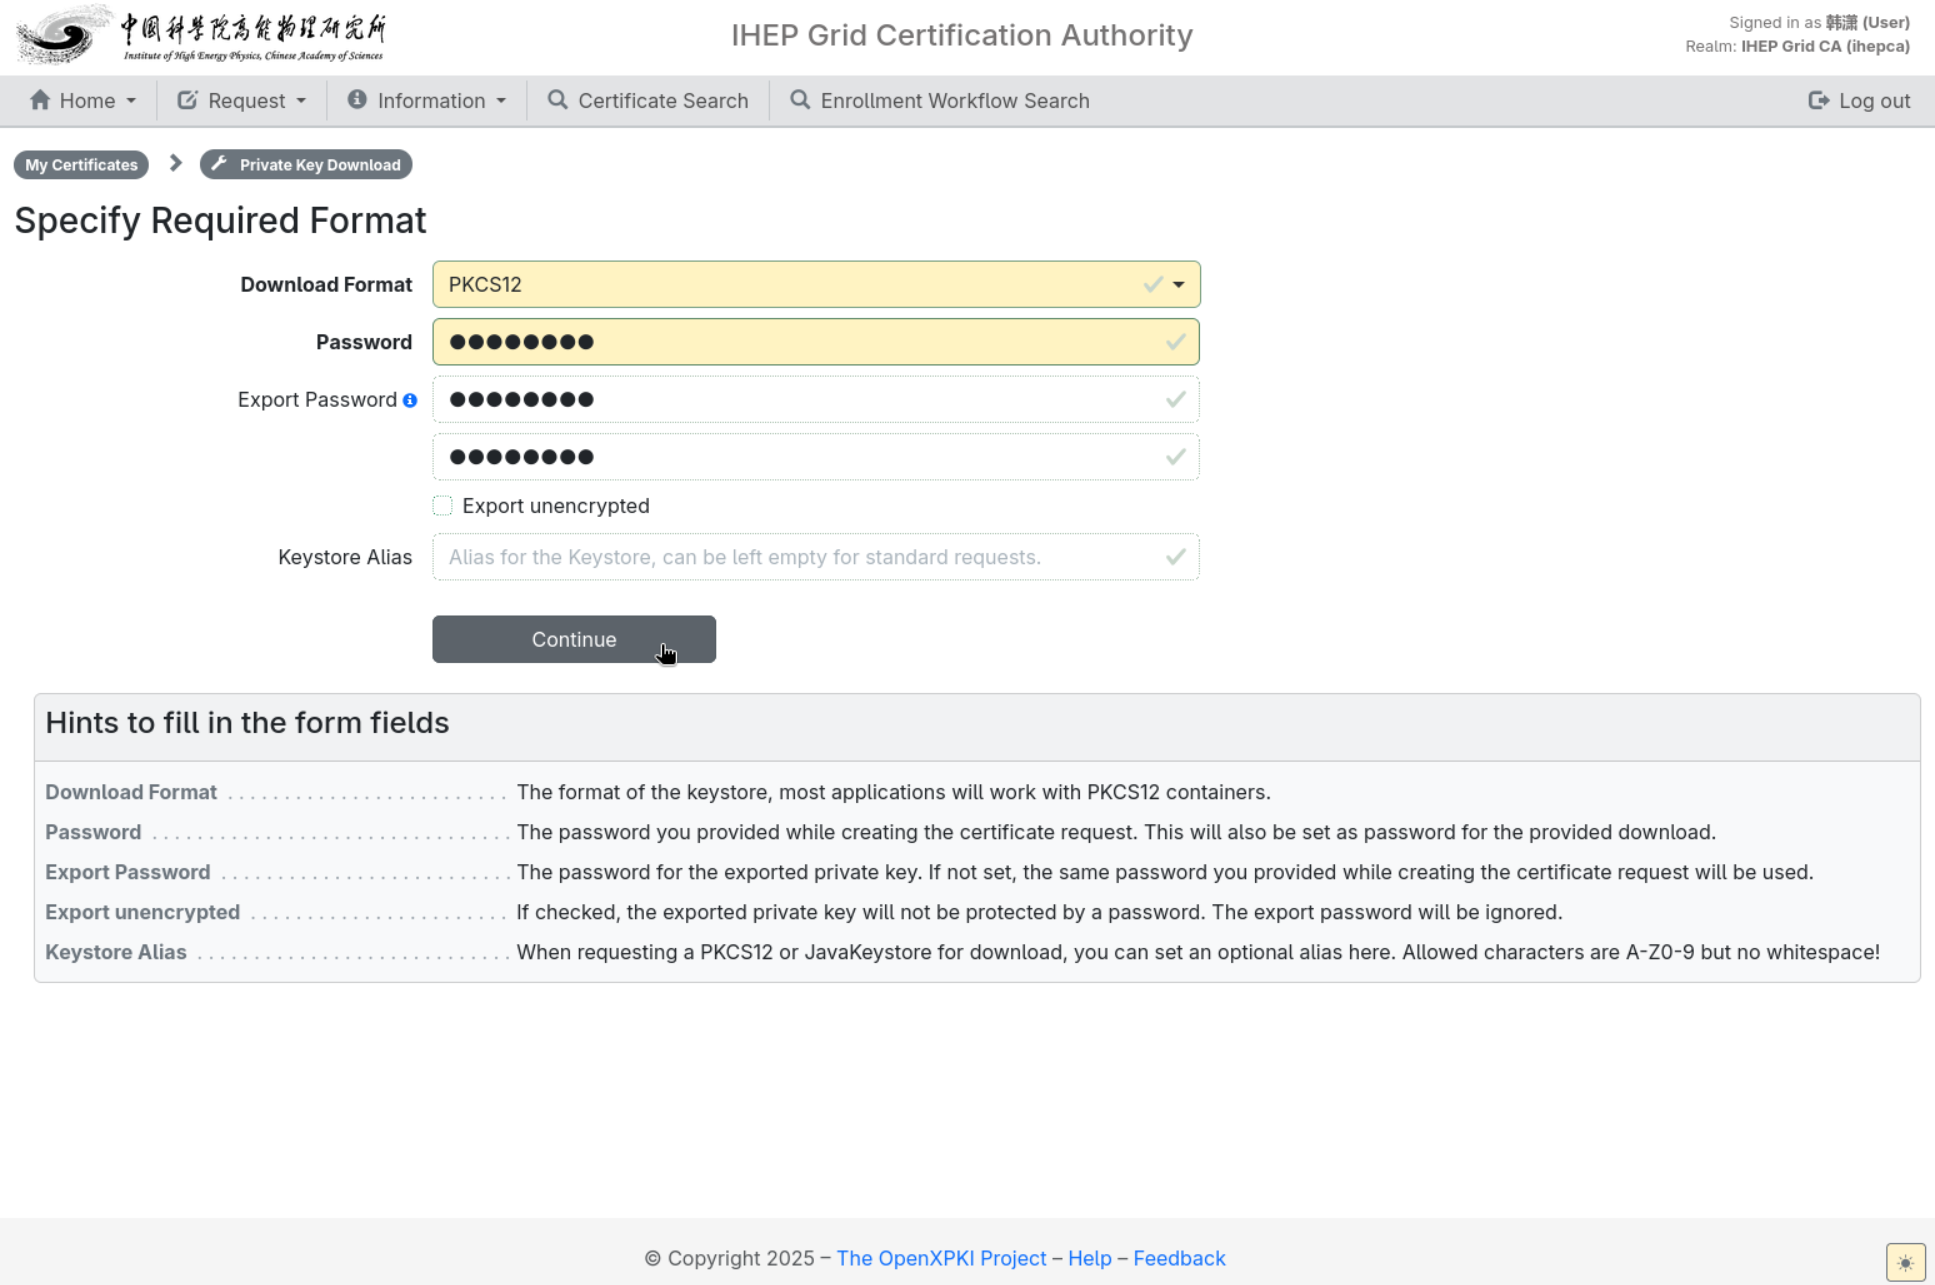
-
Click Continue, then on the SUCCESS page click Download to download the
.p12file (the download entry disappears after you leave the page):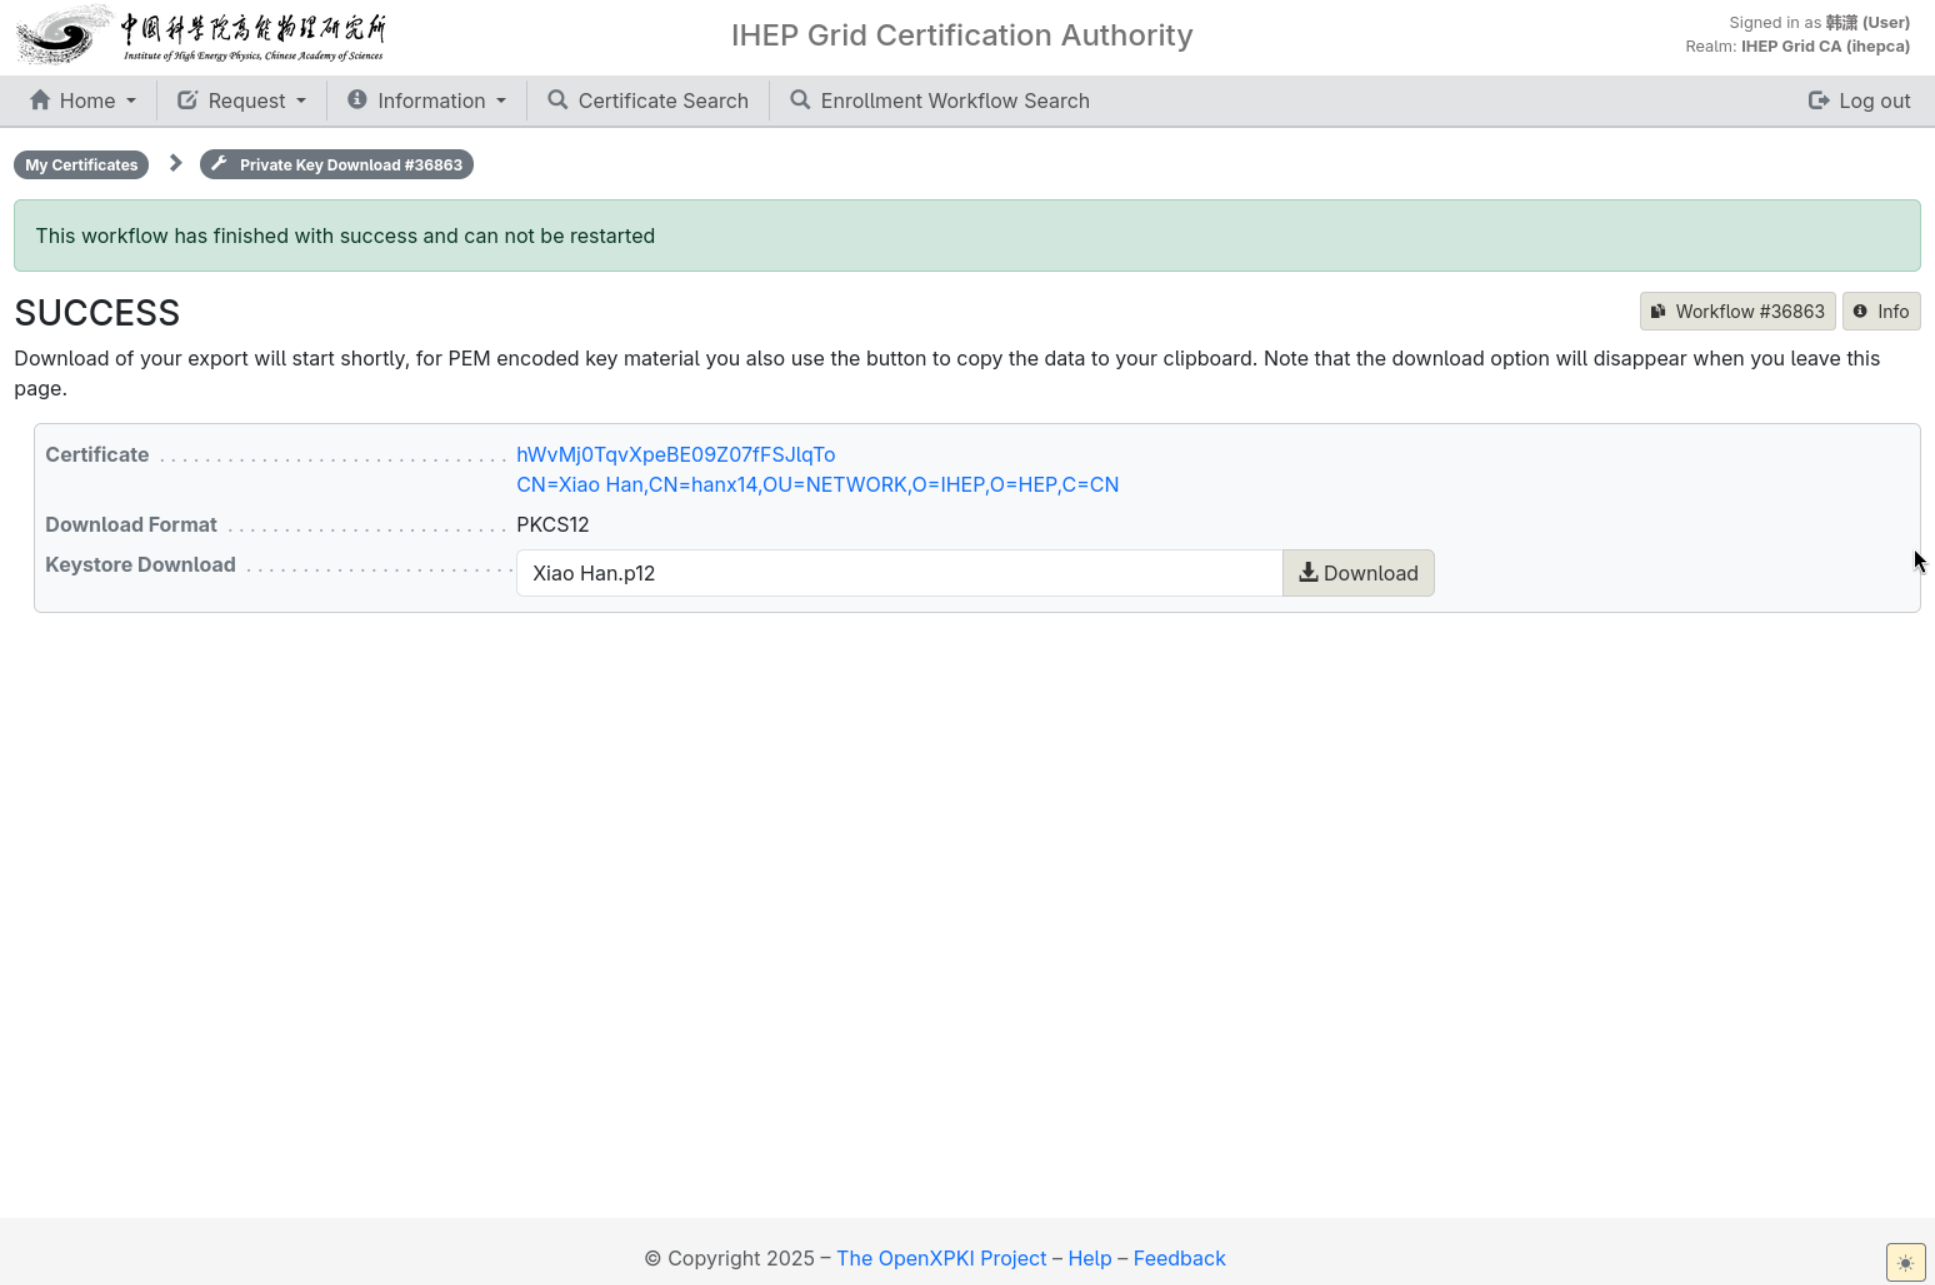
The .p12 bundle contains the certificate, the private key and the CA chain; importing it requires the Export Password (or the application-time private key password if none was set). Immediately move the file out of the browser's public download directory to a protected location and check its permissions; do not leave .p12 files in shared /tmp, public download folders, sync drives or world-readable home directories.
No download-private-key Action?
User, Robot and WebUI-issued Host certificates all have their keys generated by the CA, so the private-key download Action is offered. Its absence does not mean the certificate is invalid — usually the key is not kept at the CA, has already been exported, or the certificate came from EST.
Export the PEM files needed by Grid
The following commands export the end-entity certificate and the private key from the .p12:
mkdir -p "$HOME/.globus"
chmod 700 "$HOME/.globus"

openssl pkcs12 -in '/path/to/Xiao Han.p12' -clcerts -nokeys \
  -out "$HOME/.globus/usercert.pem"
openssl pkcs12 -in '/path/to/Xiao Han.p12' -nocerts \
  -out "$HOME/.globus/userkey.pem"
chmod 600 "$HOME/.globus/userkey.pem"
chmod 644 "$HOME/.globus/usercert.pem"
The system will ask for the Export Password, and possibly a protection password for the PEM key; if an automated client cannot enter the key password interactively, follow your site's key-protection policy first. Verify locally after export:
openssl x509 -in "$HOME/.globus/usercert.pem" -noout \
  -subject -issuer -dates -ext subjectAltName
test "$(openssl x509 -in "$HOME/.globus/usercert.pem" -noout -modulus | openssl sha256)" = \
     "$(openssl rsa -in "$HOME/.globus/userkey.pem" -noout -modulus | openssl sha256)" \
  && echo 'certificate and key match'
Never send the .p12 or the password to others to solve an import problem.
Install into the browser
- In Firefox open Privacy & Security → Certificates → View Certificates.
- Open the Your Certificates tab, click Import, choose the downloaded
.p12and enter the Export Password. - Visit a site that requires a client certificate; select the new IHEP CA personal certificate when prompted.
After importing, double-click the entry in Your Certificates and check that Issued By is the new IHEP Issuing CA and the Subject Alternative Name contains your email. If a site still trusts only IHEP-2013, the site must update its trust anchors before the new certificate works.
Client certificate not shown in the browser?
Before first using a client certificate on a site, the browser must be able to access its private key; importing only the .crt/.pem public certificate will not appear in the selectable identity list. In Firefox, check Settings → Privacy & Security → Certificates → View Certificates → Your Certificates to confirm the entry exists and shows a private key; incorrect local time may also hide certificates that are not yet valid or already expired.
Never transfer .p12, userkey.pem or passwords via email, public links or chat tools.
10.1.8 View, Renew and Revoke
View certificates
- Open Home → My Certificates and click the target certificate.
- Check Subject, Issuer, Not Before/Not After, SAN and serial number on the detail page.
- Use Download PEM (CRT) format for a single certificate; use Download chain as PEM bundle, including root for the full trust chain.
- To verify ownership in the system, use Action → Show metadata; requester, email and owner contact there are system metadata, not X.509 extensions.
Renew via the WebUI
For user certificates or WebUI-managed host certificates approaching expiry:
- Open Home → My Certificates and enter the valid certificate to renew.
- Click Renew in the Action area.
- The system carries over the profile and Subject of the original certificate; check name, account, organization, unit, DNS names and email — do not use renewal to change the certificate type or host ownership.
- Set a new private key password as prompted and set the export password when downloading the new
.p12; for Host certificates, install on the target host as in 10.1.6. - Click Submit and track the status in My Workflows; download and install after issuance. Within the normal renewal window the old certificate remains valid for its original lifetime, allowing a smooth transition.
User, Robot and WebUI Host renewals all produce a new key bundle and a new serial number; export/install the new .p12 instead of stitching the new certificate onto the old key. Robot renewal keeps the original Subject (the CN=Robot part is fixed); if the experiment/purpose or responsible person changes, re-apply instead of disguising the change as a renewal. Do not delete the old certificate backup until the service is confirmed healthy.
Request revocation
Request revocation immediately when a key is suspected compromised, a host is decommissioned, a person leaves, or the certificate information is no longer correct:
- Open the certificate to revoke in My Certificates.
- Click Revoke in the Action area.
- Choose the most accurate revocation reason and provide a note for RA review, then click Submit.
- Wait for RA review and CRL publication. Revocation is irreversible; if the certificate merely approaches expiry, renew it instead.
If a private key has been compromised, stop using the key and related services first, then submit the revocation; do not wait for expiry and do not merely delete local files — copies may still be abused.
10.1.9 Host Certificate EST Auto Renewal and Legacy Host Migration
Applicable to Host certificates issued by the new IHEP CA. By default a simplereenroll is initiated within 45 days before expiry; normal renewal does not revoke the old certificate. This part is purely script-based — no web operations.
Install the script and CA public keys
The site administrator deploys the following files to the target host:
/usr/local/sbin/ihep-host-auto.sh
/etc/grid-security/certificates/IHEP-2026-Root.pem
/etc/grid-security/certificates/IHEP-2026-ICA.pem
/etc/grid-security/certificates/IHEP-2013.pem   # only needed for legacy Host migration
The script requires Bash, OpenSSL, curl, flock and GNU coreutils, and only supports password-less PEM host keys. The certificate and key live in /etc/grid-security/ (or the application's own path); CA public keys live in the standard trust directory /etc/grid-security/certificates/.
sudo install -o root -g root -m 0755 ihep-host-auto.sh /usr/local/sbin/ihep-host-auto.sh
sudo install -d -o root -g root -m 0755 /etc/grid-security/certificates
sudo install -o root -g root -m 0644 IHEP-2026-Root.pem /etc/grid-security/certificates/IHEP-2026-Root.pem
sudo install -o root -g root -m 0644 IHEP-2026-ICA.pem /etc/grid-security/certificates/IHEP-2026-ICA.pem
For legacy migration, save the old IHEP-2013 CA public key as /etc/grid-security/certificates/IHEP-2013.pem (mode 0644; it contains no CA private key). Check that the current host key is password-less and safely permissioned: if openssl asks for a password or errors out, the key is unsuitable for this automation.
Manual run example
The example uses DIRAC host certificate paths. CURL_CA_CERT only verifies the HTTPS server chain of gridca.ihep.ac.cn; it can be omitted if the system CA already verifies it:
sudo env \
  PKI_HOST=gridca.ihep.ac.cn \
  CERT_FILE=/opt/dirac/etc/grid-security/hostcert.pem \
  KEY_FILE=/opt/dirac/etc/grid-security/hostkey.pem \
  INSTALL_OWNER=dirac INSTALL_GROUP=dirac \
  CERT_MODE=0444 KEY_MODE=0400 \
  CURL_CA_CERT=/etc/grid-security/certificates/est-ca.pem \
  /usr/local/sbin/ihep-host-auto.sh
The script first verifies that the current certificate and key match, then decides:
- Current certificate issued by the IHEP-2013 CA: calls the migration endpoint and issues a new-CA Host certificate.
- Current certificate issued by the new IHEP CA: calls the EST renewal endpoint only within 45 days of expiry.
- Outside the renewal window: makes no change and exits successfully.
Do not set ALLOW_REPLACE=1 in routine tasks; it is only for administrator-directed out-of-window reissue tests or incident handling. After the first successful issue, check the new serial number, expiry and install path in the output, then run:
openssl x509 -in /opt/dirac/etc/grid-security/hostcert.pem -noout \
  -subject -issuer -dates -ext subjectAltName -ext extendedKeyUsage
test "$(openssl x509 -in /opt/dirac/etc/grid-security/hostcert.pem -noout -modulus | openssl sha256)" = \
     "$(openssl rsa -in /opt/dirac/etc/grid-security/hostkey.pem -noout -modulus | openssl sha256)" \
  && echo 'certificate and key match'
A host certificate should contain the DNS SANs, the responsible person's email SAN, and both TLS Web Server Authentication and TLS Web Client Authentication extended key usages.
Set up the cron job
- Run it manually once and confirm the output shows issuance or "not in renewal window".
- Confirm the target service can read the newly installed
hostcert.pemandhostkey.pem. -
Edit root's
crontab -efor a daily run, e.g.: -
If the certificate is not in the default path, put the environment variables into a root-owned wrapper script that ordinary users cannot modify, and let cron call the wrapper. Save it as
/usr/local/sbin/renew-dirac-host-cert, then runsudo chown root:rootandsudo chmod 0700:#!/usr/bin/env bash set -euo pipefail exec env \ PKI_HOST=gridca.ihep.ac.cn \ CERT_FILE=/opt/dirac/etc/grid-security/hostcert.pem \ KEY_FILE=/opt/dirac/etc/grid-security/hostkey.pem \ INSTALL_OWNER=dirac INSTALL_GROUP=dirac \ CERT_MODE=0444 KEY_MODE=0400 \ CURL_CA_CERT=/etc/grid-security/certificates/est-ca.pem \ RELOAD_CMD='systemctl reload dirac-service' \ /usr/local/sbin/ihep-host-auto.shReplace
dirac-servicewith the real service unit; if the service has no safe reload command, do not configure a restart casually. Run the wrapper manually as root and verify the service before switching the cron line to the wrapper.
The script keeps backups of old files which may contain private keys: protect the backup directory at key level and clean it regularly; after a power loss or forced kill, first check the backups and that certificate/key match before restarting services.
Automatic IHEP-2013 Host migration
This uses the same script as above. On first run the script authenticates with the old Host certificate via mTLS and requests a new Host certificate from:
The server verifies the old CA CRL, the old chain, consistency between the CSR and the old Subject/DNS/email SANs, and queries LDAP ownership by the SAN email. The old Host certificate must be: non-CA, one email SAN, one or more DNS SANs, CN contained in the DNS SANs, C=CN, and conform to the original IHEP Host DN structure; migration is rejected if the old certificate is revoked, the CRL is missing/expired, the LDAP email does not exist, or the CSR rewrites the host name.
Each host name may be migrated only once. If a migration is interrupted, keep the script state/backup files and logs and contact the CA administrators for the corresponding workflow; do not delete the server-side migration record and blindly retry. After migration the new certificate is issued by the new IHEP CA; the next script run recognizes the new chain and switches to the regular EST renewal endpoint. The old certificate remains valid for its original lifetime for a smooth transition, but do not mix old and new certificates into the same hostcert.pem file.
10.1.10 FAQ
| Symptom | Check first |
|---|---|
| WebUI login fails | LDAP account/password, wrong client certificate selected in the browser, system time |
| Cannot find your certificate | Use Home → My Certificates; compare the login email with the certificate owner/email metadata |
| Request stuck in PENDING | Record the workflow ID in My Workflows and contact the RA; do not resubmit |
| No download-private-key Action | The certificate may not be a CA-generated-key one, or the key is no longer server-side; keys cannot be recovered |
| EST TLS failure | Check the full server TLS chain with curl or the script; set CURL_CA_CERT correctly, never use -k |
| EST migration rejected | Old certificate validity, old CA CRL, key match, LDAP email and unchanged DNS/SAN |
| Browser shows no certificate chooser | Whether the browser store has the private key, a cached choice, or the wrong auth method |
| Host service fails after reload | Restore the previous matching cert/key pair from local backups, check service logs and permissions, then contact the site admin |
| Chain validation fails | Client installed the new Root and Issuing CA; public Issuing/Root CRL URLs reachable |
When contacting support, provide the certificate serial number or Subject, the WebUI workflow ID, the time (UTC), the full error text and relevant log excerpts; never provide private keys, .p12 files, key passwords or LDAP passwords.
CA contact: Han Xiao, hanx@ihep.ac.cn, +86 010 88238602.
FAQ
See FAQ.
有问题?输入后跳转到对话页继续交流