6. Interactive Analysis Workbench (INK) User Guide
6.1 Introduction
The Interactive Analysis Workbench (INK), developed by the IHEP Computing Center, provides users with secure and convenient interactive analysis tools. It encapsulates user interactions as specialized jobs and delivers web-based interactive operations. Current features include applications like VSCode, Jupyter, VNC, and services such as file operations, ENode, EShell, OpenClaw, and opencode.
6.2 Quick Start
6.2.1 Login
Users with a cluster account can directly access http://ink.ihep.ac.cn and log in via their IHEP SSO account. If you do not have a cluster account, please refer to User Account Application.
6.2.2 Homepage
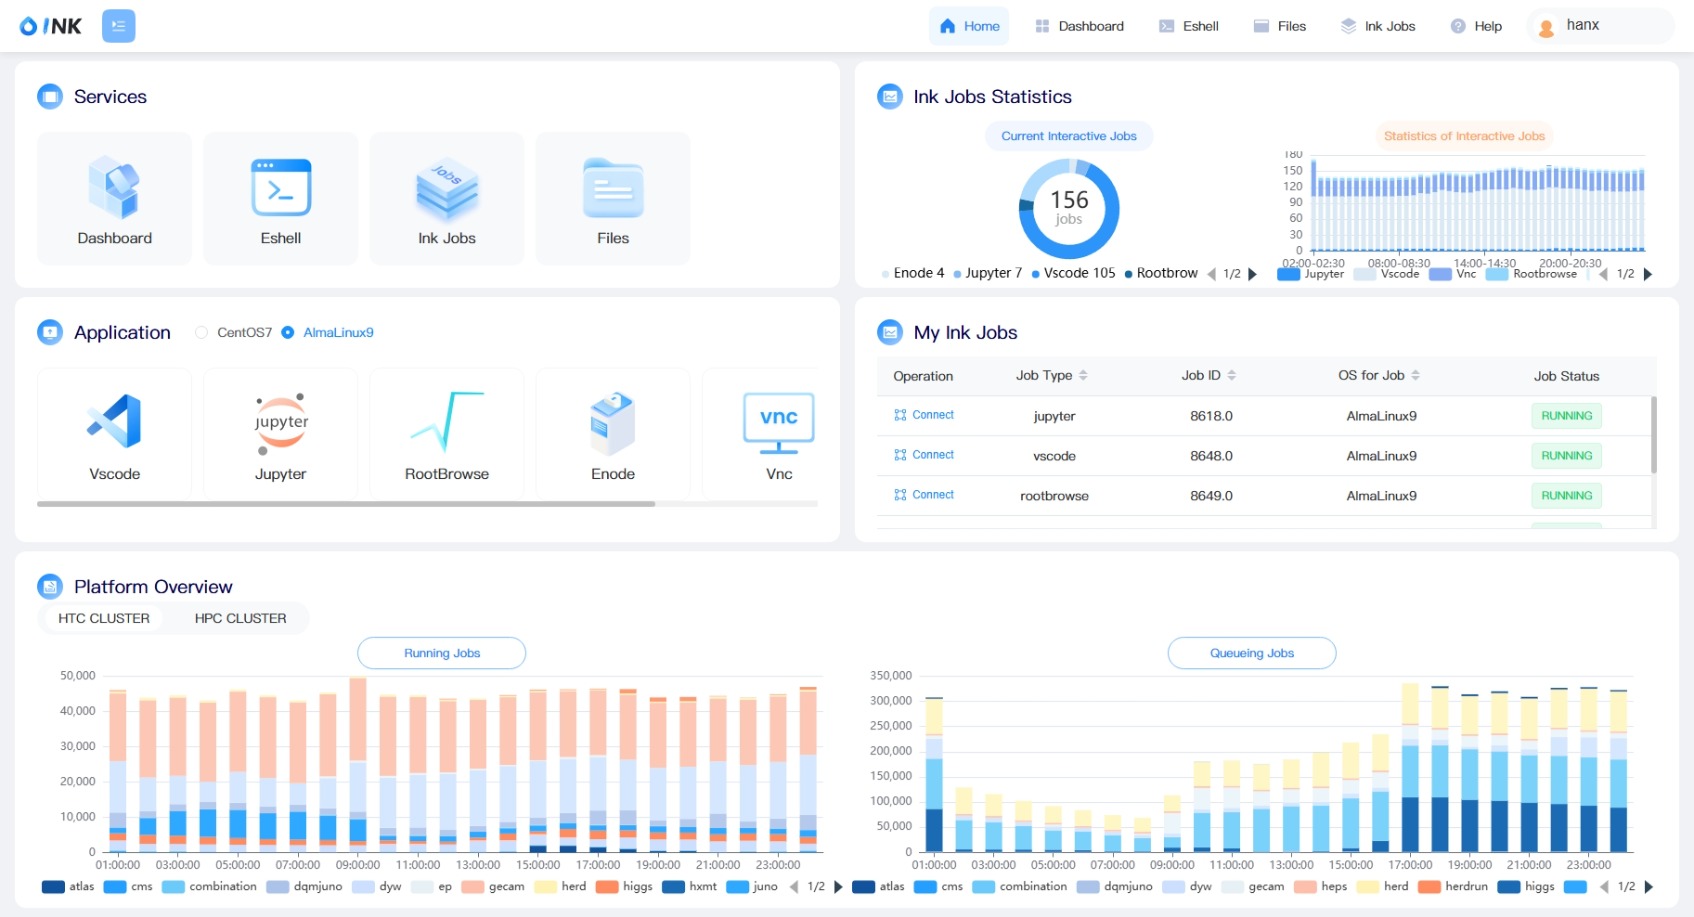
After successful login, you will enter the INK homepage, which includes five sections: Services , User Info , Application , Interactive Jobs , and Platform Overview , providing basic services, interactive applications, and system runtime information.
6.2.3 File Operations
Method 1: Click the Files icon in the top-right corner of the homepage.

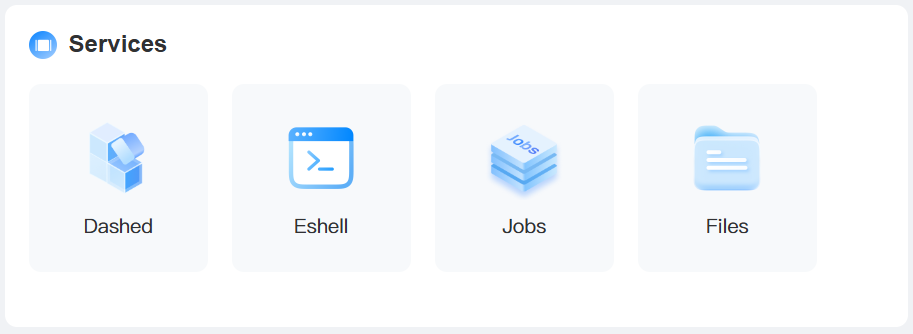
Method 2: Click the Files icon in the Services section.
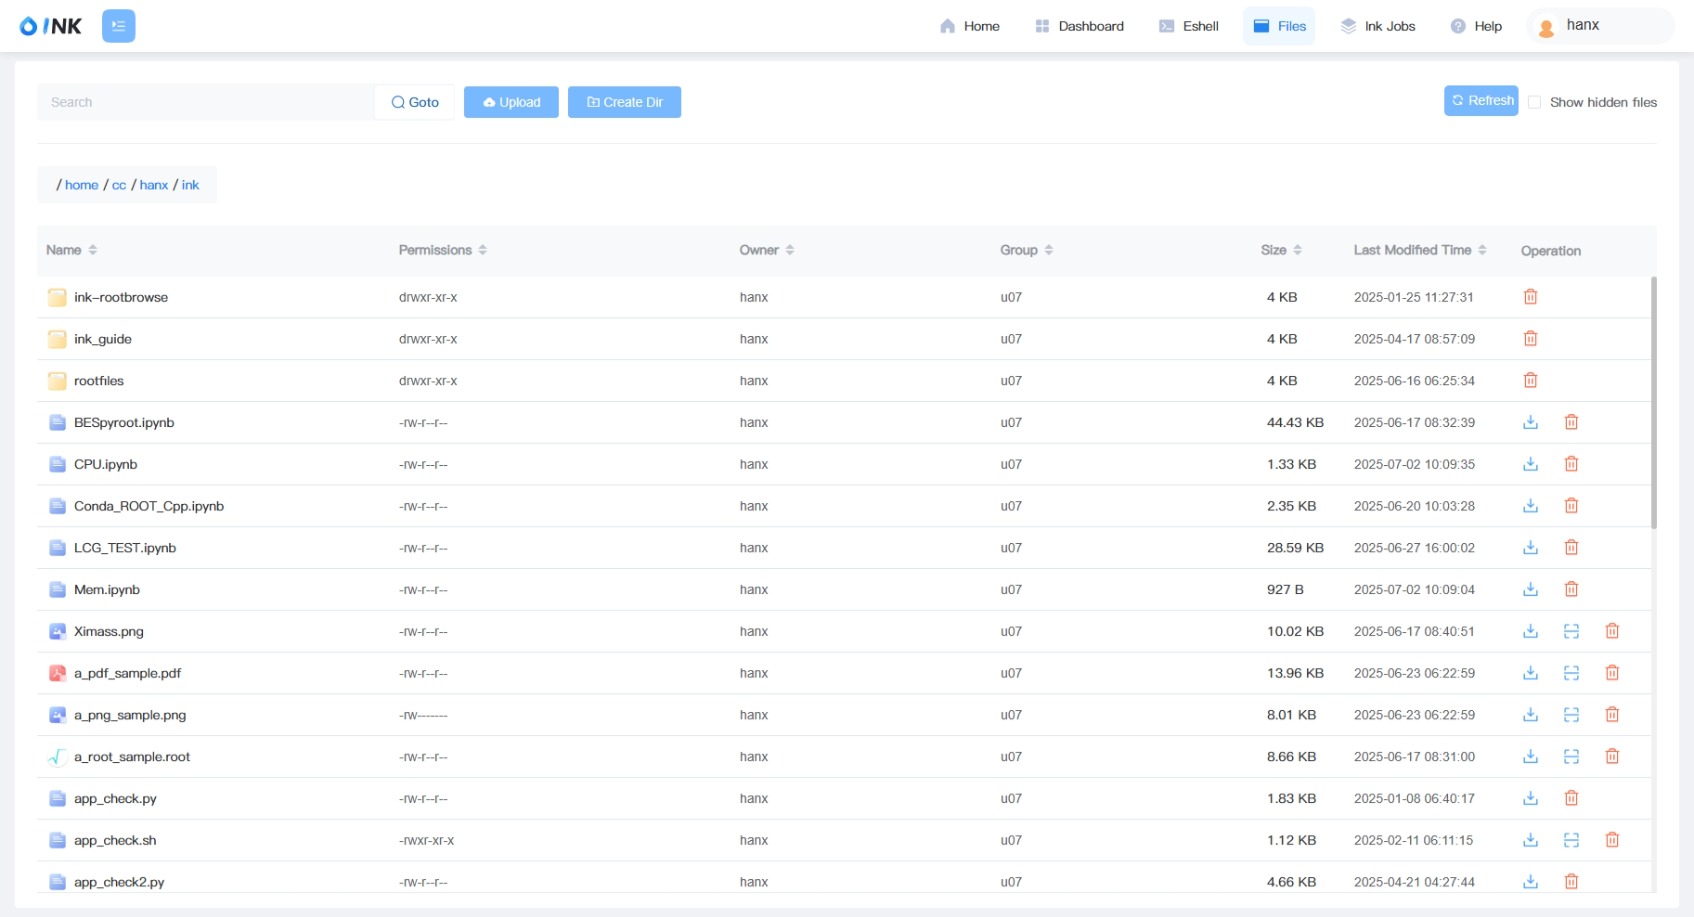
This opens the file management interface. Features include: path navigation via manual input or folder clicks, toggle hidden file visibility, file upload/download/delete operations on the cluster, and online preview for PNG / PDF / ROOT / FITS files.
6.2.4 Interactive Applications
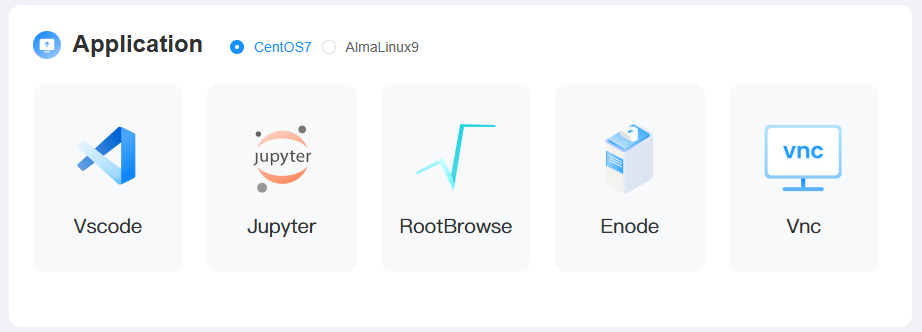
INK offers web-based interactive applications like VSCode, Jupyter, RootBrowse, and VNC.
Note: Users in the
physicsgroup may choose between CentOS7 or AlmaLinux 9 OS. Non-physicsusers use AlmaLinux 9 by default. CentOS7 has older software versions; use AlmaLinux 9 unless necessary.
Steps:
-
Step 1: Click the application icon under Application to submit a job. A job list will pop up.
-
Step 2: The Jobs page displays all your submitted interactive computing jobs. A star (⭐) marks the job you recently selected on the homepage for quick identification. Click Connect when the job status becomes available. You can also check the job log by clicking the Detail button.
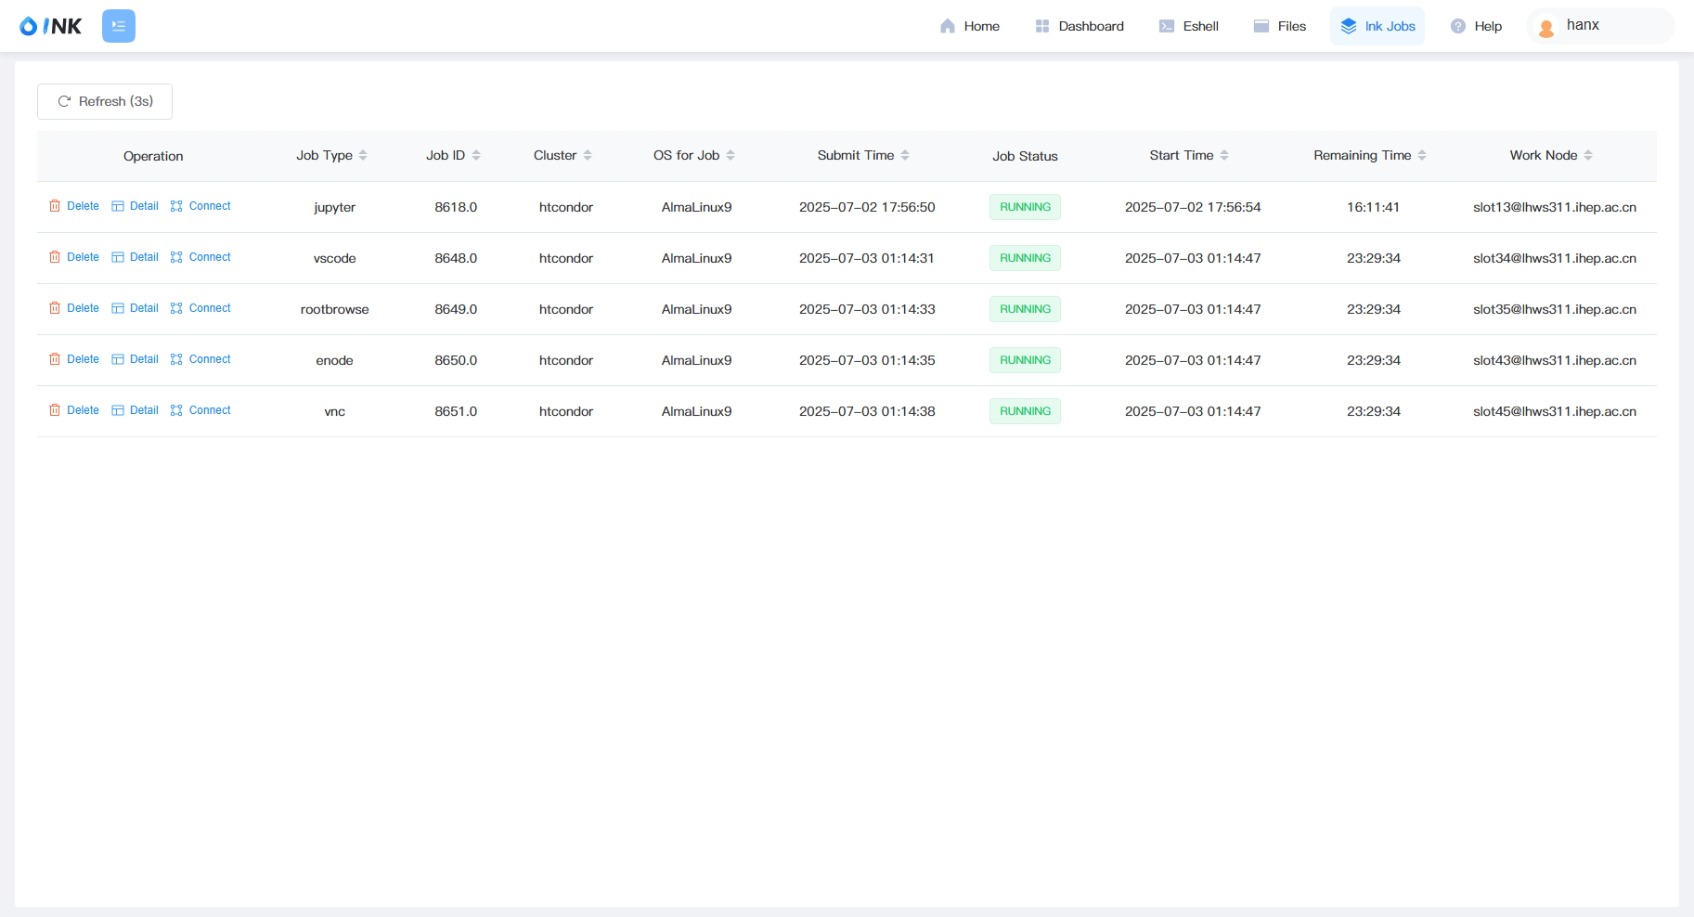
Note 1: The Connect button appears only when the application is ready. Use Refresh to update the status.
Note 2: For VNC, copy the auto-generated password from the job's Detail page.
6.2.5 User Dashboard
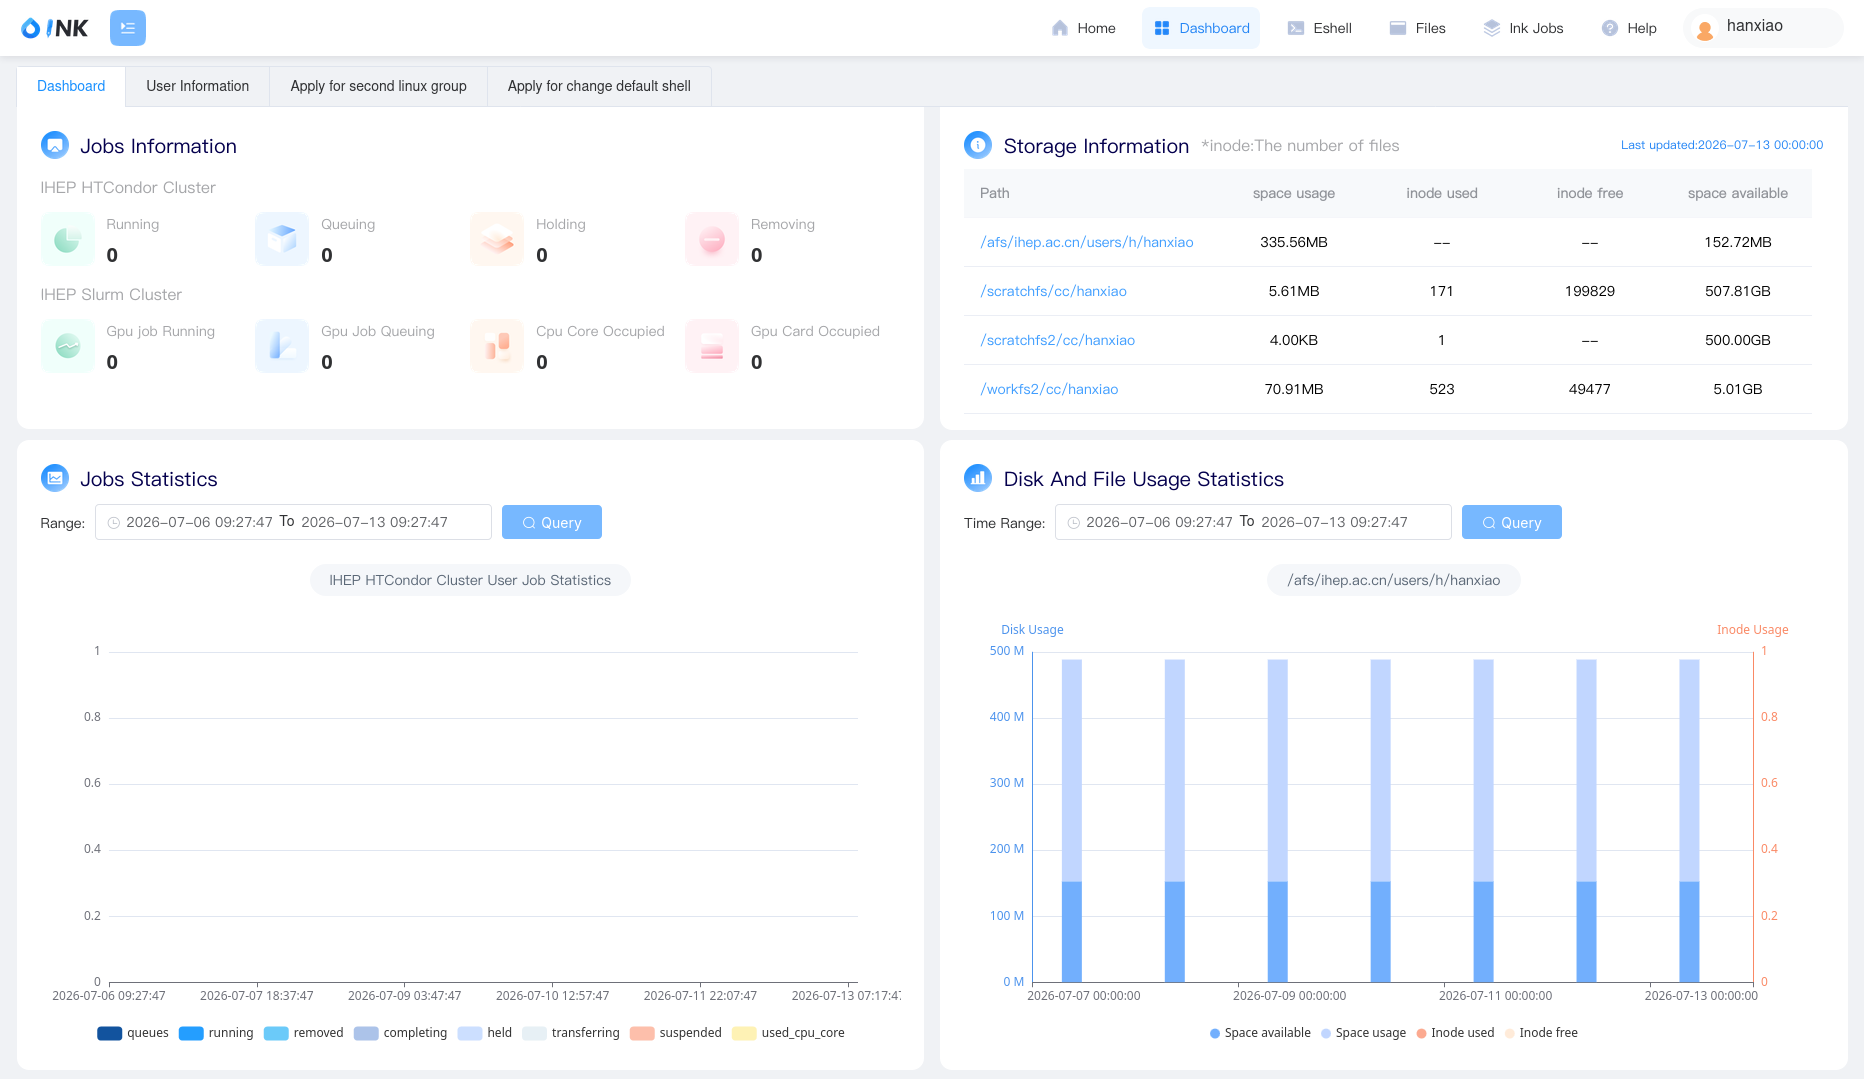
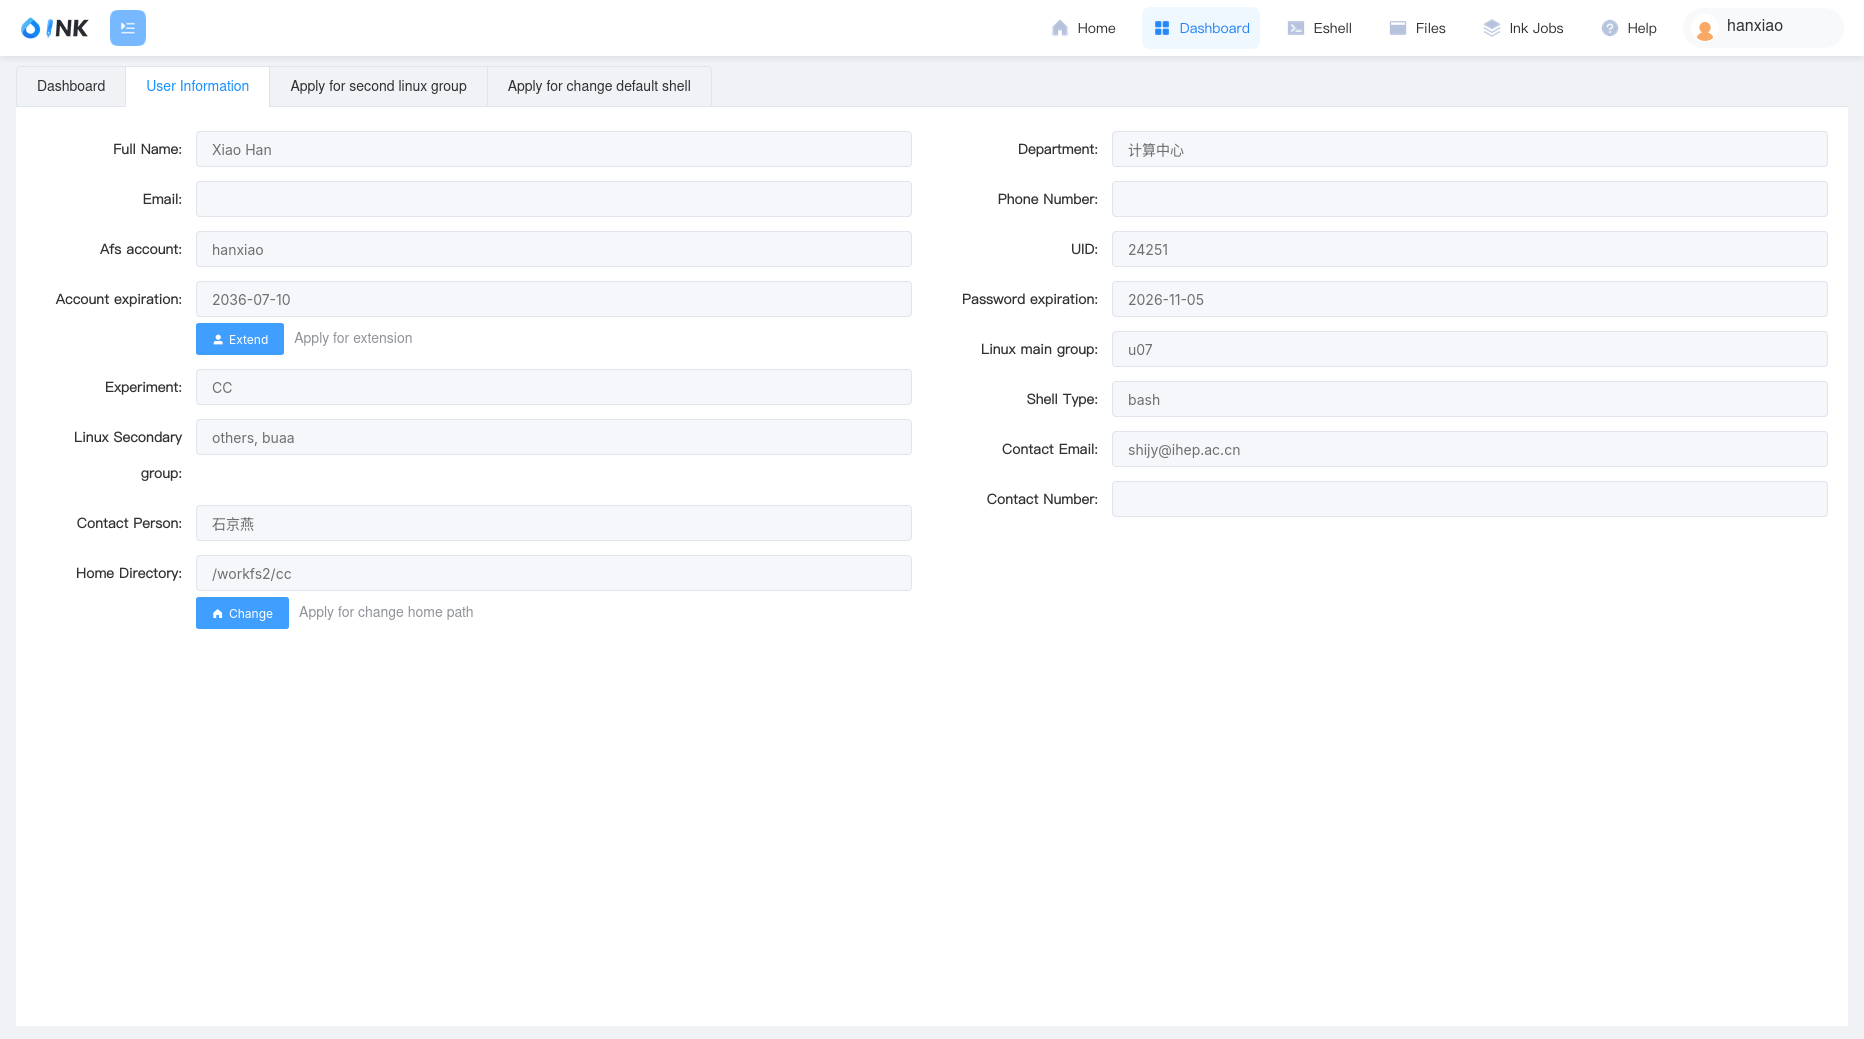
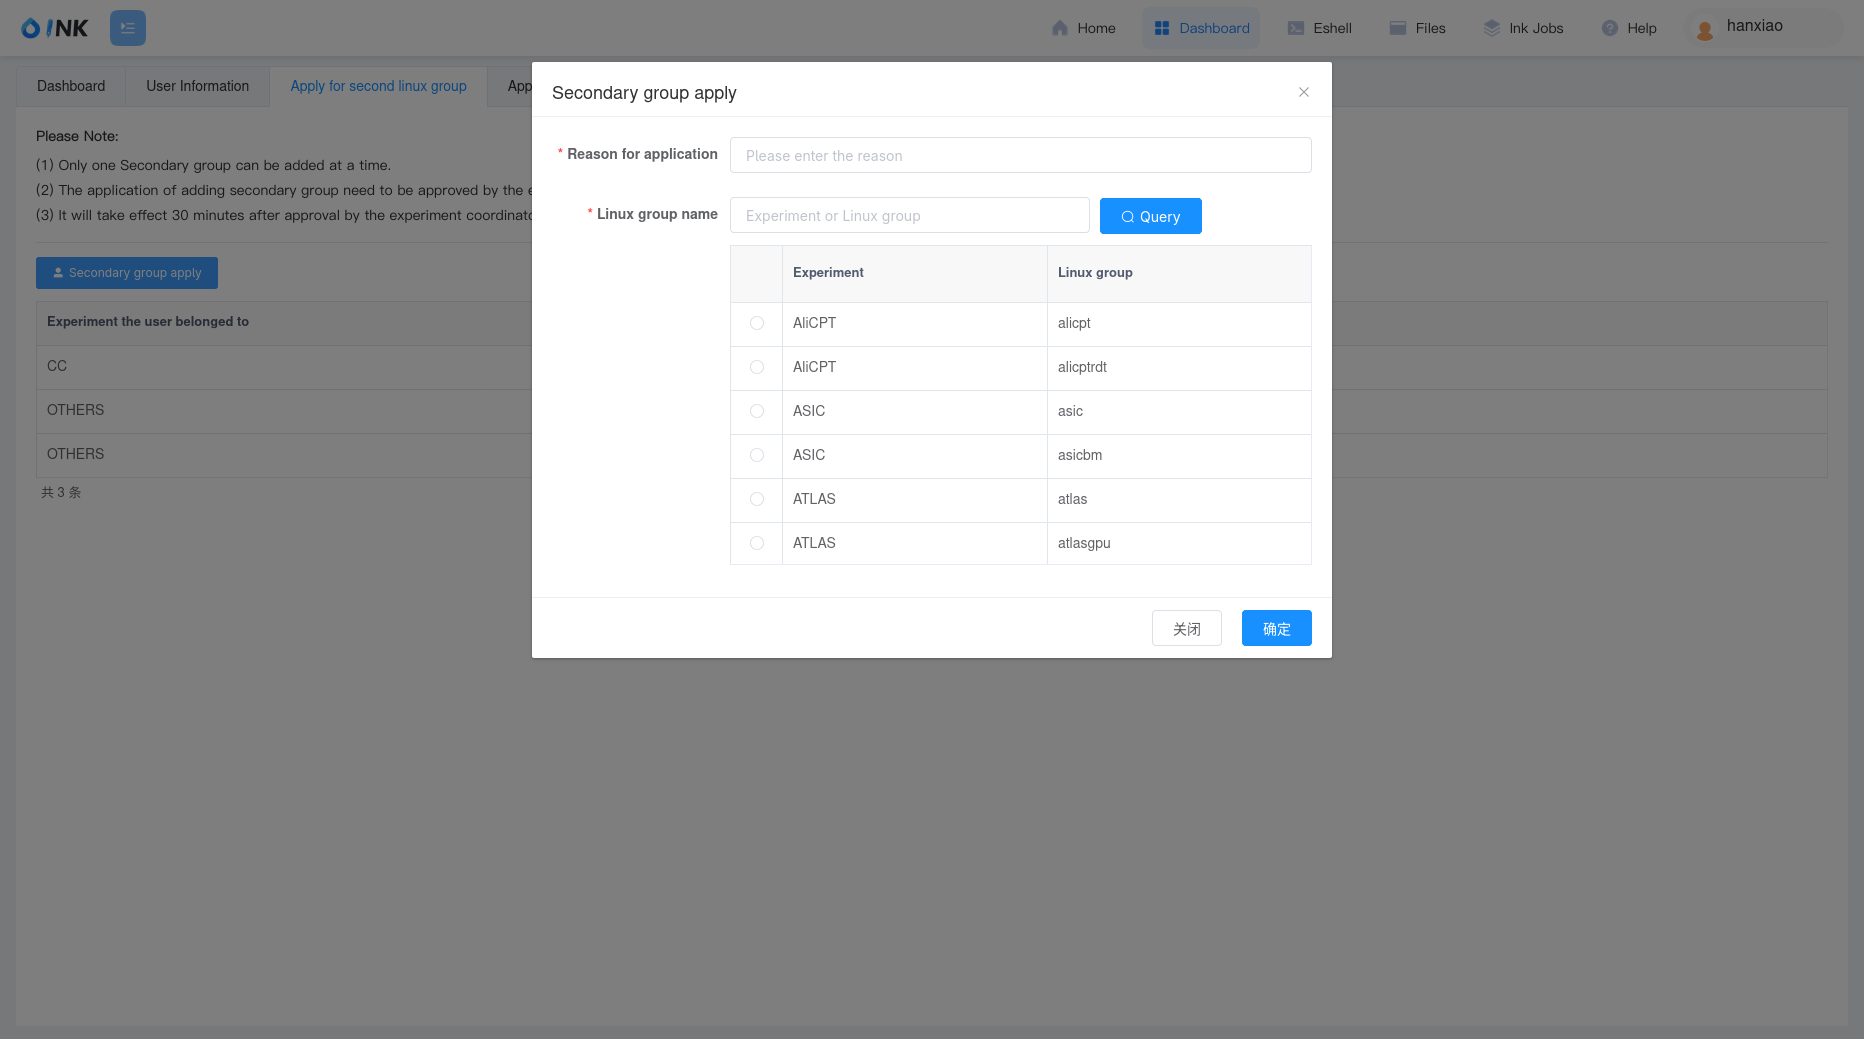
Click the Dashboard icon in the top-right corner or the Services section to access the Dashboard page, which includes five tabs:
-
Dashboard : View cluster job status and storage usage.
-
User Information : Extend account, change home directory, etc.
-
Apply for second linux group : Apply to add secondary groups.
-
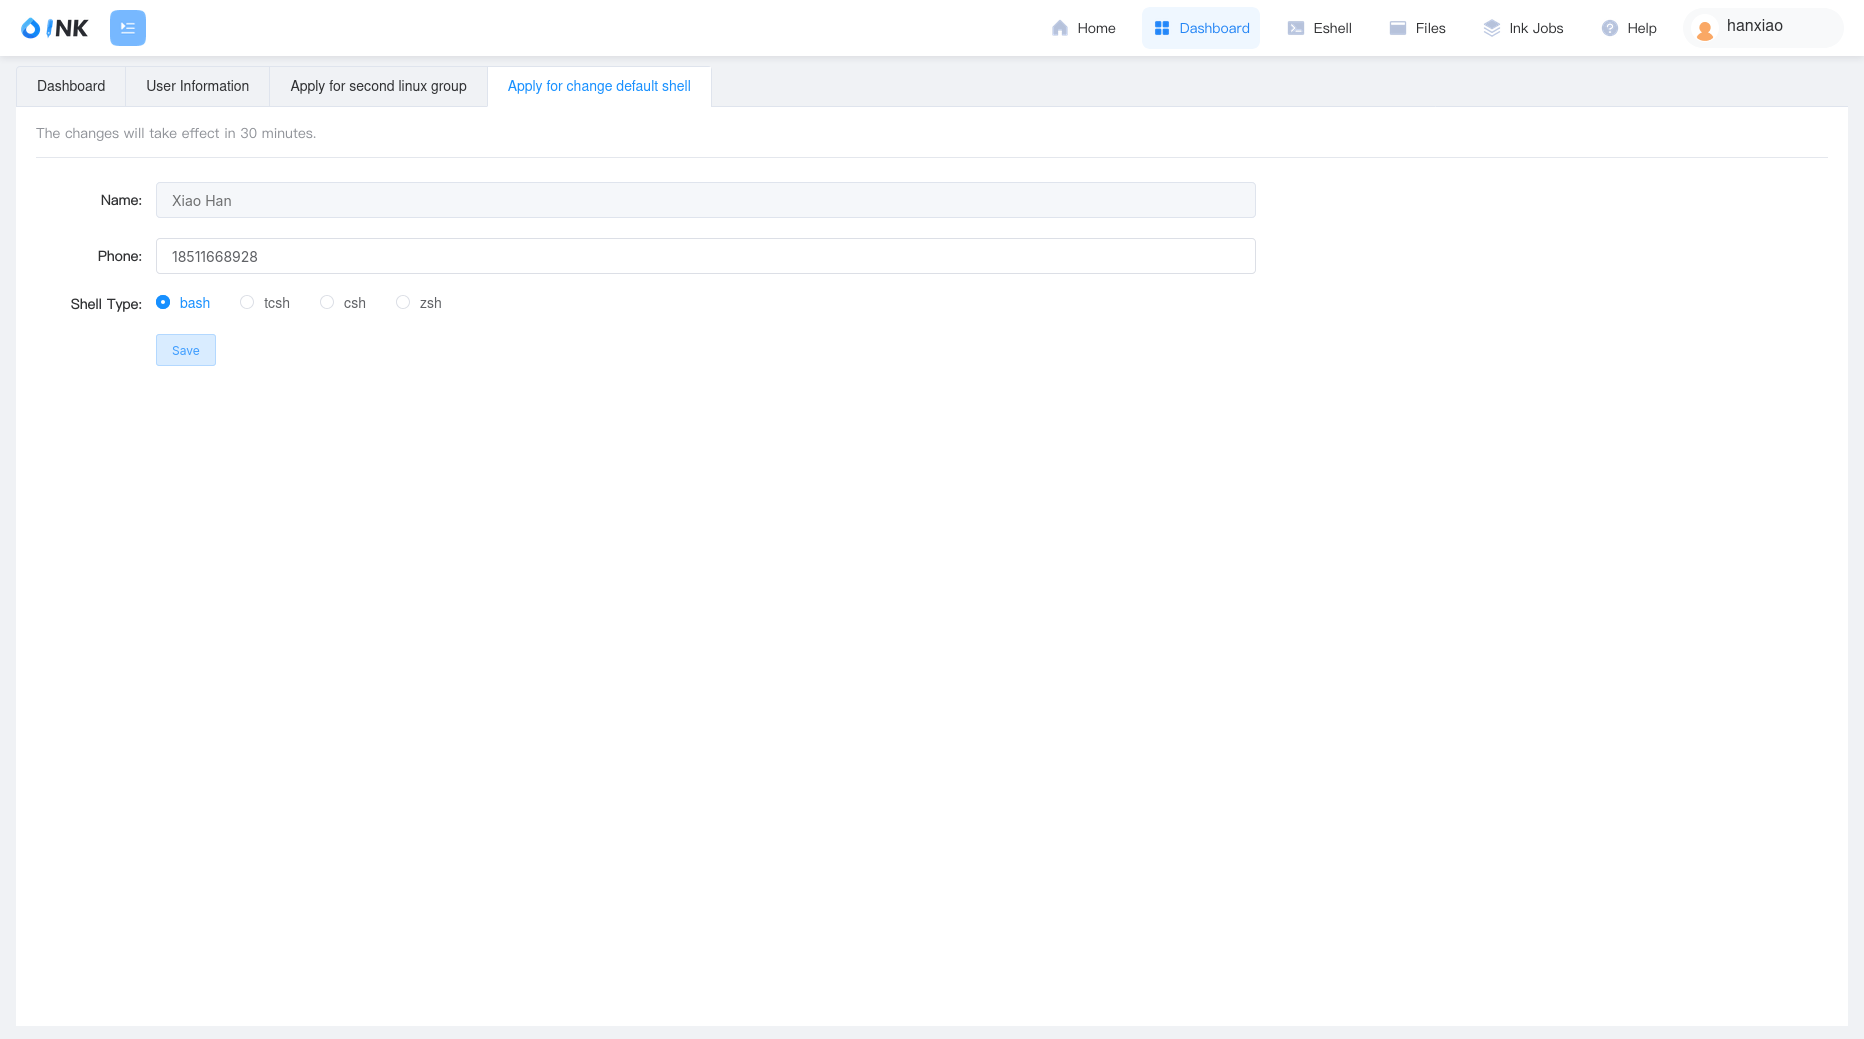
Apply for change default shell : Change default shell type (bash, tcsh, csh, zsh).
-
AFS ACL Recovery : Reset ACL permissions under your AFS home directory.
The initial ACL for files and directories under your AFS home is rlidwka, where a (administer) allows you to manage ACLs on your own. If you accidentally remove the a permission from your own ACL entry on a directory, you will lose the ability to restore it on your own.
To recover, enter the directory path in this tab and click Check to inspect the current ACL settings. If your own ACL entry is missing or incomplete (less than full rlidwka rights), click Reset to restore your owner permissions. The operation only affects your own ACL entry and never touches system or group permissions.
6.2.6 EShell
A web-based terminal for accessing login nodes. Click the EShell icon in the top-right corner or the Services section.
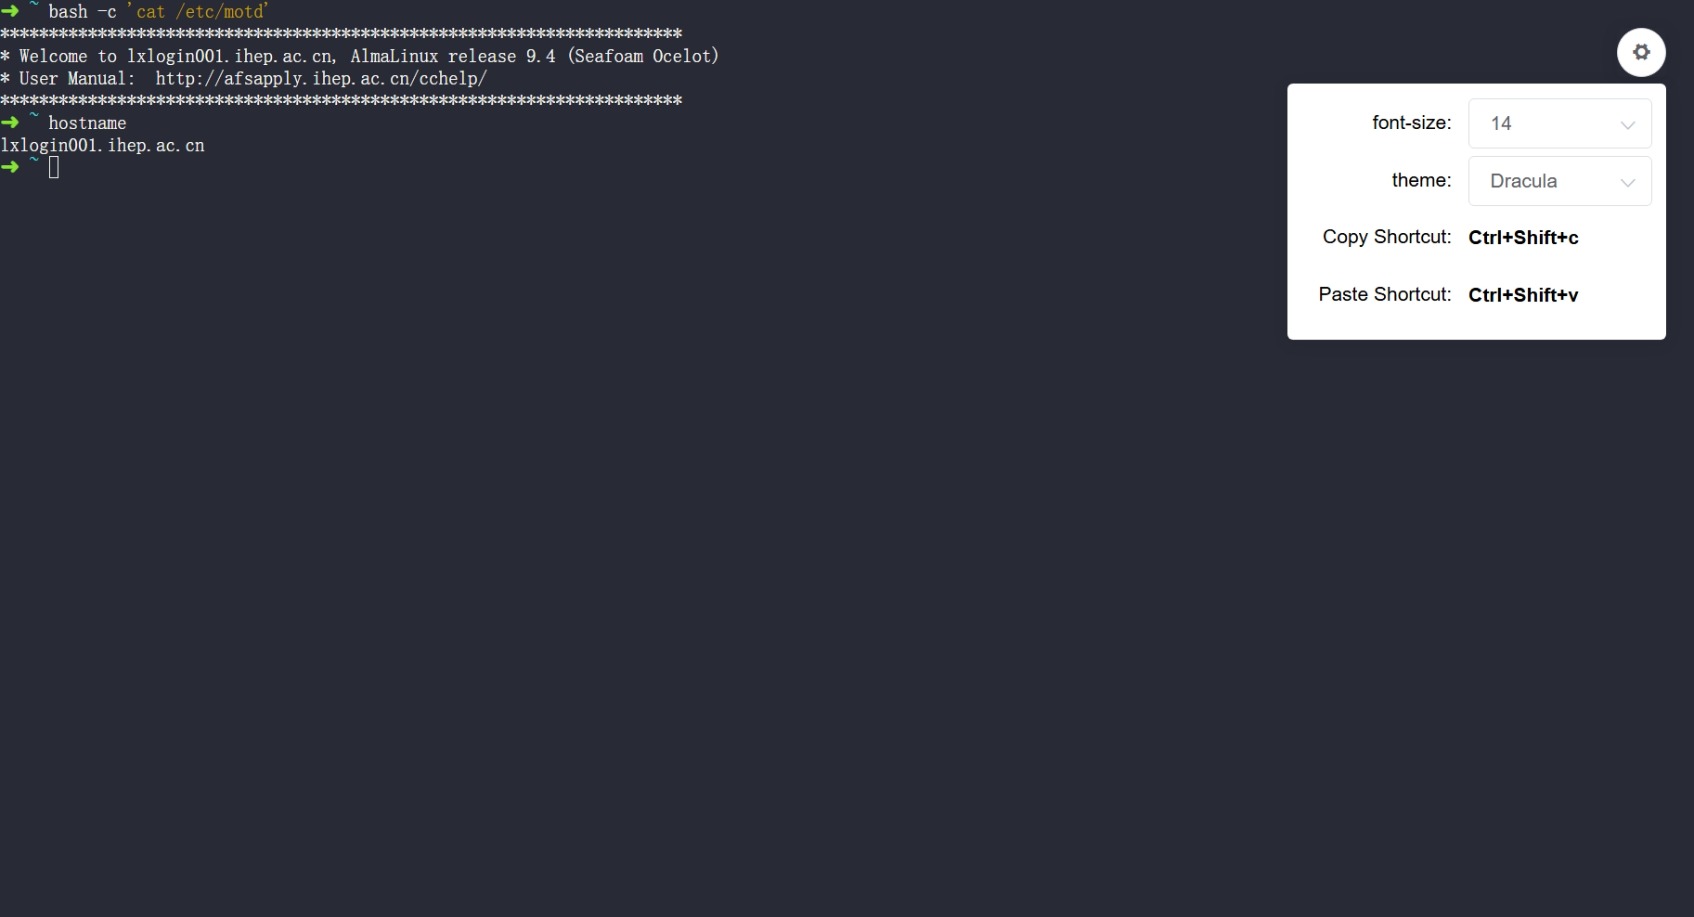
You can use Ctrl + Shift + C to copy and Ctrl + Shift + V to paste. You can also click the settings button in the top right corner to adjust the font size and theme color.
6.2.7 Mattermost Channel
A communication platform for cluster users: https://mattermost.ihep.ac.cn/signup_user_complete/?id=k3rkdozw43frxf4bgtgeho7wqw&md=link&sbr=su
6.3 Interactive Application Details
6.3.1 VSCode
A code editor supporting C/C++, Python, Java, JavaScript, etc. Users can edit files, submit jobs, and view results. INK runs VS Code on computing nodes using the code-server service. After clicking "Connect", the web-based VS Code interface will open. Some browser extensions may interfere with key inputs; it is recommended to disable such plugins on ink.ihep.ac.cn.
Plugins & Internet Access:
Compute nodes have internet access. Install plugins directly via the marketplace.
Limitations: Since code-server is an SSH-based VS Code, some plugins (e.g., GitHub Copilot, Remote SSH, vscode-pdf) are unsupported. If you need unsupported features, consider using ENode instead.
AI Code Assistant:
INK supports AI-assisted coding to improve research efficiency. Many VS Code plugins provide this functionality (Example: Tencent Cloud AI Code Assistant):
-
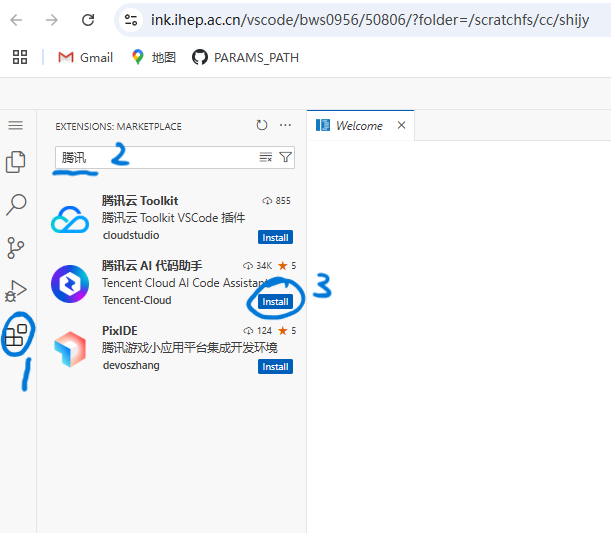
Step 1-3: Open the Extensions panel in VS Code. Install the plugin by searching for "Tencent Cloud AI Code Assistant".
-
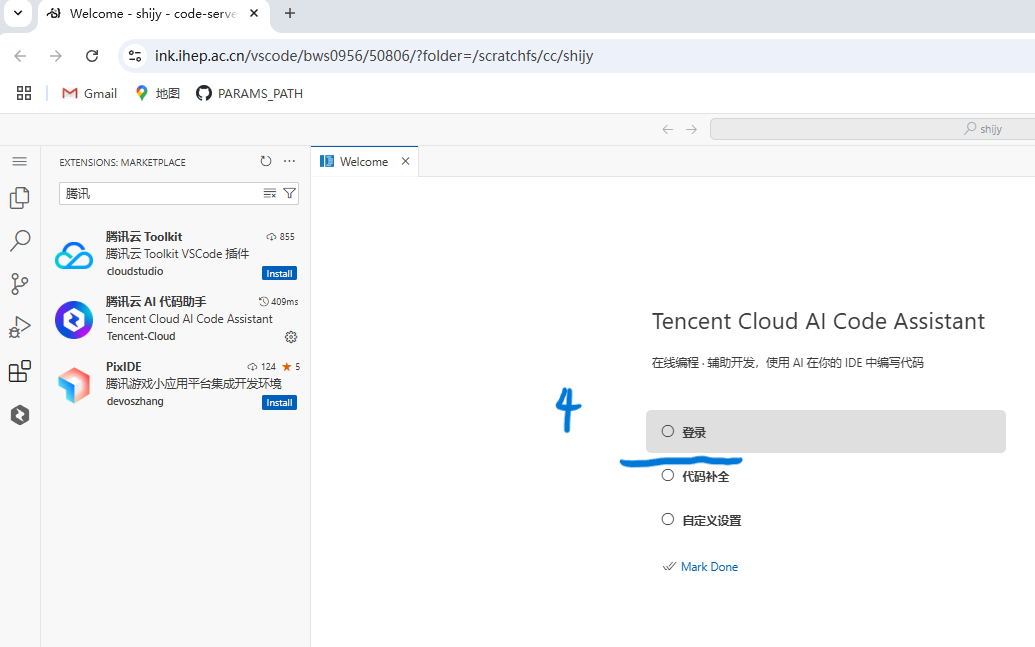
Step 4: Click Login and complete registration on Tencent Cloud.
-
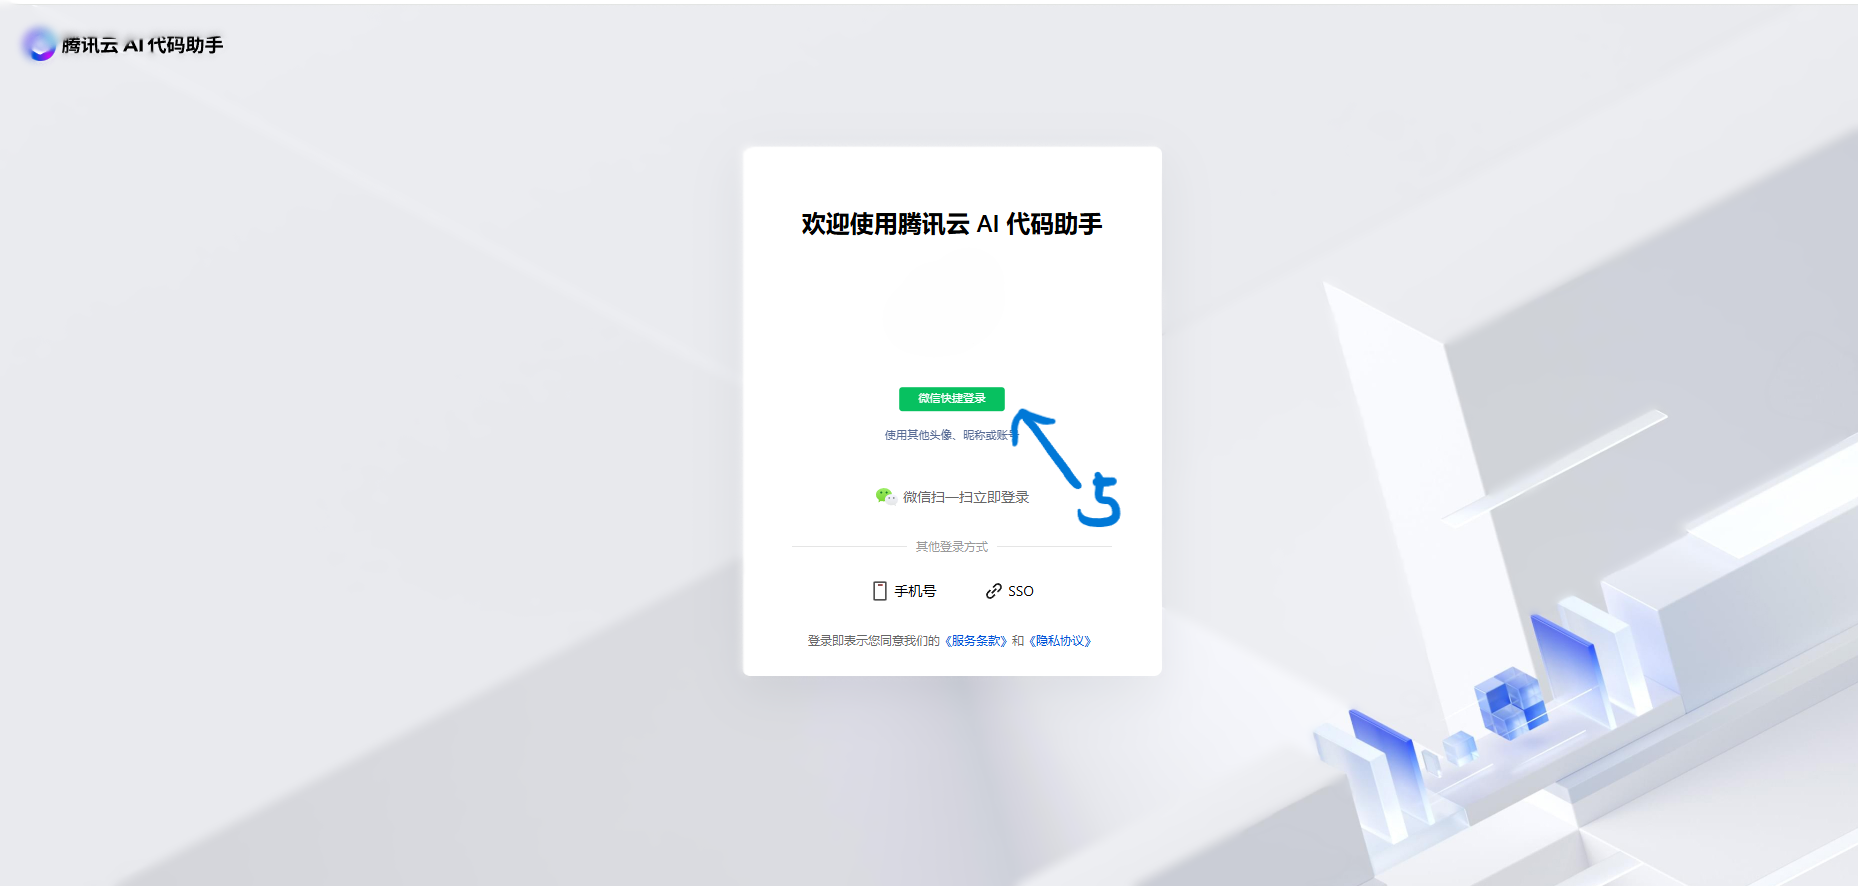
Step 5: Register and log in to Tencent Cloud.
-
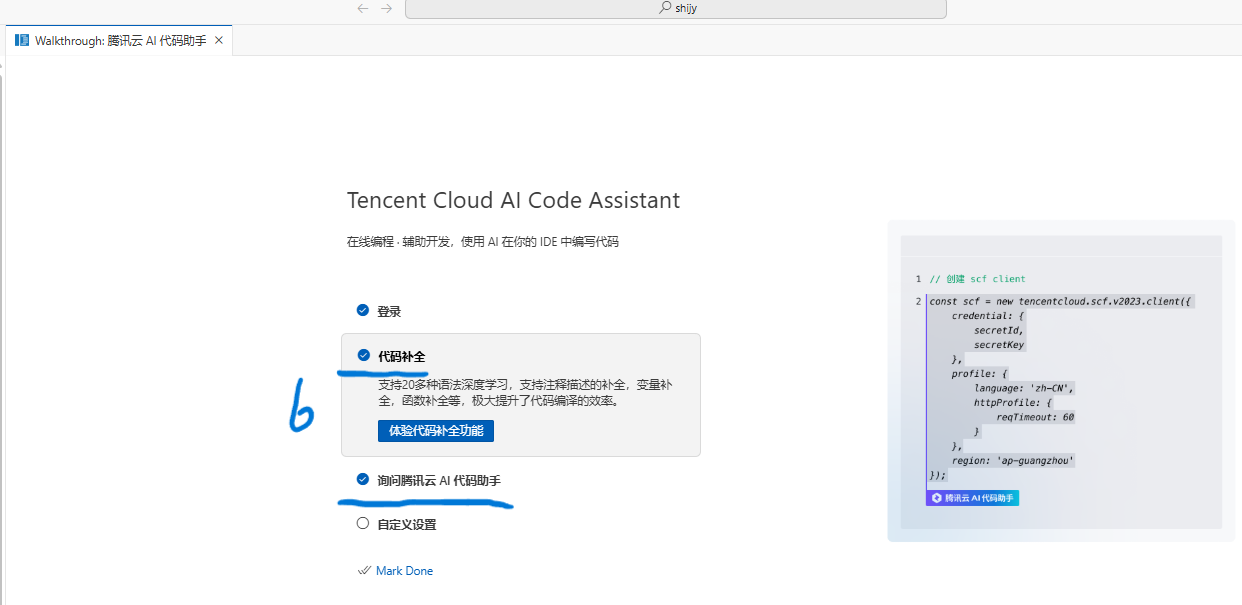
Step 6: Return to the VS Code tab and enable code completion and AI assistance.
-
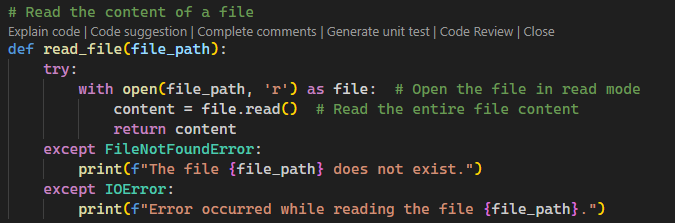
Step 7: Use AI suggestions during coding in VSCode. Suggestions include: explaining functions, providing suggestions, auto-generating comments, generating test cases, code reviews and intelligent completion.
For details and more features: https://open-vsx.org/extension/Tencent-Cloud/coding-copilot
6.3.2 Jupyter
A Python/ROOT interactive environment for code execution and file management.
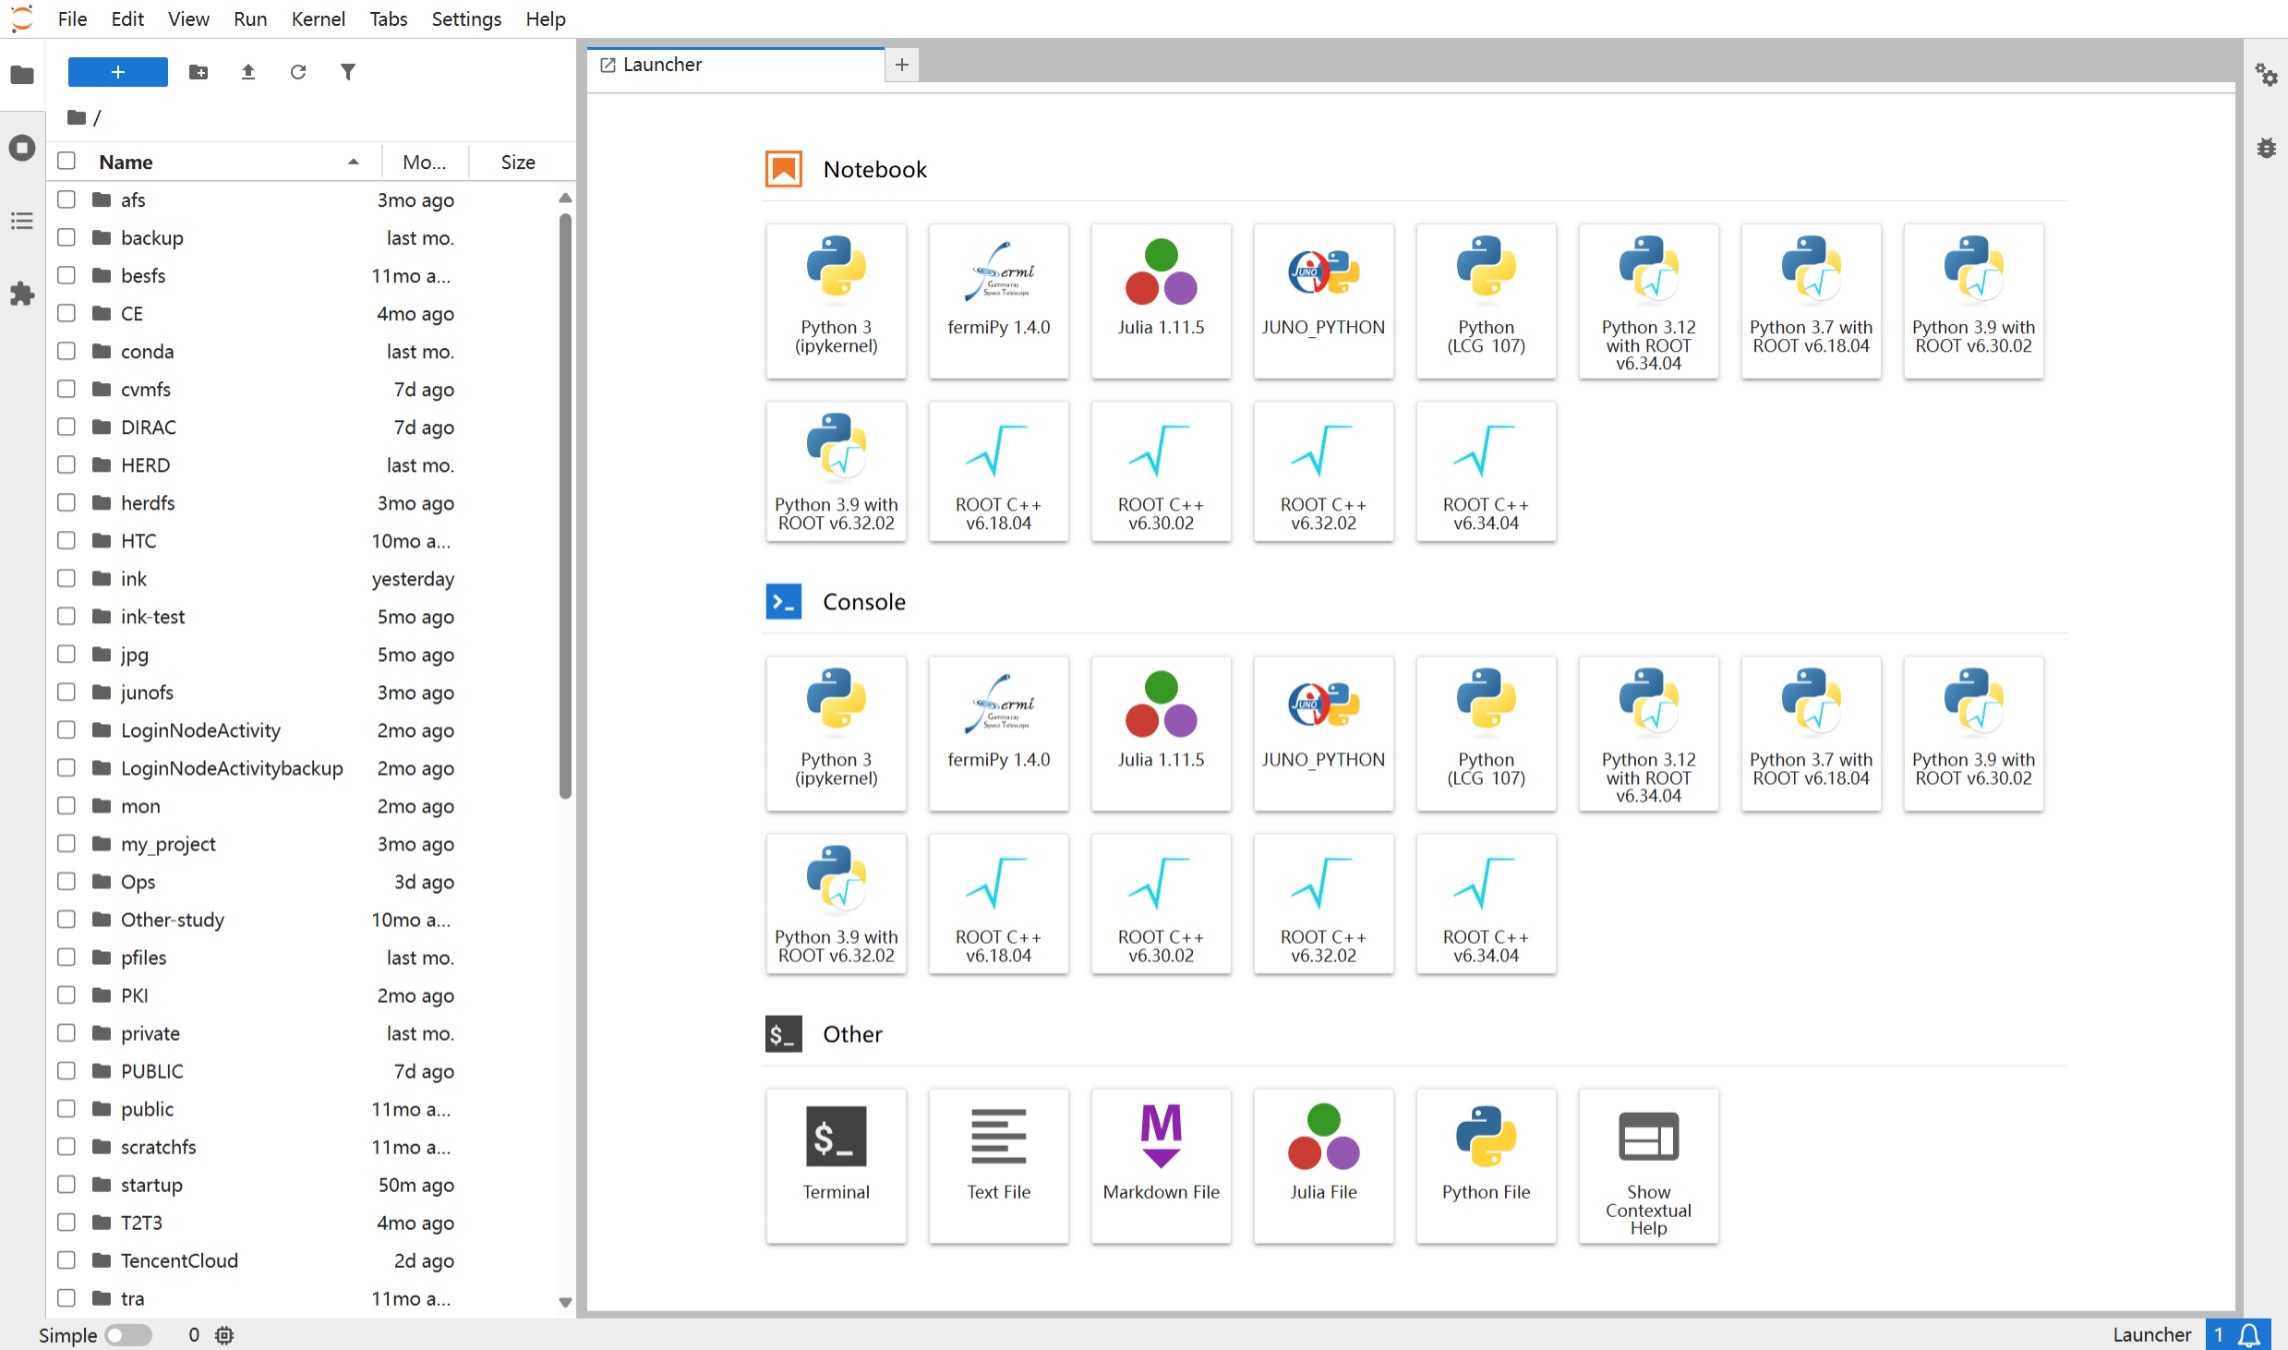
- Left Panel: File browser, command palette, and runtime management.
- Workspace: Multi-tab support for notebooks, documents, and terminals.
- Top Menu: File operations, code execution, and export options (e.g., HTML/PDF).
- Terminal Access: Directly open a terminal from the + menu.
- Text Editor: Built-in editor for code/text files.
Kernel Selection:
INK-Jupyter offers a variety of scientific kernels for researchers to choose from. Users can also install custom ipykernels to meet the needs of different analysis scenarios. The available public kernels include:
| Kernel Name | Description |
|---|---|
| Python 3 (ipykernel) | Default kernel with various scientific Python packages |
| fermiPy 1.4.0 | Kernel with fermiPy 1.4.0 installed |
| Julia 1.11.5 | Kernel with Julia 1.11.5 |
| JUNO_PYTHON | Python kernel configured for the JUNO environment |
| Python (LCG_107) | Python kernel with LCG_107 environment |
| Python 3.12 with ROOT v6.34.04 | Python 3.12 kernel integrated with ROOT 6.34.4 |
| ROOT C++ v6.34.04 | C++ kernel for ROOT 6.34.4 |
If you have additional analysis requirements, you may contact the administrator to request installation.
Installing a Custom Jupyter Kernel
You can install your own Jupyter kernels under ~/.local/share/jupyter/kernels/, either using Python venv or conda environments:
# Create a virtual environment
python3 -m venv ~/venvs/mykernel

# Activate the environment
source ~/venvs/mykernel/bin/activate

# Upgrade pip and install necessary packages
pip install --upgrade pip

# Build your env: pip install something

# Install ipykernel
pip install ipykernel

# Register the kernel
python -m ipykernel install --user --name mykernel --display-name "Python (mykernel)"
6.3.3 RootBrowse
RootBrowse is a ROOT file browser tool that supports web-based file viewing, upload, download, and deletion. It also allows code execution and result visualization directly on the web interface.
The application utilizes the built-in ROOT::RBrowser() method from the latest ROOT software to launch a web-based RootBrowse. Compared to the legacy TBrowse (implemented via X11 and C++ GUI libraries), it retains similar usage patterns while significantly improving responsiveness and adding new features.
Note: RootBrowse uses one-time links . Refreshing or reusing the link address will fail. Users must click Connect in the INK Jobs interface to generate a new link. Links expire after 1 minute; repeated clicks within this interval may also fail. This feature is available only in the new ROOT version and does not support CentOS7 systems .
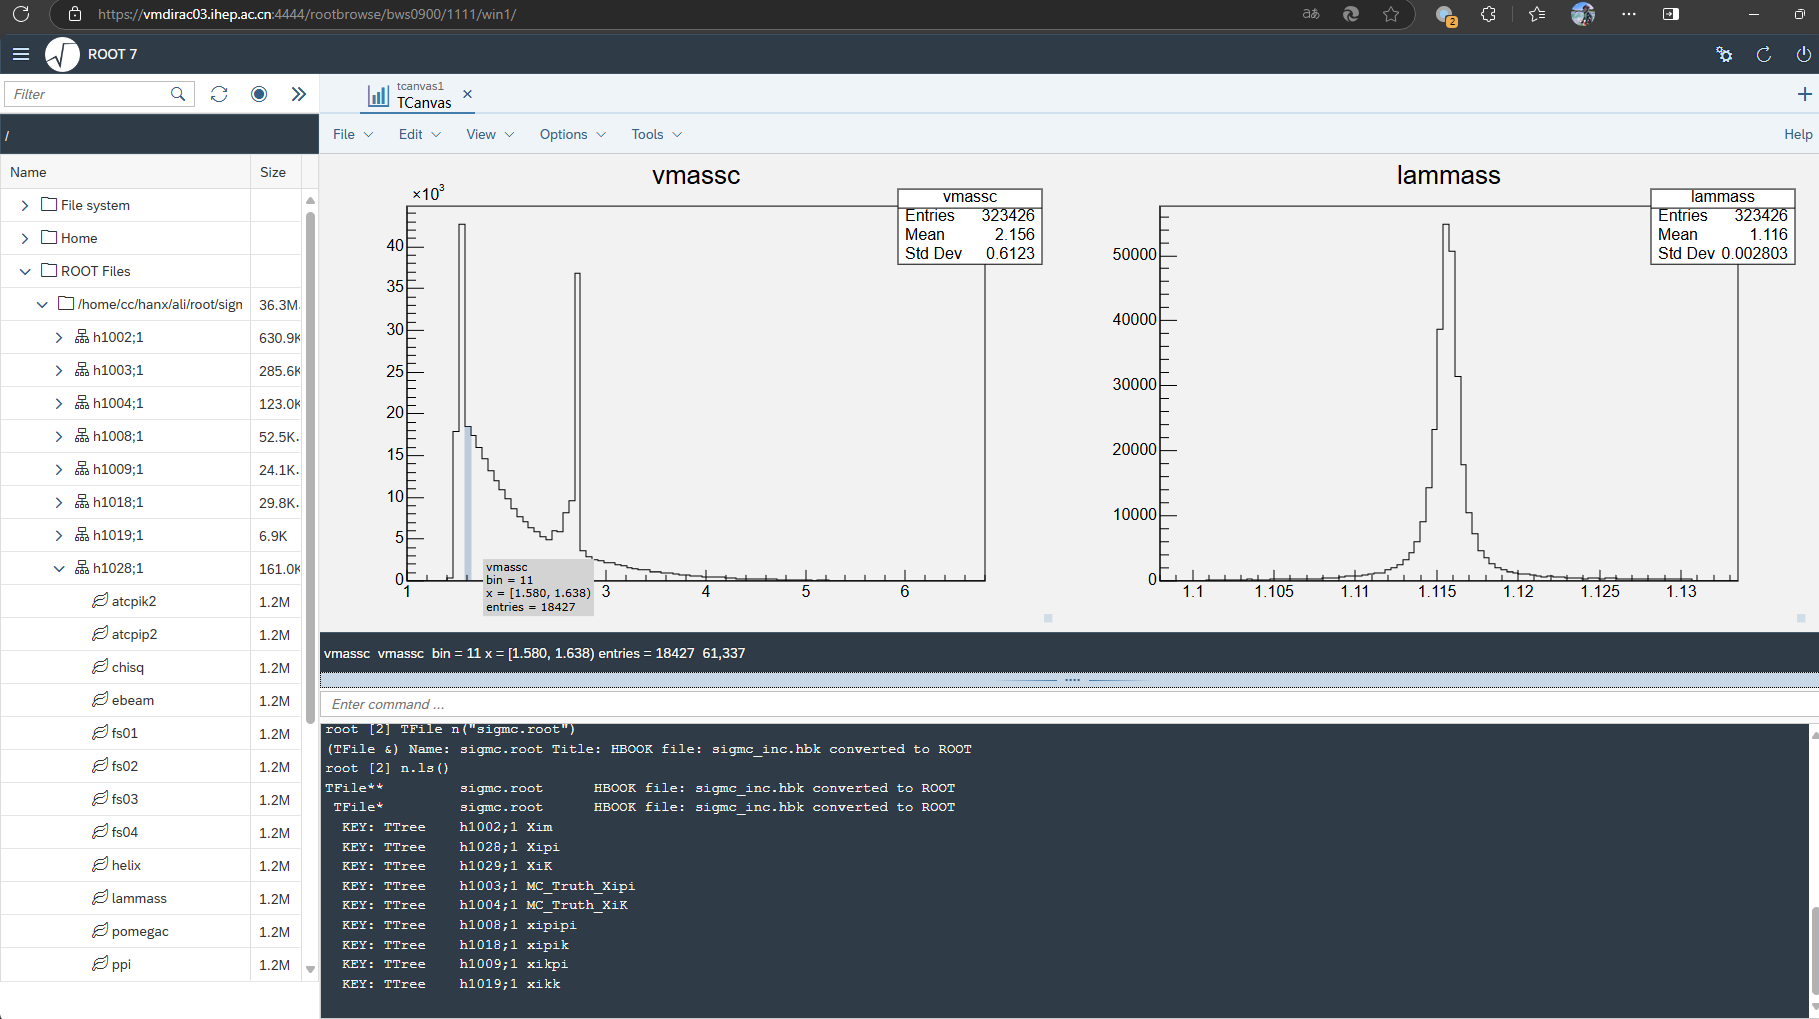
The RootBrowse application provides a web interface for browsing file systems and ROOT files. Users can open ROOT files, explore directory structures, and inspect objects.
Interface Details
- Sidebar : Displays the directory tree of the file system or ROOT file contents, enabling navigation through data structures. Users can select directories, files, or objects for further operations.
- Toolbar : Contains shortcut buttons for common actions (e.g., open file, save, refresh view).
- Workspace : Displays selected data objects with multiple view modes, including numerical tables, histograms, graphs, and other visualizations.
- Properties Panel : Shows detailed metadata and properties of selected objects, allowing modifications and settings adjustments.
Features
- Multi-File Support : Open and browse multiple ROOT files simultaneously, with seamless switching and data comparison.
- Dynamic Visualization : Interactive charts and visualization tools for real-time data adjustments. Supports common types like histograms, scatter plots, and curve plots.
- Scripting & Analysis : Integrated ROOT scripting capabilities for direct code execution and data analysis. Compatible with modern interfaces like RDataFrame.
- Search & Filtering : Advanced search functionality to quickly locate specific objects or datasets. Filter by metadata or content.
6.3.4 VNC
Web VNC is a remote desktop protocol that allows viewing files on a web page. It enables running code and viewing results by GUI directly in the web interface.
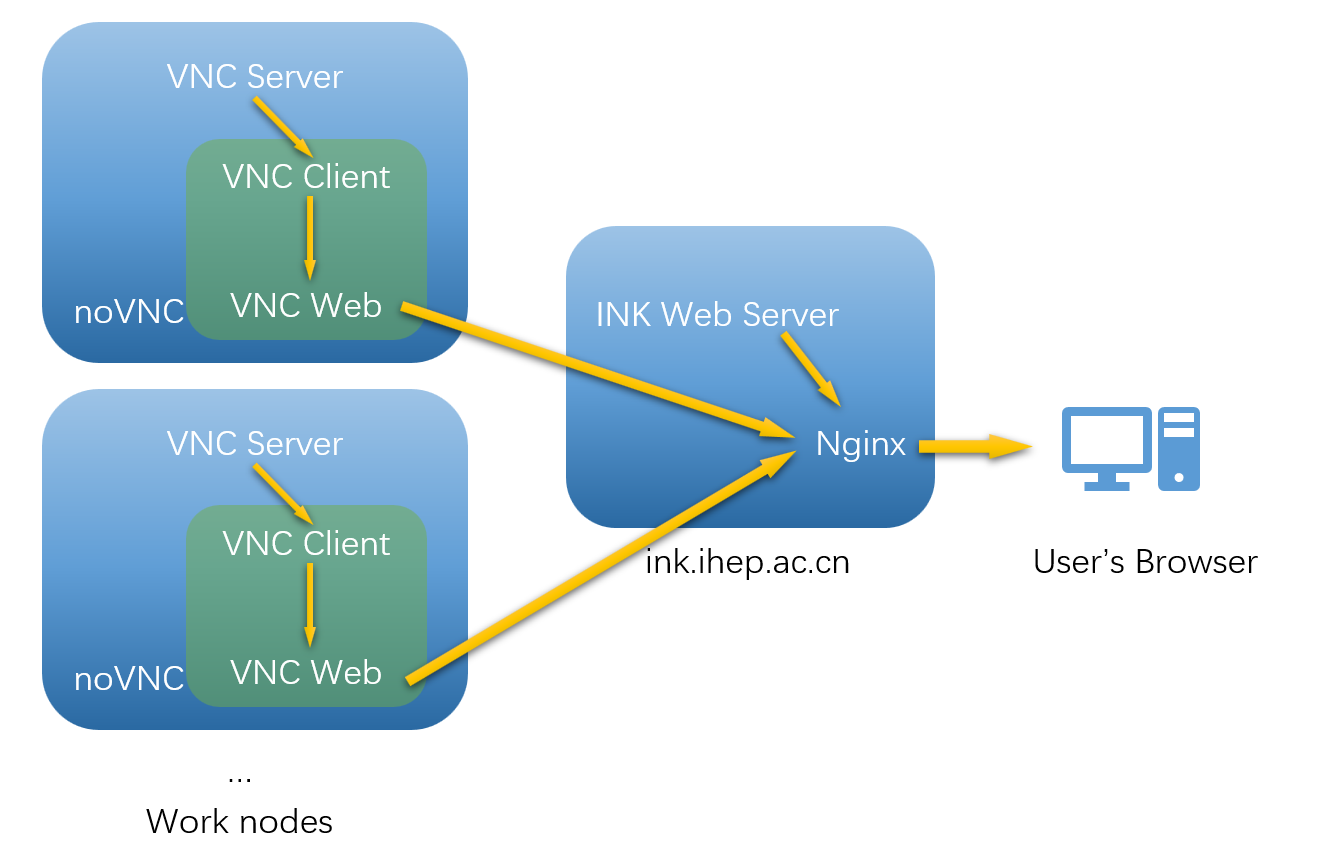
This application is based on a VNC Server service running on compute nodes, with noVNC acting as the client to connect and forward the service via a web server. The architecture is shown below:
Tips:
- The noVNC sidebar can be used to transfer clipboard content.
- Some browser extensions may intercept keystrokes. It is recommended to disable them on
ink.ihep.ac.cn.
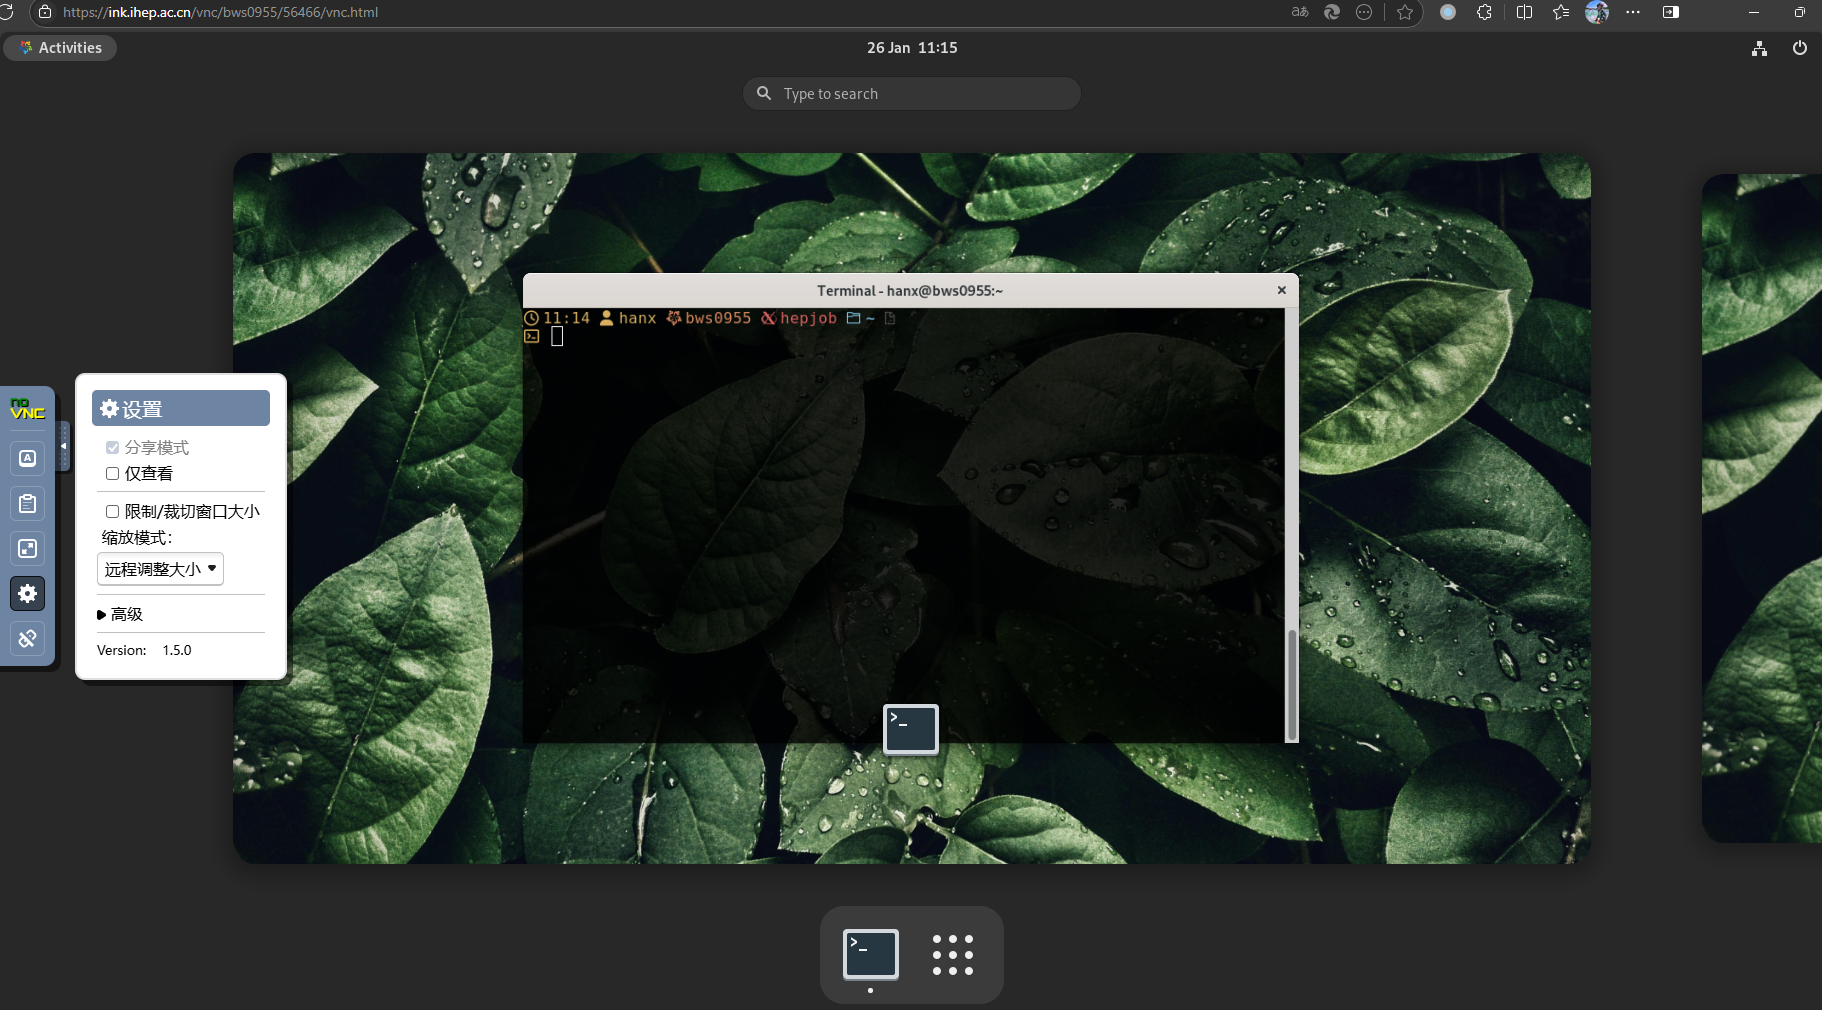
To install a desktop application, contact the administrator and provide details including the purpose, installation method, and other relevant information.
6.3.5 OpenClaw
OpenClaw is a web application for interactive programming, code understanding, and assisted analysis. It runs on compute nodes and provides an agent-like interface in the browser, suitable for reading code, writing scripts, executing commands, and working with local large-model-assisted tasks.
OpenClaw is started in the same way as other INK interactive applications: click the OpenClaw icon in the Application section on the homepage to submit a job, wait until the job becomes connectable in the Jobs list, and then click Connect to open the interface.
First Use and Model Configuration
When OpenClaw is used for the first time, you need to configure the model service first. The pop-up menu on the frontend usually contains the following items:
- Template : Select a preset model-service configuration. If the user has already saved a configuration before, the related template will be moved to the first position for easier reuse.
- Base URL : The endpoint address of the model service. OpenClaw connects to the selected provider through this address.
- API Key : The credential required to access the model service, used for authentication.
- API Name : The API protocol type used by the model service, such as
openai-completionsoranthropic-messages. - Model ID : The actual model name or identifier to use, for example
hepai/deepseek-v3.2. - Mount experiment data : Whether to mount experiment data directories into the job.
After the user confirms the configuration, the system synchronizes the model settings to the personal OpenClaw workspace. When OpenClaw is started again later, the system will preferentially load the user's last valid saved configuration.
IHEP Local Customization and Data Security
OpenClaw in INK is specially adapted for the IHEP environment, with the following main features:
- Several preset templates are provided for quickly selecting commonly used model services.
- Previously saved user configurations are displayed with higher priority in the template list, reducing repeated input.
- The OpenClaw connection URL uses token-based authentication. After entering through Connect in INK, users generally do not need to complete device pairing manually.
- User settings are stored in the OpenClaw directory under the personal scratch workspace and can be reused by later jobs.
When Mount experiment data is disabled, users may use either local models or external model services. When this option is enabled, the system allows only IHEP local models, in order to prevent experiment data from being transmitted to external model services. The current local-model pattern is generally:
Base URL = https://aiapi.ihep.ac.cn/apiv2Model IDstarts withhepai/
If experiment data mounting is enabled but the configured model does not satisfy the above conditions, the system will reject the configuration.
Usage Recommendations
- If you need to process experiment data, internal code, or other sensitive content, it is recommended to use IHEP local models and enable Mount experiment data .
- If you are only doing general code generation, text organization, or processing public information, you may choose external model services as needed.
- After the model configuration is changed, the new configuration will continue to take effect in later OpenClaw sessions.
- If the job has started but is not connectable yet, use Refresh on the Jobs page and wait until Connect appears.
6.3.6 opencode (Code Assistant)
opencode is a web-based AI coding assistant built from the Opencode v1.17.16 PR branch (anomalyco/opencode#28326, which adds --base-path support), running on compute nodes and providing interactive programming capabilities including code understanding, editing, and command execution through the browser.
opencode is started in the same way as other INK interactive applications: click the opencode icon in the Application section on the homepage to submit a job, wait until the job becomes connectable in the Jobs list, and then click Connect to open the interface.
Adding a Project
When using opencode for the first time, you need to add a project directory. Click the Add Project button on the main interface and select or enter the project path.
Note : Do not use directories that are too large (such as
/afs/ihep.ac.cn/users/.../or~/) as the project root. An oversized project will cause excessive memory usage, and the Slurm job may be held. Additionally, project paths do not support symbolic links, and some users may experience page crashes when selecting~/. If this happens, you can recover by clearing the browser's site storage data for that URL:
- Chrome : Open the opencode page → Press F12 → Application → Storage → Click "Clear site data"
- Firefox : Open the opencode page → Press F12 → Storage → Right-click the URL → "Delete All"
Starting a New Session
Click New Session on the project page to start a new conversation. Each session independently saves its conversation history, allowing users to create multiple sessions for different tasks and switch between working contexts.
Connecting a Model
Click Settings in the session interface to configure the model service:
- Base URL : The model service endpoint. For IHEP local models, use
https://aiapi.ihep.ac.cn/apiv2 - API Key : The authentication key for the model service
- Model : Select the model to use. IHEP local model IDs start with
hepai/
Additionally, opencode officially provides the free model service OpenCode Zen , which includes open-source models such as deepseek and minimax, with Big Pickle as the default model. See the OpenCode Zen documentation for configuration details. Note : OpenCode Zen uses overseas model providers — if you need to process sensitive information (experimental data, internal code, etc.), consider using IHEP local models instead.
Conversation and Approval
Once configured, you can enter instructions in the chat input. opencode automatically invokes tools (reading/writing files, executing commands, etc.) based on the task type. For convenience, opencode uses a permissive permission policy by default — file read/write operations and shell command execution within the project require no approval and run automatically. The approval mechanism is only triggered when accessing paths outside the project (external_directory) or when a doom loop (same action repeated 3 times) is detected. Users can also customize permission rules in the configuration file.
Build Mode vs. Plan Mode
opencode provides two working modes:
- Plan Mode : Read-only mode. The AI only performs analysis, planning, and answering, without executing any file modifications or commands. Suitable for code reading, design planning, and similar scenarios.
- Build Mode : Full mode. The AI can read files, execute commands, modify code, etc. Suitable for actual code development and debugging.
Users can switch modes via instructions in the chat or through the interface button.
Note : opencode v1.18.0 and later adopt a new interface layout, so the mode-switching entry point has changed. Users are advised to enable Show Agents under Settings → General → Advanced , so that the build/plan modes are visible and switchable in the session interface, avoiding unnecessary erroneous operations.
Default Execution Permissions
opencode uses a permissive default permission policy — most operations run automatically without approval:
read/edit/bash/glob/grepetc.: defaultallow(runs automatically), with.envfile reads denied by defaultexternal_directory: accessing paths outside the project working directory, defaultask(requires approval)doom_loop: detecting the same action repeated 3 times consecutively, defaultask(requires approval)
Users can customize permission rules in the project configuration file (opencode.json) via the permission field, setting specific operations to allow / ask / deny. For detailed configuration, refer to the opencode permissions documentation.
Configuration and Data Storage
opencode stores configuration and data in the following paths:
- Global config :
~/.config/opencode/opencode.json - Project config :
opencode.jsonor.opencode/directory in the project root - Data storage :
~/.local/share/opencode/(contains authentication info, logs, session data, etc.) - Cache :
~/.cache/opencode/
Since the AFS home directory has a default quota of only 500MB, if the above paths grow too large, users can move the actual folders to other storage locations (e.g., /scratchfs) and create symbolic links at the original paths:
# Example: move opencode data directory to scratchfs
mv ~/.local/share/opencode /scratchfs/<group>/<username>/opencode_data
ln -s /scratchfs/<group>/<username>/opencode_data ~/.local/share/opencode
Session Isolation
opencode session data is stored under ~/.local/share/opencode/. If you use both INK's opencode Web version and the opencode CLI in a login node shell, and want to keep their sessions isolated from each other, you can set the XDG_DATA_HOME environment variable in the shell to specify a separate data directory:
# Use an isolated data directory in the shell
export XDG_DATA_HOME=/scratchfs/<group>/<username>/.local_share_cli
opencode
This way, the shell-based opencode will use /scratchfs/<group>/<username>/.local_share_cli/opencode/ as its data directory, keeping sessions completely separate from the INK Web version.
6.3.7 OpenChamber
OpenChamber is an open-source AI coding assistant platform whose functionality is basically the same as the opencode service described in 6.3.6. On the computing platform, OpenChamber runs as an INK interactive application on compute nodes, providing interactive coding capabilities such as code understanding, code writing, command execution, and debugging through the browser, which is well suited to daily code development and data analysis work.
How to Launch
OpenChamber is launched in the same way as other INK interactive applications: click the OpenChamber icon in the Application section on the homepage to submit a job, wait until the job becomes connectable in the Jobs list, and then click Connect to open the interface.
Note : The "Connect" button may not appear immediately after submission. Use "Refresh" to update the job status and enter once the interface is ready.
Adding a Project
When using OpenChamber for the first time, you need to add a project directory. Click the Add Project button on the main interface and select or enter the project path.
Note : Do not use directories that are too large (such as
/afs/ihep.ac.cn/users/.../or~/) as the project root. An oversized project will cause excessive memory usage, and the Slurm job may be held. Additionally, project paths do not support symbolic links, and some users may experience page crashes when selecting~/. If this happens, you can recover by clearing the browser's site storage data for that URL.
Starting a New Session
Click New Session on the project page to start a new conversation. Each session independently saves its conversation history, allowing users to create multiple sessions for different tasks and switch between working contexts.
Connecting a Model
Click Settings in the session interface to configure the model service:
- Base URL : The model service endpoint. For IHEP local models, use
https://aiapi.ihep.ac.cn/apiv2 - API Key : The authentication key for the model service
- Model : Select the model to use. IHEP local model IDs start with
hepai/
Additionally, OpenChamber also provides the free model service OpenCode Zen , which includes open-source models such as deepseek and minimax. See the OpenCode Zen documentation for configuration details. Note : OpenCode Zen uses overseas model providers — if you need to process sensitive information (experimental data, internal code, etc.), consider using IHEP local models instead.
Conversation and Approval
Once configured, you can enter instructions in the chat input. OpenChamber automatically invokes tools (reading/writing files, executing commands, etc.) based on the task type. For convenience, OpenChamber uses a permissive permission policy by default — file read/write operations and shell command execution within the project require no approval and run automatically. The approval mechanism is only triggered when accessing paths outside the project (external_directory) or when a doom loop (same action repeated 3 times) is detected. Users can also customize permission rules in the configuration file.
Build Mode vs. Plan Mode
OpenChamber provides two working modes:
- Plan Mode : Read-only mode. The AI only performs analysis, planning, and answering, without executing any file modifications or commands. Suitable for code reading, design planning, and similar scenarios.
- Build Mode : Full mode. The AI can read files, execute commands, modify code, etc. Suitable for actual code development and debugging.
Users can switch modes via instructions in the chat or through the interface button.
Default Execution Permissions
OpenChamber uses a permissive default permission policy — most operations run automatically without approval:
read/edit/bash/glob/grepetc.: defaultallow(runs automatically), with.envfile reads denied by defaultexternal_directory: accessing paths outside the project working directory, defaultask(requires approval)doom_loop: detecting the same action repeated 3 times consecutively, defaultask(requires approval)
Users can customize permission rules in the project configuration file (opencode.json) via the permission field, setting specific operations to allow / ask / deny. For detailed configuration, refer to the opencode permissions documentation.
Configuration and Data Storage
OpenChamber stores configuration and data in the following paths:
- Global config :
~/.config/opencode/opencode.json - Project config :
opencode.jsonor.opencode/directory in the project root - Data storage :
~/.local/share/opencode/(contains authentication info, logs, session data, etc.) - Cache :
~/.cache/opencode/
Since the AFS home directory has a default quota of only 500MB, if the above paths grow too large, users can move the actual folders to other storage locations (e.g., /scratchfs) and create symbolic links at the original paths:
# Example: move OpenChamber data directory to scratchfs
mv ~/.local/share/opencode /scratchfs/<group>/<username>/opencode_data
ln -s /scratchfs/<group>/<username>/opencode_data ~/.local/share/opencode
Session Isolation
OpenChamber session data is stored under ~/.local/share/opencode/. If you use both INK's OpenChamber Web version and the opencode CLI in a login node shell, and want to keep their sessions isolated from each other, you can set the XDG_DATA_HOME environment variable in the shell to specify a separate data directory:
# Use an isolated data directory in the shell
export XDG_DATA_HOME=/scratchfs/<group>/<username>/.local_share_cli
opencode
This way, the shell-based opencode will use /scratchfs/<group>/<username>/.local_share_cli/opencode/ as its data directory, keeping sessions completely separate from the INK Web version.
6.4 FAQ
-
Job Submission Failure
If a user's rc files (
.bashrc,.tcshrc, etc.) contain blocking input or similar commands, INK may fail to submit jobs or create files under the user's identity.Solution: Add a safeguard in the rc file to exit when the session is non-interactive. Example code for each shell:
- BASH
- ZSH
- TCSH/CSH
-
Kerberos error after initial login

Solution: Click the avatar at the top right corner to log out, close the browser and log in again.
See FAQ for more.
有问题?输入后跳转到对话页继续交流