9.2.3 University of Science and Technology of China
1 University of Science and Technology of China Computing Environment
The USTC computing platform runs an HTCondor cluster with about 2000 CPU cores and more than 30 GPU cards. The Lustre file system provides multiple file storage services for experiment groups and individual users, with total storage resources of about 3.9 PB.
Computing resource usage and limits for each experiment:
| Group | Group quota | Default quota |
|---|---|---|
| ATLAS | 100 | 70 |
| BESIII | 400 | 300 |
| BELLE | 50 | 35 |
| CMS | 100 | 70 |
| HIC | 100 | 70 |
| JLAB | 50 | 35 |
| NAPE | 50 | 35 |
| STCF | 460 | 360 |
Storage directories:
| Directory | Purpose | Access Entry (Client) | Capacity |
|---|---|---|---|
| /home | User home directory | All nodes | 28 TB |
| /ustcfs | Experiment data | All nodes | 1.2 PB |
| /ustcfs2 | Experiment data | All nodes | 639 TB |
| /ustcfs3 | Experiment data | All nodes | 2.0 PB |
1.1 Login Nodes
Login nodes are the only entry point for users to access the computing platform. Users edit files, debug programs, and submit jobs on login nodes. After logging in successfully with an account and password, users can access the corresponding computing resources.
| No. | Login Node OS | Quantity | IP |
|---|---|---|---|
| 1 | AlmaLinux 9.4 (64 bit) | 1 | 202.141.163.220 |
| 2 | AlmaLinux 9.4 (64 bit) | 1 | 202.141.163.221 |
| 3 | AlmaLinux 9.4 (64 bit) | 1 | 202.141.163.222 |
1.2 SSH Login to the Cluster
This section describes how to log in to the cluster through SSH on Linux, Windows, and macOS.
1.2.1 Linux
On Linux, the easiest way is to log in to the cluster directly from a terminal through SSH.
1.2.2 macOS
The login method on macOS is the same as the Linux method.
1.2.3 Windows
Windows does not include a native SSH client in older versions, so third-party software is needed. Windows 10 includes a native SSH client, and OpenSSH can be added through optional features.
1) SSH Clients
Common SSH clients on Windows include:
- PuTTY - A classic and lightweight SSH client.
- MobaXterm - Includes X server and SSH support, with tabbed sessions.
- Solar-PuTTY - A PuTTY-based client with tab support.
- WinSCP - A convenient SSH and file transfer client.
- Bitvise SSH - A free SSH client.
- Xshell - Commercial software with free personal and educational editions.
- SSH Shell Client
- WSL for Windows - One of the preferred options on Windows 10, providing a complete Linux terminal environment.
2) Login Example
The following example uses PuTTY to demonstrate cluster login.
-
Download and install PuTTY from the official website.
-
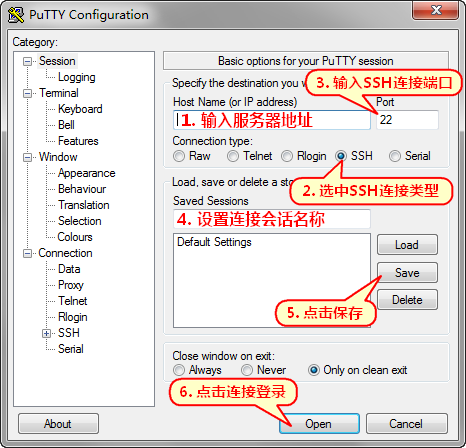
Open PuTTY, enter
user@hostnameinHost Name, and usually use port22. After filling in the information, clickSaveto save the session. If a saved session already exists, select it and clickLoad.
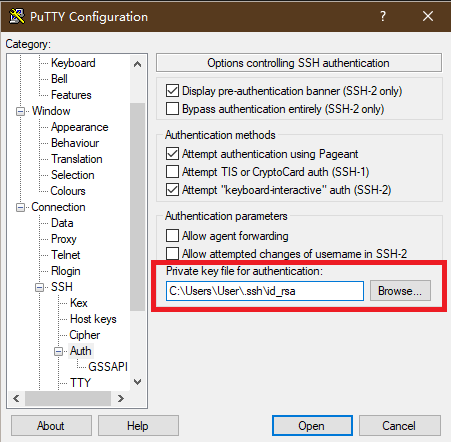
- To log in with a private key, set the private key path under
Connection->SSH->Auth.
- Click
Opento log in to the cluster. On first connection, PuTTY prompts for the server fingerprint. Choose yes or no. Choosing yes saves the fingerprint; choosing no does not. After saving the fingerprint, the same server will not prompt again. If it prompts again, the server fingerprint may have changed, for example after a system reinstall.
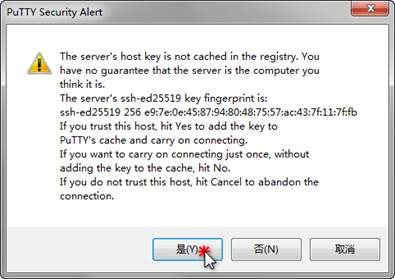
Figure 3.1-4 Ignore possible warnings during connection.
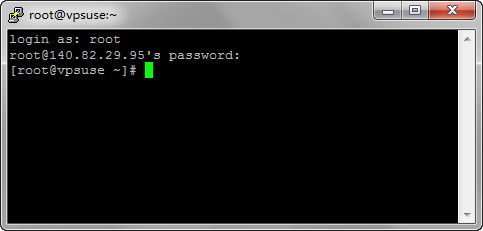
If no private key is selected, the system will ask for a password.
1.2.4 Password Change
Password security requirements:
- Do not use weak passwords. Use at least 10 characters and include four character types: uppercase letters, lowercase letters, numbers, and special characters. Do not include the username, personal information, common words, simple letter sequences, number sequences, or keyboard sequences.
- Do not use the same password as the site account on public external information systems such as WeChat, QQ, websites, or apps.
- Change passwords regularly. Changing once per year is recommended.
- Do not lend account passwords to others.
After logging in to a login node, run kpasswd to change the password.
1.3 Job Submission, Query, and Management
The cluster uses HTCondor as its job scheduling system. HTCondor supports high-throughput computing and is suitable for the current computing environment because it can quickly process large numbers of computing tasks.
Current cluster resources are listed below.
| Resource Type | Resource Quantity | Note |
|---|---|---|
| CPU | About 2000 cores | |
| GPU | 32 GPU cards | 4 nodes, 8 cards per node |
Queue and wall-time information:
| Group | Group quota | Default quota | Default wall time (hours) | Mid quota | Mid wall time (hours) | Long quota | Long wall time (hours) |
|---|---|---|---|---|---|---|---|
| ATLAS | 100 | 70 | 40 | 20 | 40 | 10 | 336 |
| BESIII | 400 | 300 | 40 | 50 | 40 | 50 | 336 |
| BELLE | 50 | 35 | 40 | 10 | 40 | 5 | 336 |
| CMS | 100 | 70 | 40 | 20 | 40 | 10 | 336 |
| HIC | 100 | 70 | 40 | 20 | 40 | 10 | 336 |
| JLAB | 50 | 35 | 40 | 10 | 40 | 5 | 336 |
| NAPE | 50 | 35 | 40 | 10 | 40 | 5 | 336 |
| STCF | 460 | 360 | 40 | 50 | 40 | 50 | 336 |
For other groups, refer to the JLAB quota and wall-time settings. In addition, the wall-time limit for GPU node jobs is 30 days.
1.3.1 Job Submission
Before submitting a job, prepare a JDL job description file. The JDL file must specify the job script path, standard output file, and standard error file. Submit the JDL file to submit the job.
- Example job script
test_job.sh(for demonstration only; use the actual script for real jobs):
#!/bin/bash


echo "This job is running on $(hostname)."


echo "We're doing a simple operation:"
result=$(expr 1 + 1)
echo " 1+1=$result"


echo "Job Done!"
Note: The script must have executable permission, especially when submitting jobs from a shared file system. Set executable permission with:
- Write the job description file
test_job.jdl:
# do not change
universe = vanilla

# set the job script
executable = job.sh

# set output and error file name
output = job.sh.out.$(Cluster).$(Process)
error = job.sh.err.$(Cluster).$(Process)

# set the resource needs
# set the number of cpu core
#request_cpus = 2
# set the number of gpu card
#request_gpus = 2
# set the size of memory, unit is MB
#request_memory = 4000

# set experiment, group, walltime
+HepJob_Experiment = "ATLAS"
+HepJob_RealGroup = "ATLAS"
# if not use test or short walltime,
# keep it same with HepJob_RealGroup
+HepJob_VirtualGroup = "ATLAS"
# walltime need to select from 'default' or 'long'
+HepJob_Walltime = "default"
# combine the attributes above
accounting_group = ATLAS.ATLAS.default
#accounting_group = ATLAS.ATLAS.long

# select from AlmaLinux9 or CentOS7
+HepJob_RequestOS = "AlmaLinux9"

# do not change
+HepJob_SiteName = "ustc"

# 'True' means allow to propagate environments
getenv = True

# do not change
queue
The universe attribute usually does not need to be changed. The executable attribute is the path to the job script. The output and error attributes are the standard output and standard error files. The last line should end with queue and usually does not need to be changed.
Note: The cluster supports two job durations. Short jobs are limited to 40 hours, while long jobs are limited to 30 days. Long jobs have limited resource availability. When submitting a job, the accounting_group attribute must be specified to select the required queue.
Adjust the queue or wall-time related attributes according to actual needs:
+HepJob_RealGroup = "ATLAS"
+HepJob_VirtualGroup = "ATLAS"
+HepJob_Walltime = "default"
accounting_group = ATLAS.ATLAS.default
- Submit the job with
condor_submit:
- Multi-core jobs
Add the request_cpus attribute to the JDL file. For example, to request 32 CPU cores, use:
universe = vanilla
executable = test_job.sh
output = test_job.sh.out.$(Cluster).$(Process)
error = test_job.sh.error.$(Cluster).$(Process)
request_cpus = 32
queue
- GPU jobs
Add the request_gpus attribute to the JDL file. For example, to request two GPU cards, use:
universe = vanilla
executable = test_job.sh
output = test_job.sh.out.$(Cluster).$(Process)
error = test_job.sh.error.$(Cluster).$(Process)
request_gpus = 2
queue
1.3.2 Query Job Status
- Query jobs submitted by a specified user, for example user
xiaoming:
- Query a specified job ID, for example job ID
1001:
- If the job status is
H, the job is held. Use the following command to view the hold reason:
1.3.3 Delete Jobs
- Delete jobs submitted by a specified user, for example user
xiaoming:
- Delete a specified job ID, for example job ID
1001:
1.3.4 HepJob Job Tool
HepJob can submit jobs without preparing a job description file.
- To submit a job, use
-gto specify the group:hep_sub job.sh -g ATLAS - To specify the job duration, add
-wt long. A long job duration means 30 days. If-wtis not specified, the default duration is 40 hours:hep_sub job.sh -g ATLAS -wt long. - For detailed HepJob command usage, see: http://afsapply.ihep.ac.cn/cchelp/zh/local-cluster/jobs/HTCondor/
1.3.5 Other References
For detailed HTCondor usage, see:
https://htcondor.readthedocs.io/en/stable/users-manual/index.html
1.4 Container Usage
Apptainer is a lightweight container virtualization technology widely used on high-performance computing platforms. It provides operating-system-level virtualization. hep_container is a container client tool for the IHEP computing cluster, developed on top of Apptainer container management commands. It helps users work with multiple operating system versions and runtime environments.
Note: All commands in this document must be run on a login node. The commands are located in the following directory. It is recommended that you add this directory to your personal PATH environment variable.
1.4.1 Command Reference
The hep_container command mainly provides three operations: images, shell, and exec. You can use the help option on the command line to view usage instructions and examples.
$ ./hep_container help

Usage : ./hep_container <command> [command options...]

CONTAINER USAGE COMMANDS:

  shell      Run a Bourne shell within container image

  exec      Execute a command within container image

  images     List Support container images

  groups     List Support groups

  -g groupname   With a specific group name

EXAMPLES:

  ./hep_container images

  ./hep_container groups


  ./hep_container shell SL5

  ./hep_container shell SL5 -g physics


  ./hep_container exec SL5 cat /etc/redhat-release

  ./hep_container exec SL5 python ./yourprograme.py

  ./hep_container exec SL5 -g physics cat /etc/redhat-release
1.4.2 View Supported Images
Command format: hep_container images
This command lists the operating system container images currently provided.
$ hep_container images

Hep_container support images:

    SL5 : Scientific Linux 5

    SL6 : Scientific Linux 6
1.4.3 View Supported User Groups or Experiment Groups
Command format: hep_container groups
This command lists the user groups or experiment groups currently supported by the container command. Use the -g option to specify a user group or experiment group. The corresponding user directory and experiment directory are mounted inside the container. If -g is not specified, the primary group is used by default.
1.4.4 Use a Container Environment
Command format: hep_container shell [container image]
This command starts a shell inside the specified container, allowing interactive operations between the host and the container. Run exit to leave the shell. The following example starts an SL6 operating system image. After startup, the user is in an SL6 system environment.
$ hep_container shell SL6

Singularity: Invoking an interactive shell within container...

Singularity> cat /etc/redhat-release

Scientific Linux SL release 6.9 (Carbon)

Singularity> exit

exit
1.4.5 Execute Commands Inside a Container
Command format: hep_container exec [container image] [command]
This command runs the specified command inside the specified container from the external host. The following example runs a command in an SL6 container environment and prints the result.
1.5 File Storage Service
1.5.1 User File Storage
The Computing Center deploys multiple storage systems to provide storage space for users and experiment groups. These systems are used to store software, scripts, and some experiment data. Users can submit jobs from directories where they have permission. Details are listed below.
| Directory | Purpose | Access Entry (Client) | Capacity |
|---|---|---|---|
| /home | User home directory | All nodes | 28 TB |
| /ustcfs | Experiment data | All nodes | 1.2 PB |
| /ustcfs2 | Experiment data | All nodes | 639 TB |
| /ustcfs3 | Experiment data | All nodes | 2.0 PB |
1.5.2 CVMFS Software File Storage
CernVM-FS provides a scalable, reliable, and low-maintenance software distribution service. It helps deploy software for high-energy physics on worldwide distributed computing infrastructures used for data processing applications. CernVM-FS is implemented as a POSIX read-only file system in user space through FUSE. Files and directories reside on standard web servers and are mounted under the common namespace /cvmfs, allowing user jobs to read software and run correctly.
The CVMFS system currently includes multiple software volumes built by IHEP and CERN to provide software environments for different experiment jobs. Some main IHEP experiment volumes are listed below.
| Path | Purpose |
|---|---|
| /cvmfs/bes3.ihep.ac.cn | Software libraries required by BES3 |
| /cvmfs/bes.ihep.ac.cn | Software libraries required by BES |
| /cvmfs/cepc.ihep.ac.cn | Data analysis software for the CEPC experiment |
| /cvmfs/dcomputing.ihep.ac.cn | Data analysis software for distributed computing experiments |
| /cvmfs/gluex.ihep.ac.cn | Data analysis software for the GlueX experiment |
| /cvmfs/heps_ap.ihep.ac.cn | Data analysis software for the HEPS experiment |
| /cvmfs/juno.ihep.ac.cn | Data analysis software for the JUNO experiment |
| /cvmfs/lhaaso.ihep.ac.cn | Data analysis software for the LHAASO experiment |
| /cvmfs/mlgpu.ihep.ac.cn | GPU machine-learning software |
Table 1. Overview of CVMFS software volumes.
有问题?输入后跳转到对话页继续交流