8.9 gfs Object Storage
1 Quick Start
1.1 Login
Visit https://gfs.ihep.ac.cn/ and log in with your IHEP unified authentication account.
Obtain the Access Key and Secret Key from the web interface.
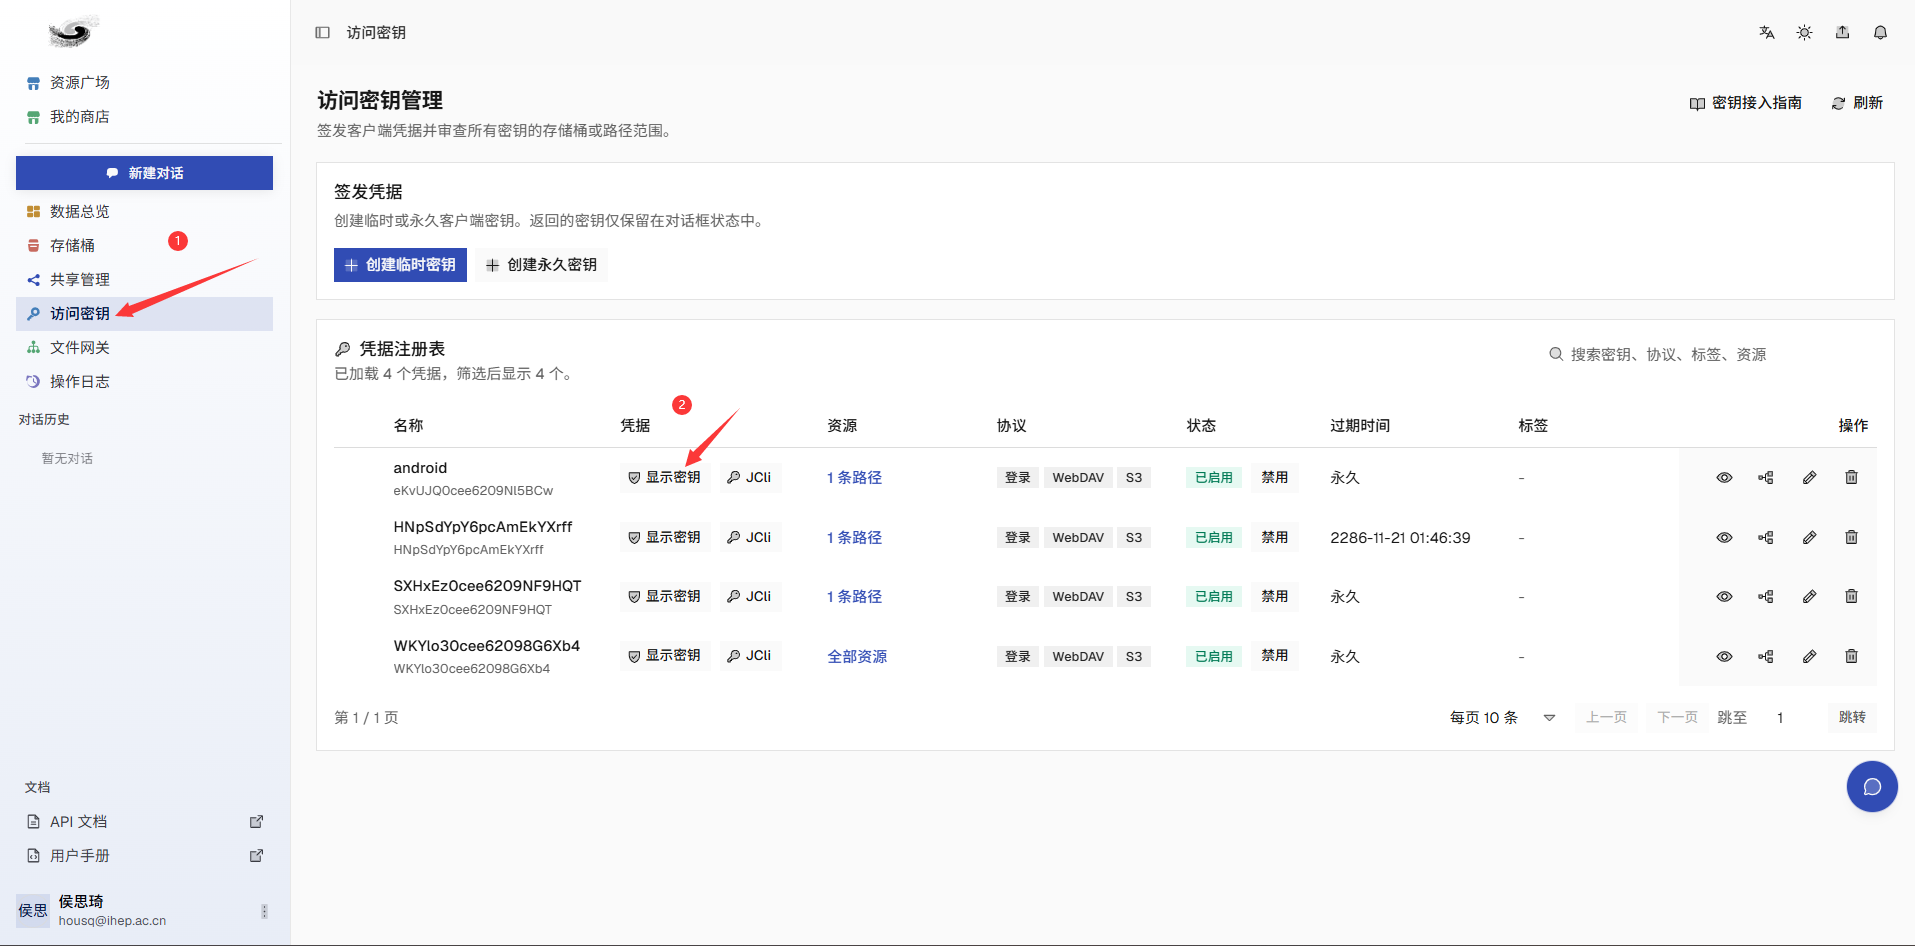
1.2 Linux Client Mounting
-
Install the
jcliclient.Select the
jclidownload link for your CPU architecture:- amd64: https://file-ocloud.ihep.ac.cn/jcli/amd64/jcli
- arm64: https://file-ocloud.ihep.ac.cn/jcli/arm64/jcli
For example, on Linux, use
wgetorcurlto download thejcliclient package.wget https://file-ocloud.ihep.ac.cn/jcli/amd64/jcli curl -L https://file-ocloud.ihep.ac.cn/jcli/amd64/jcli > jcli # Grant execute permission chmod +x jcliConfigure it under the user's
HOME/bindirectory so that thejclicommand can be used directly from the command line. -
Configure authentication information.
- Enter the Access Key and Secret Key.
- Enter the gateway address (endpoint):
https://fgws3-gfs.ihep.ac.cn - Proxy can be left blank.
- The default bucket can be selected as
0.
Example:
jcli auth Enter AccessKey(current value:[]):WKYxxxxxxxxxxxxxxxb4 Enter SecretKey(current value:[]):ZEDxxxxxxxxxxxxxxxpZ Enter endpoints, separated by commas(current value:[]): https://fgws3-gfs.ihep.ac.cn Enter proxy information(optional): Select default Bucket: > xxxxxx-testbucket01 [list,read,write] Configuration file saved successfully: ./.jcli/token/auth -
View bucket details.
If the command outputs information without errors, the configuration is correct and subsequent operations can be performed.
-
Mount the bucket.
Example:
housiqi@lxlogin003:~$ mkdir /scratchfs2/cc/housiqi/gfs_bucket   # Create a mount point

housiqi@lxlogin003:~$ jcli mount -f /scratchfs2/cc/housiqi/gfs_bucket/ --daemon   # Mount
Hint: Starting child process to run the service...

housiqi@lxlogin003:~$ ls /scratchfs2/cc/housiqi/gfs_bucket/   # Verify the mount
'Jwanfs User Manual.pdf'   mydir   tmp   demo-directory

housiqi@lxlogin003:~$ df -h   # View mount status
20005-ihep-imel-120624  512G  3.0M  512G   1% /scratchfs2/cc/housiqi/gfs_bucket
You can then access files in the bucket as if they were in a local directory.
1.3 Windows Client Mounting
-
Download links:
-
Configure environment variables and add the directory containing
jcli.exetoPath.- Locate the
jclifile. - Right-click the Windows icon in the lower-left corner and select System.
- Click Advanced system settings on the left.
- In System Properties, click Environment Variables.
- Under System variables, find
Pathand click Edit. - Click New and enter the directory path where
jcliis located. - Click OK to save the change.
- Locate the
-
Download and install WinFSP: download link.
-
Configure authentication information.
Press
Win + R, entercmd, and runjcli authin the command prompt to configure AK, SK, and endpoint information as on Linux. After configuration, run the following command to mount the bucket:
2 Web Access
Web address: https://gfs.ihep.ac.cn/
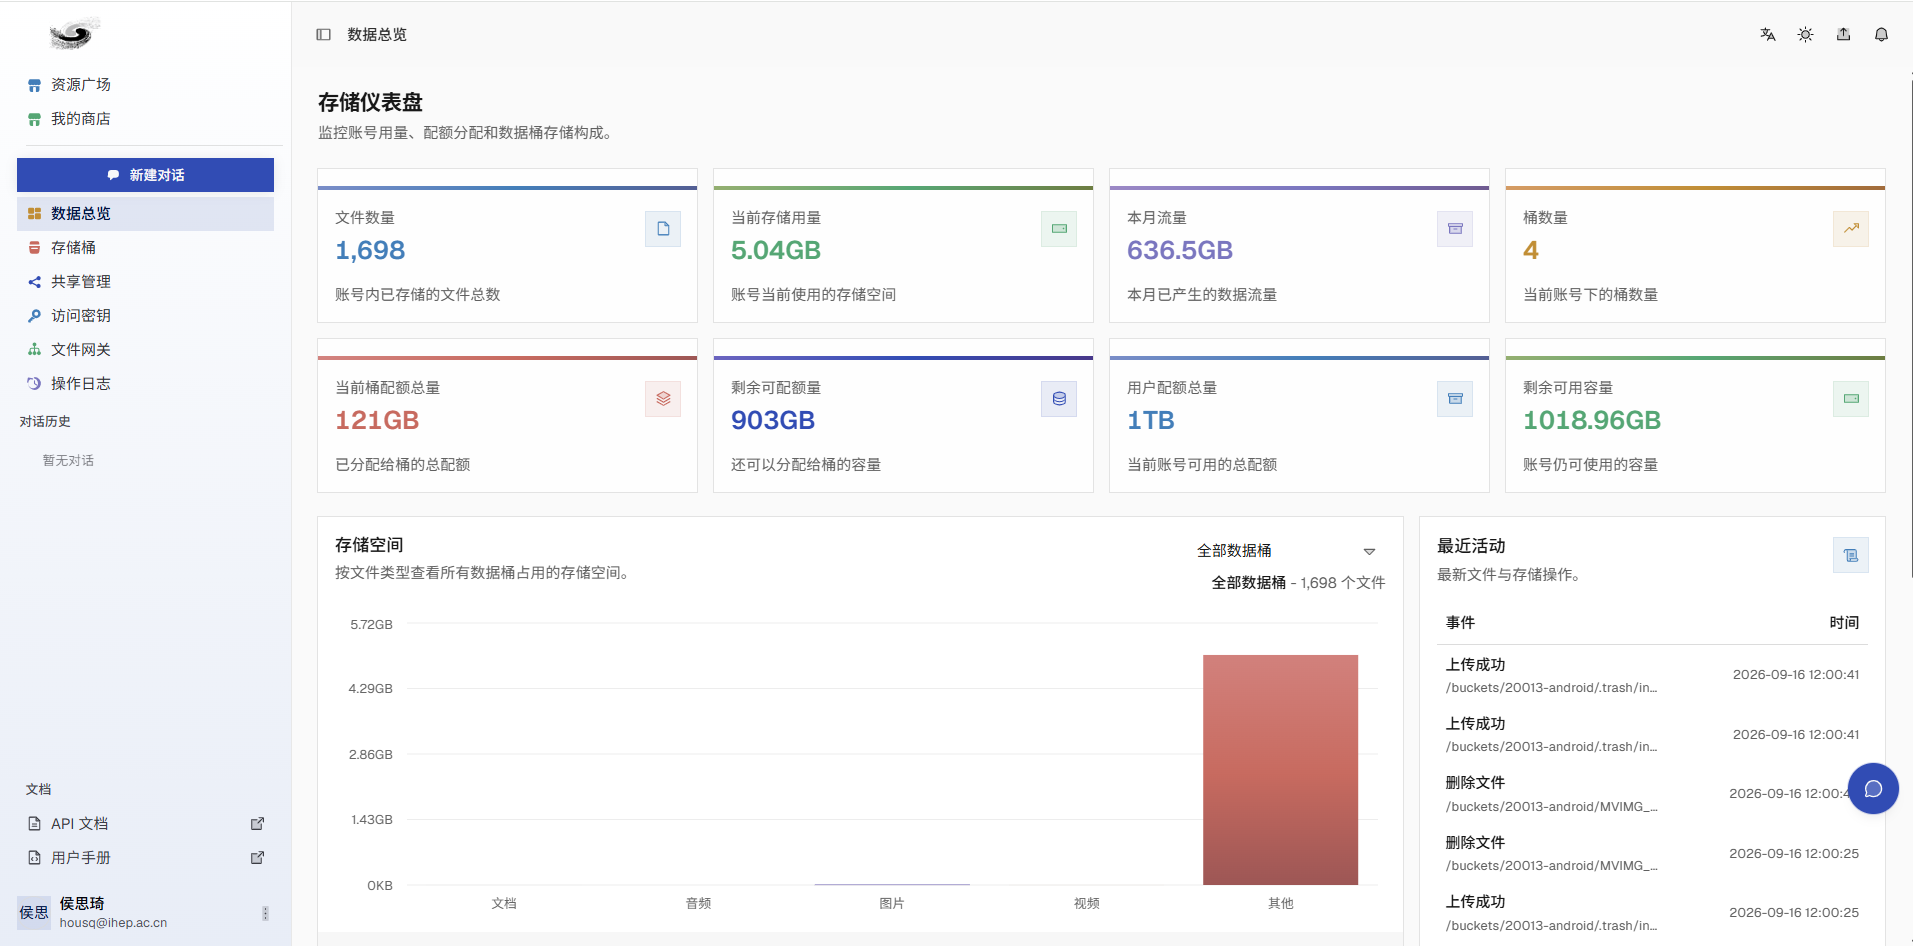
Apply for permission and log in with your IHEP unified authentication account. After the account is enabled, 1 TB of default storage space is provided automatically.
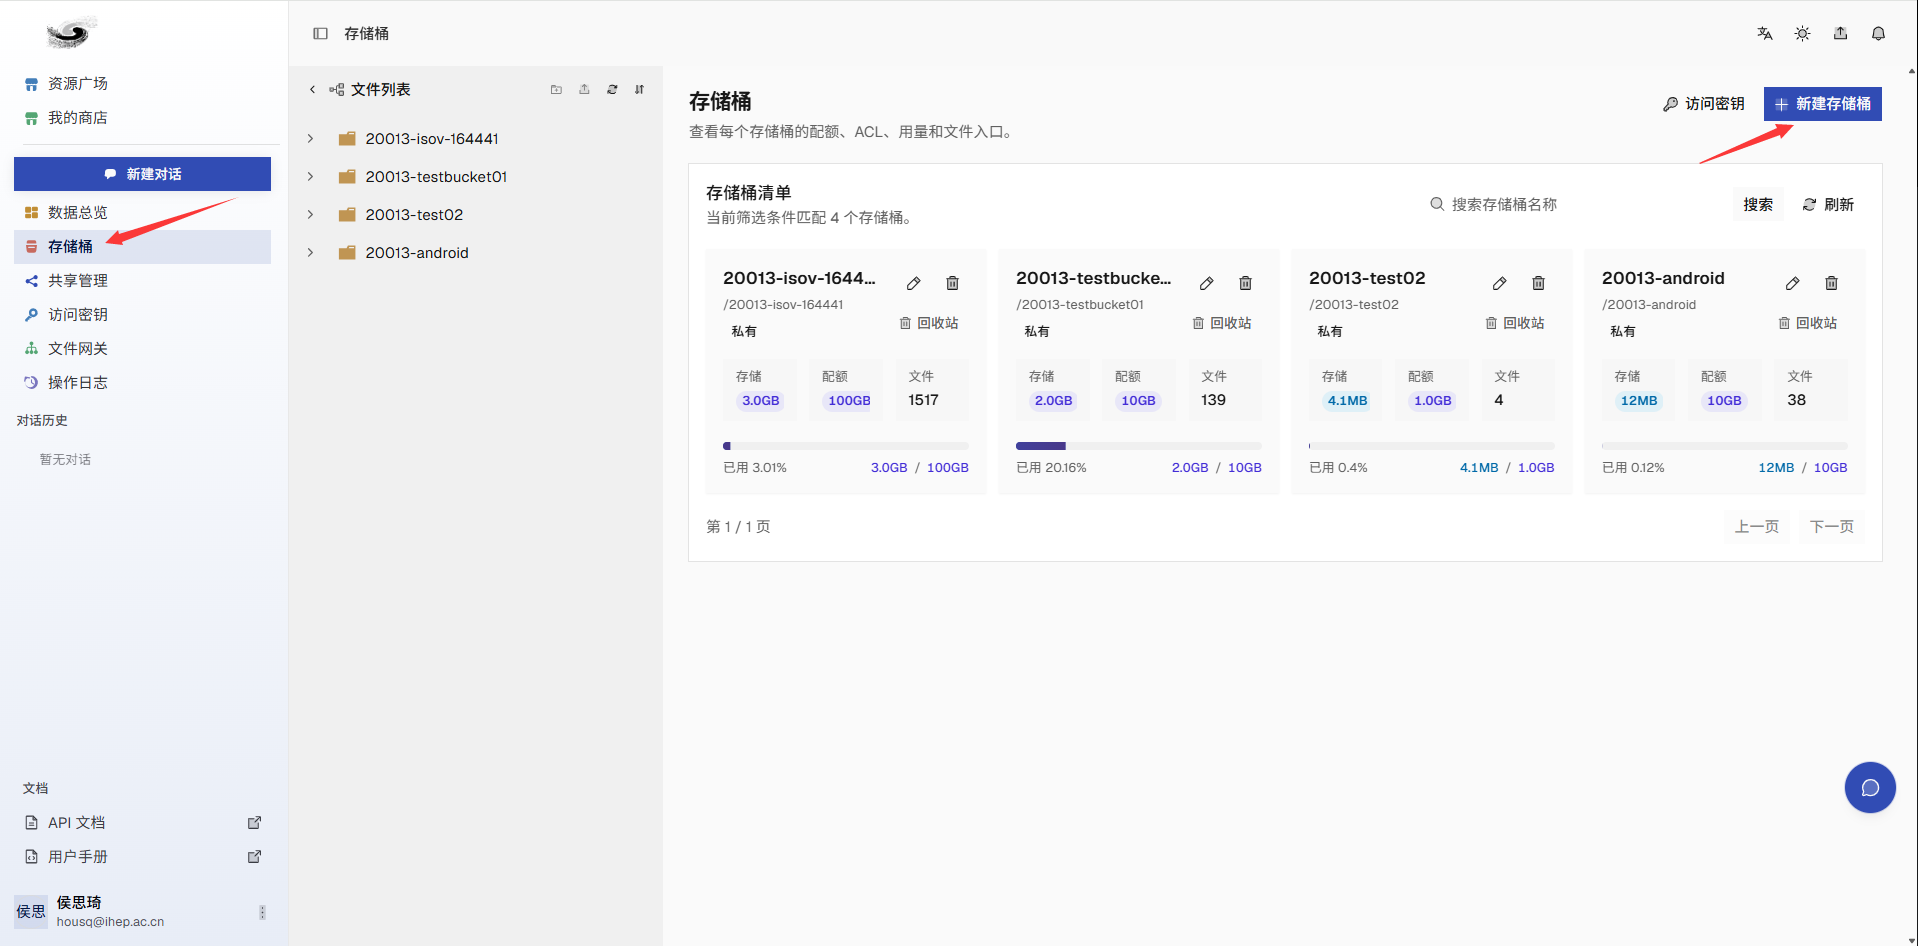
2.1 Bucket Management
The system provides functions such as creation, deletion, capacity expansion, and recycle bin management.
2.2 File Management
Click the bucket name to enter the file management interface.
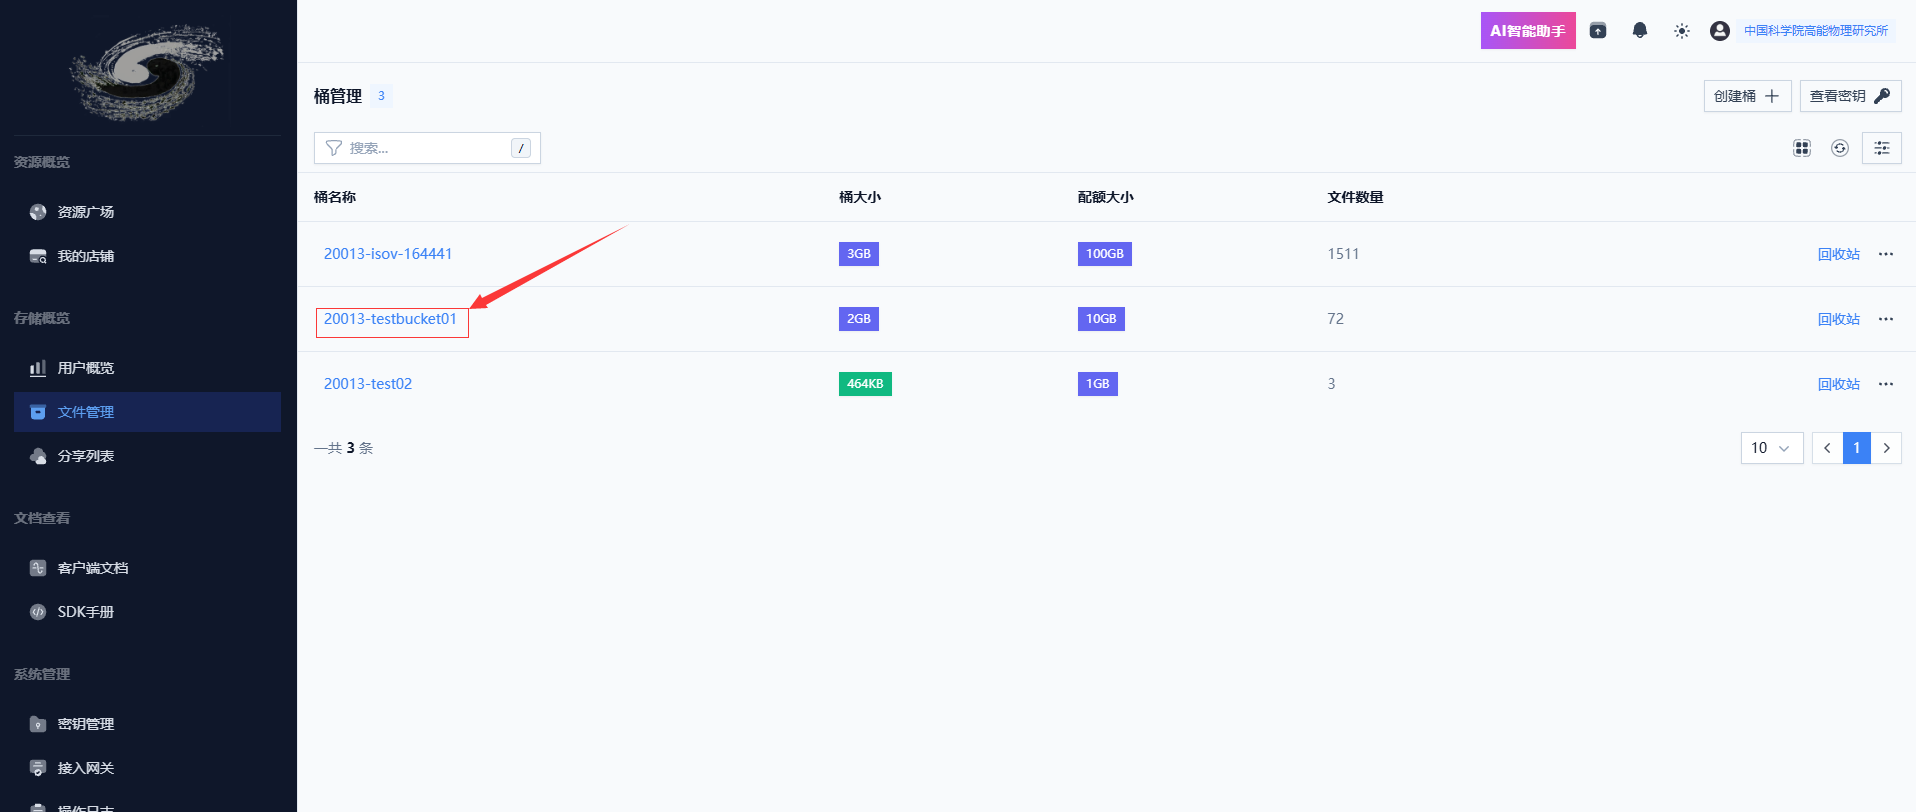
Files in a bucket follow a network-disk-style user operation and data management model. The following functions are provided:
- Publish resources
- Upload files
- Download files
- Create directories
- Preview files. On the file list page, click
...and choose preview from the menu. The file can be previewed without downloading it locally. - Delete files. Files in the recycle bin are kept for 30 days by default.
- Share files. Sharing duration and password can be configured.
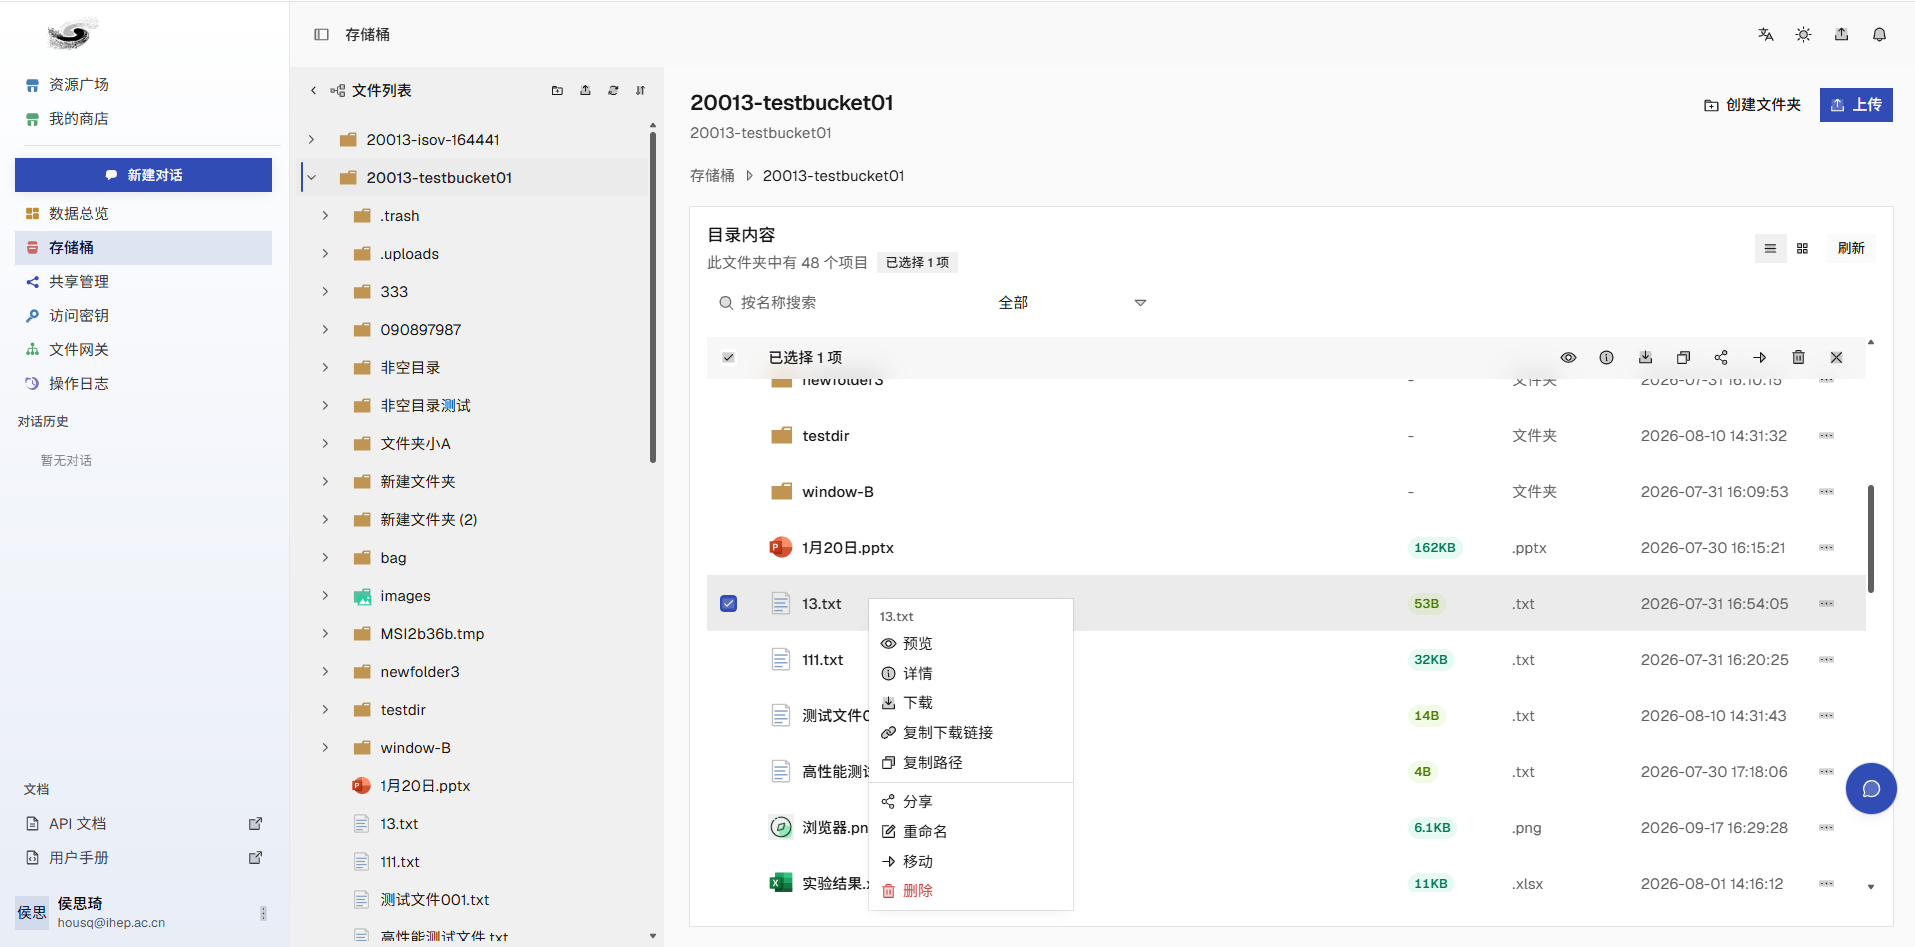
2.2.1 Upload and Download Files
On the file list page, click upload to start the upload process.
More files can be added or upload can be confirmed in the upload dialog.
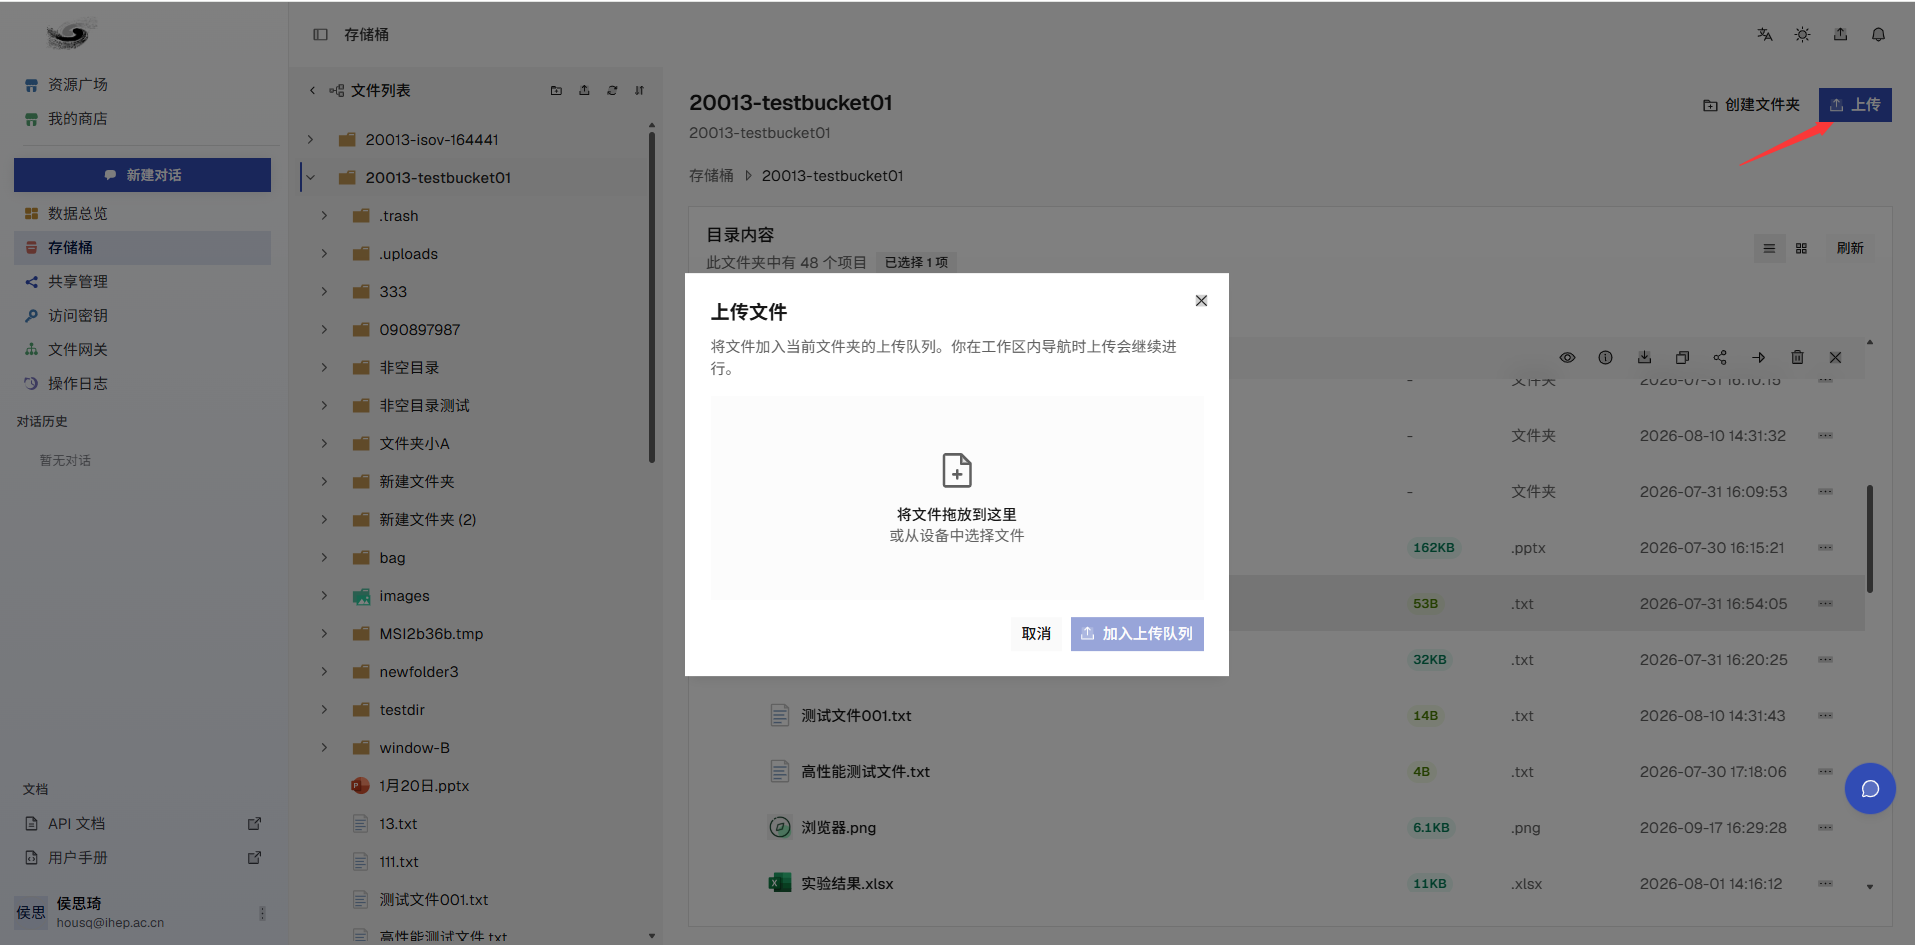
Right-click a file and click download to download it.
2.2.2 File Sharing
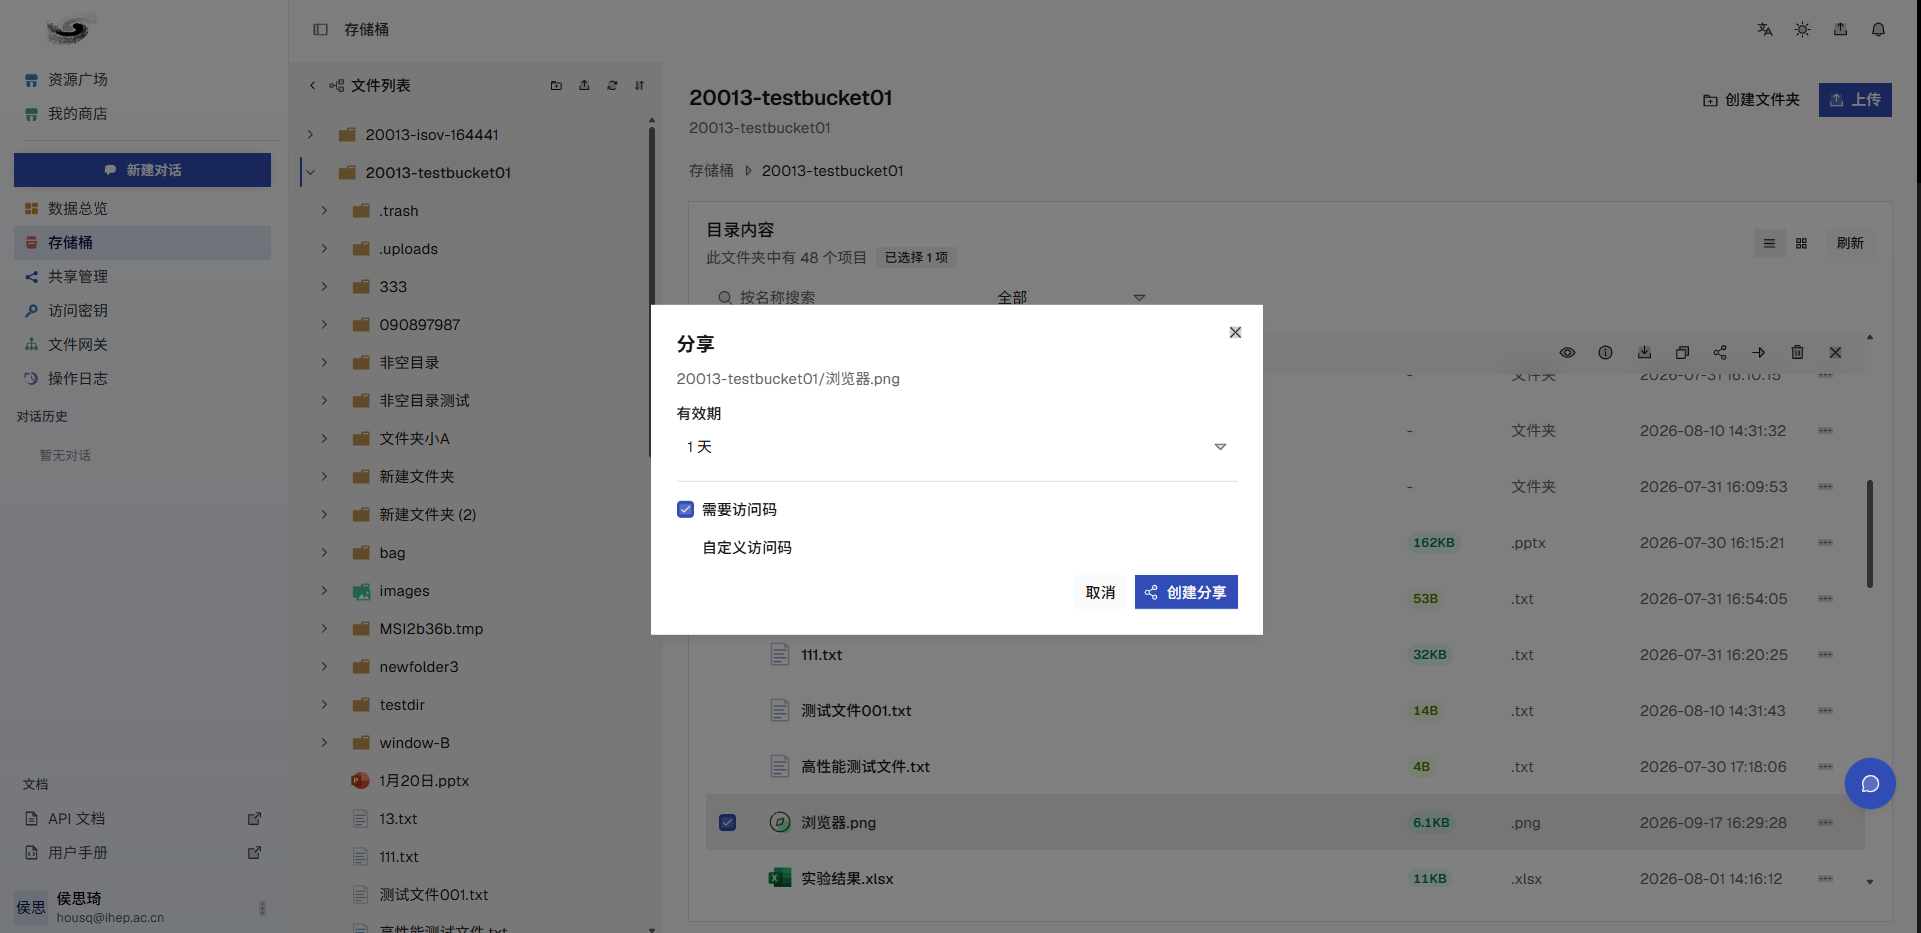
Click file sharing to generate a shared link and access password.
Shared files can be viewed in the sharing list, where sharing information can also be copied.
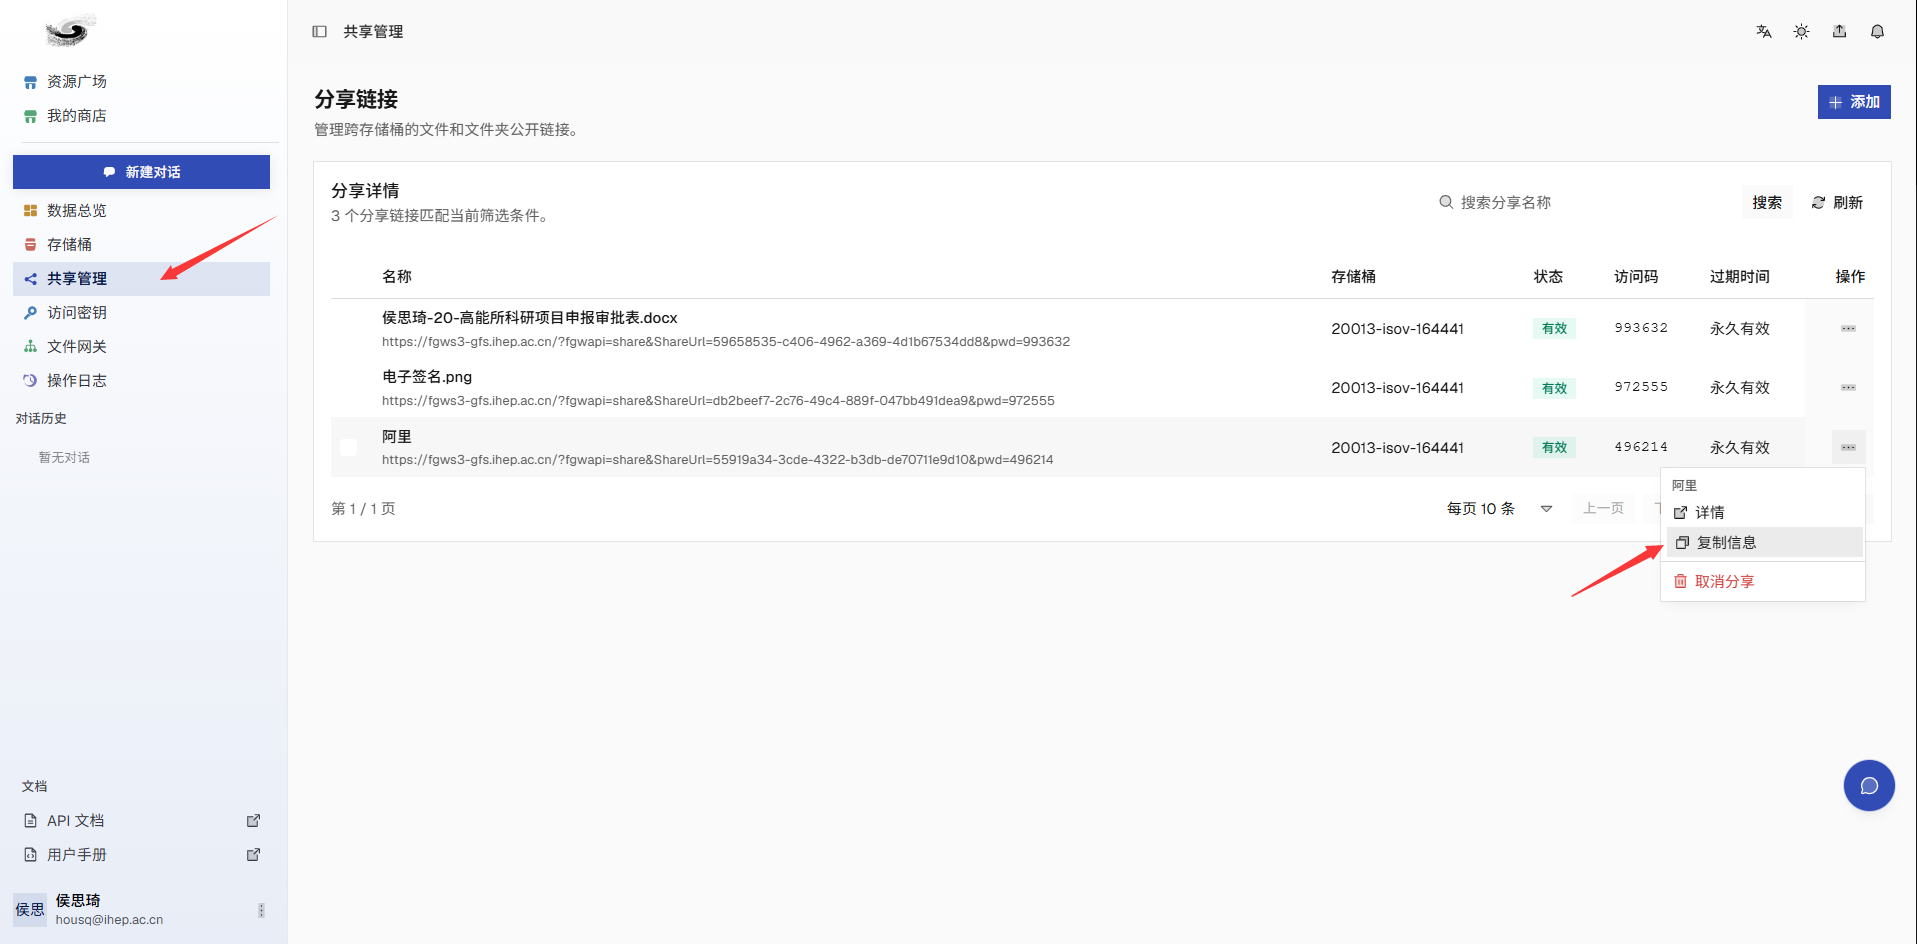
Note
- The sharing period and access password can be customized.
- Only files can be shared; directories cannot be shared.
- If the shared target is deleted, the sharing link remains valid, but the file cannot be downloaded.
2.2.3 File Preview
On the file list page, click ... and choose preview from the menu to preview a file directly.
Preview availability depends on the file type. Supported file types include:
- Images:
jpg,png, etc. - Videos:
mp4,avi, etc. - Documents:
pdf,docx, etc. - Audio:
mp3,wav, etc. - Text:
txt,md, etc. - High-energy physics data files:
root,h5
2.3 Resource Publishing
Users can publish files/directories to the resource square for other platform users to download.
Before publishing resources for the first time, create a shop on the My Shop page by filling in its name, overview, category, and tags.
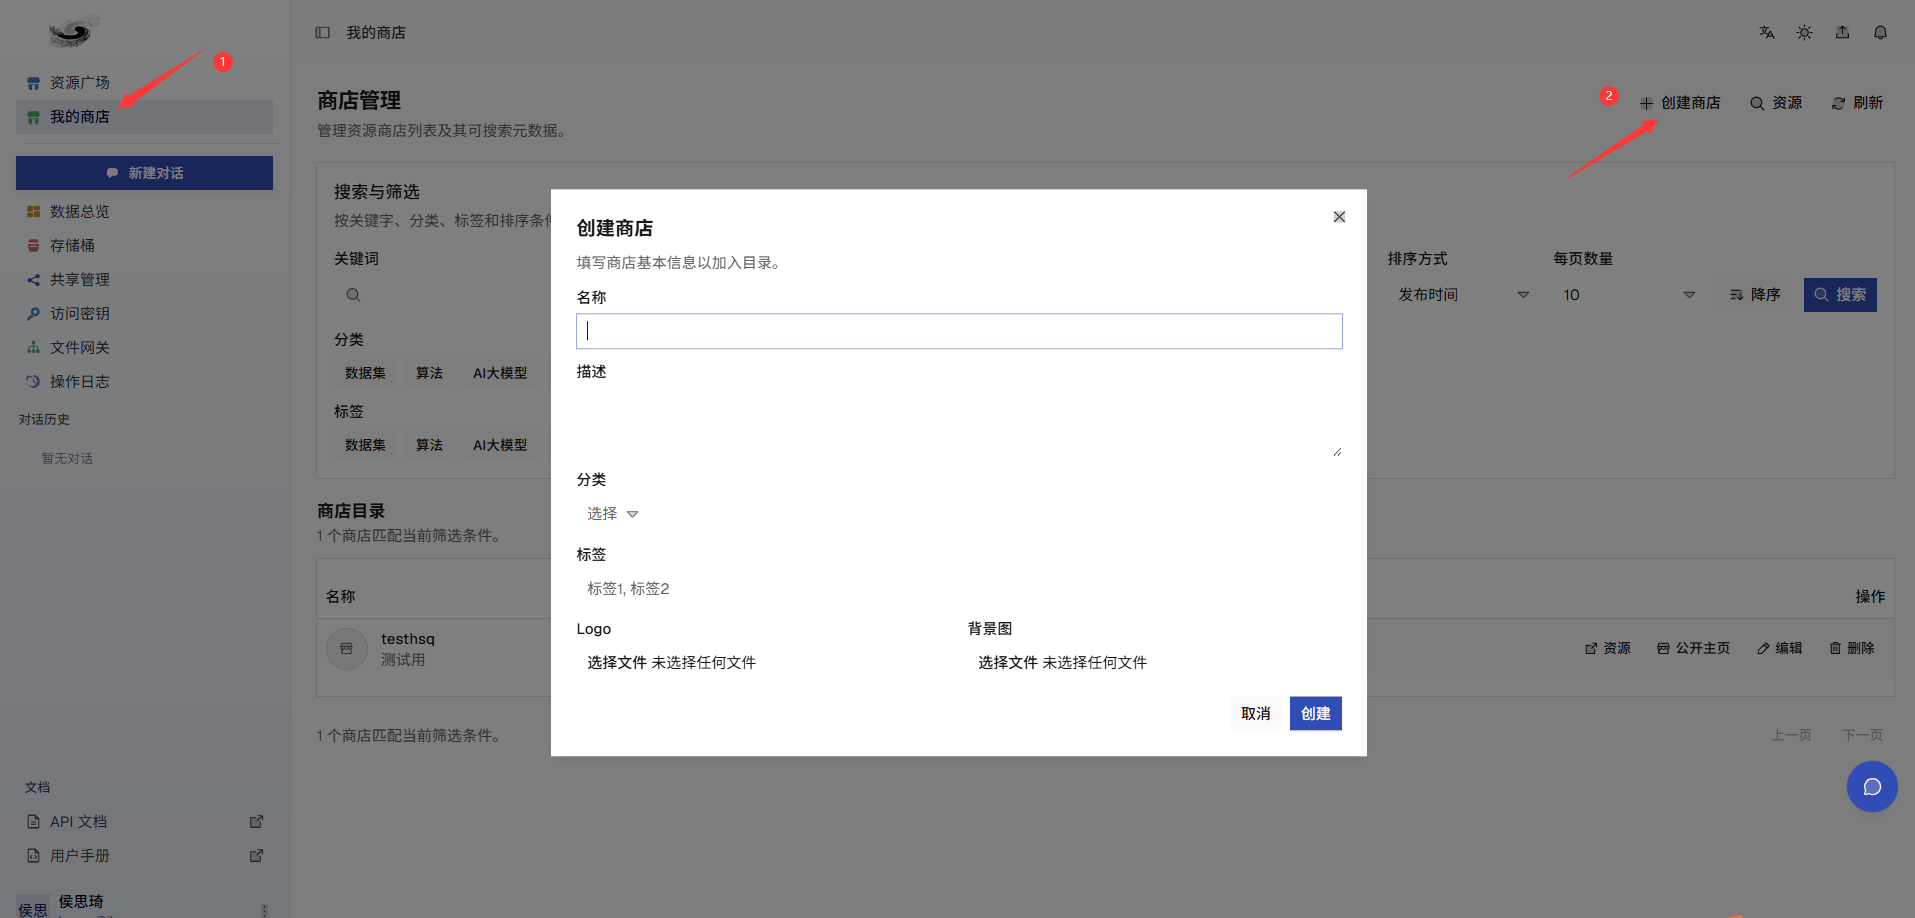
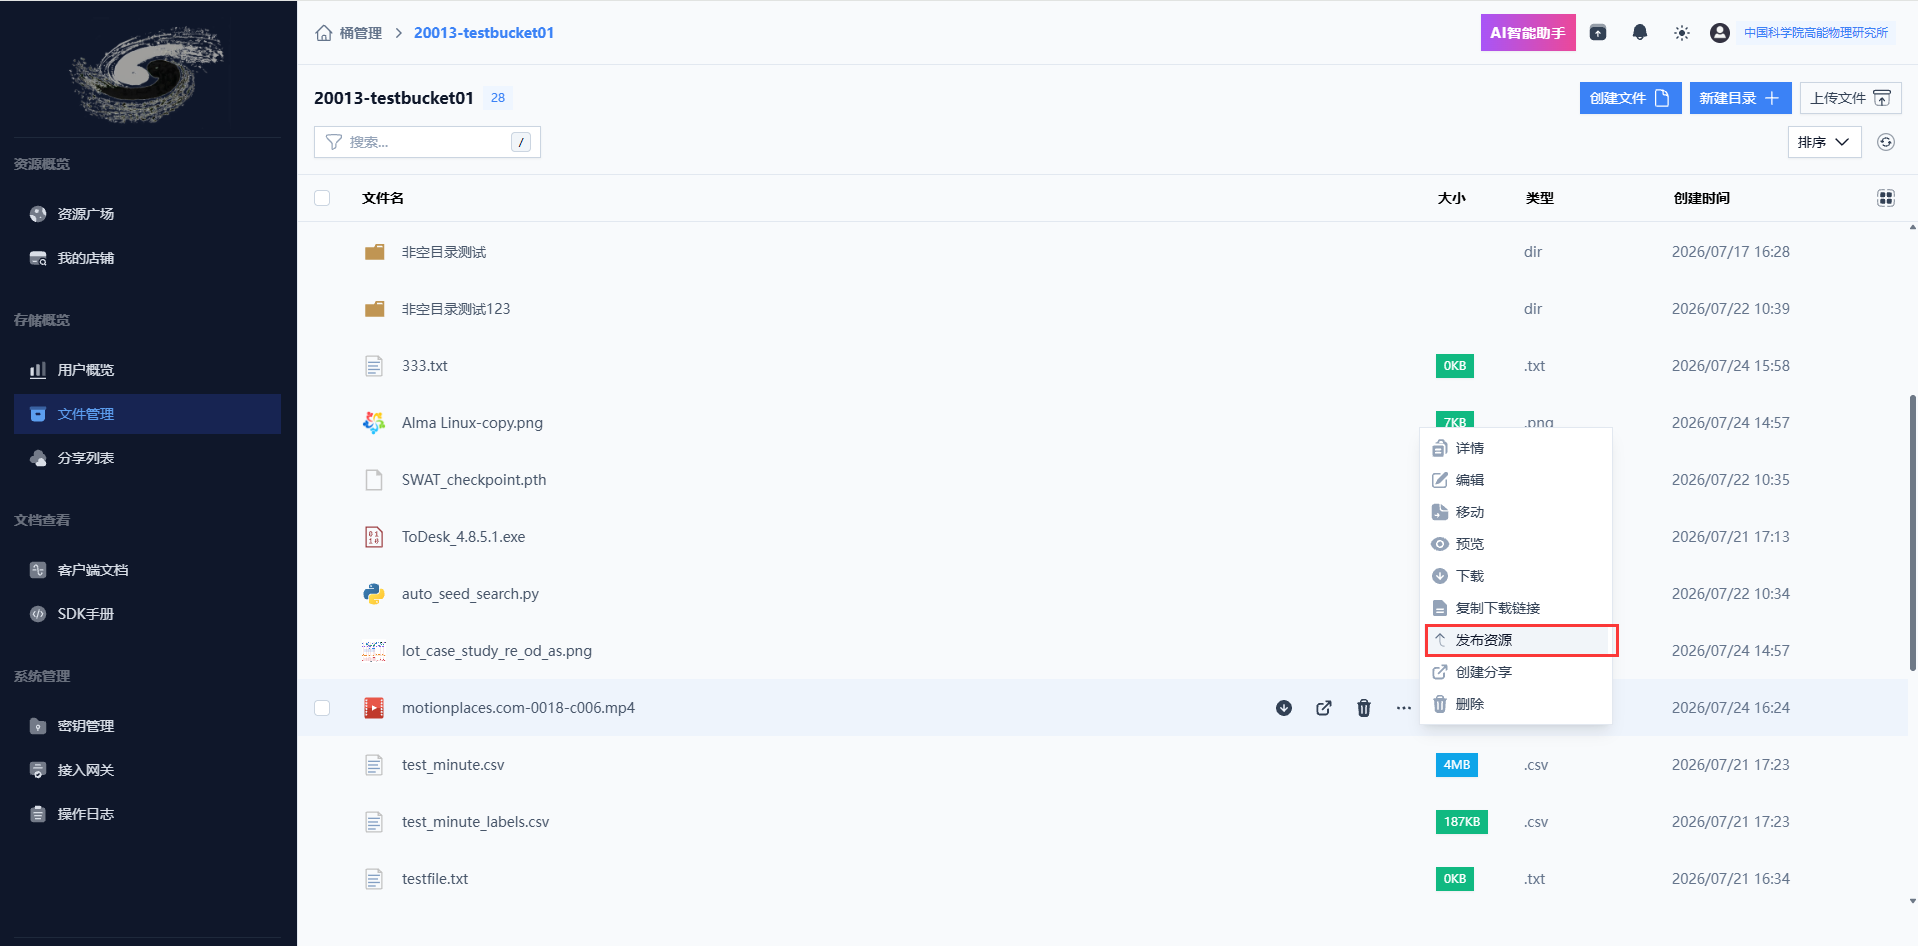
On the file list page, click ... and choose publish resource from the menu to start the publishing process.
Enter the resource information to publish the corresponding file or directory to the resource square for download.
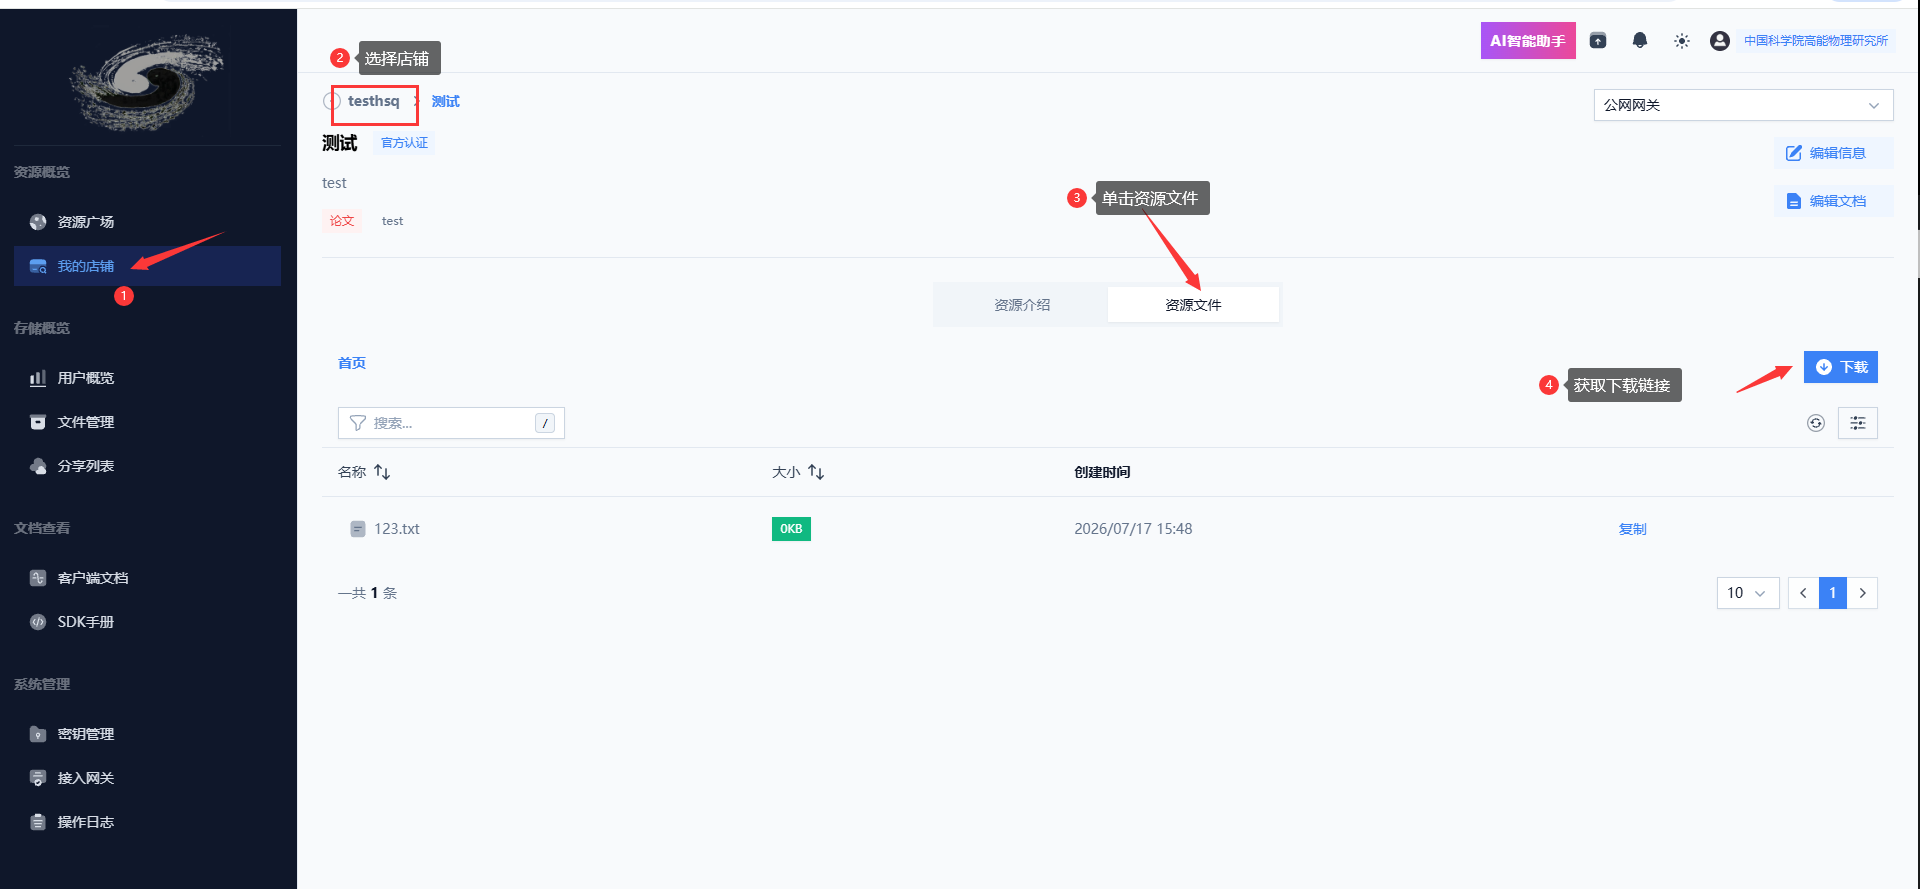
On the My Shop page, you can view published resources and obtain download links. The shop and resources can also be viewed in the resource square.
2.4 Key Management (Important)
Keys (AK and SK) are the only credentials used by the system to identify users. Operations that access the gateway with a key represent actions by the key owner. Keep your authentication information secure.
2.5 Resource Square
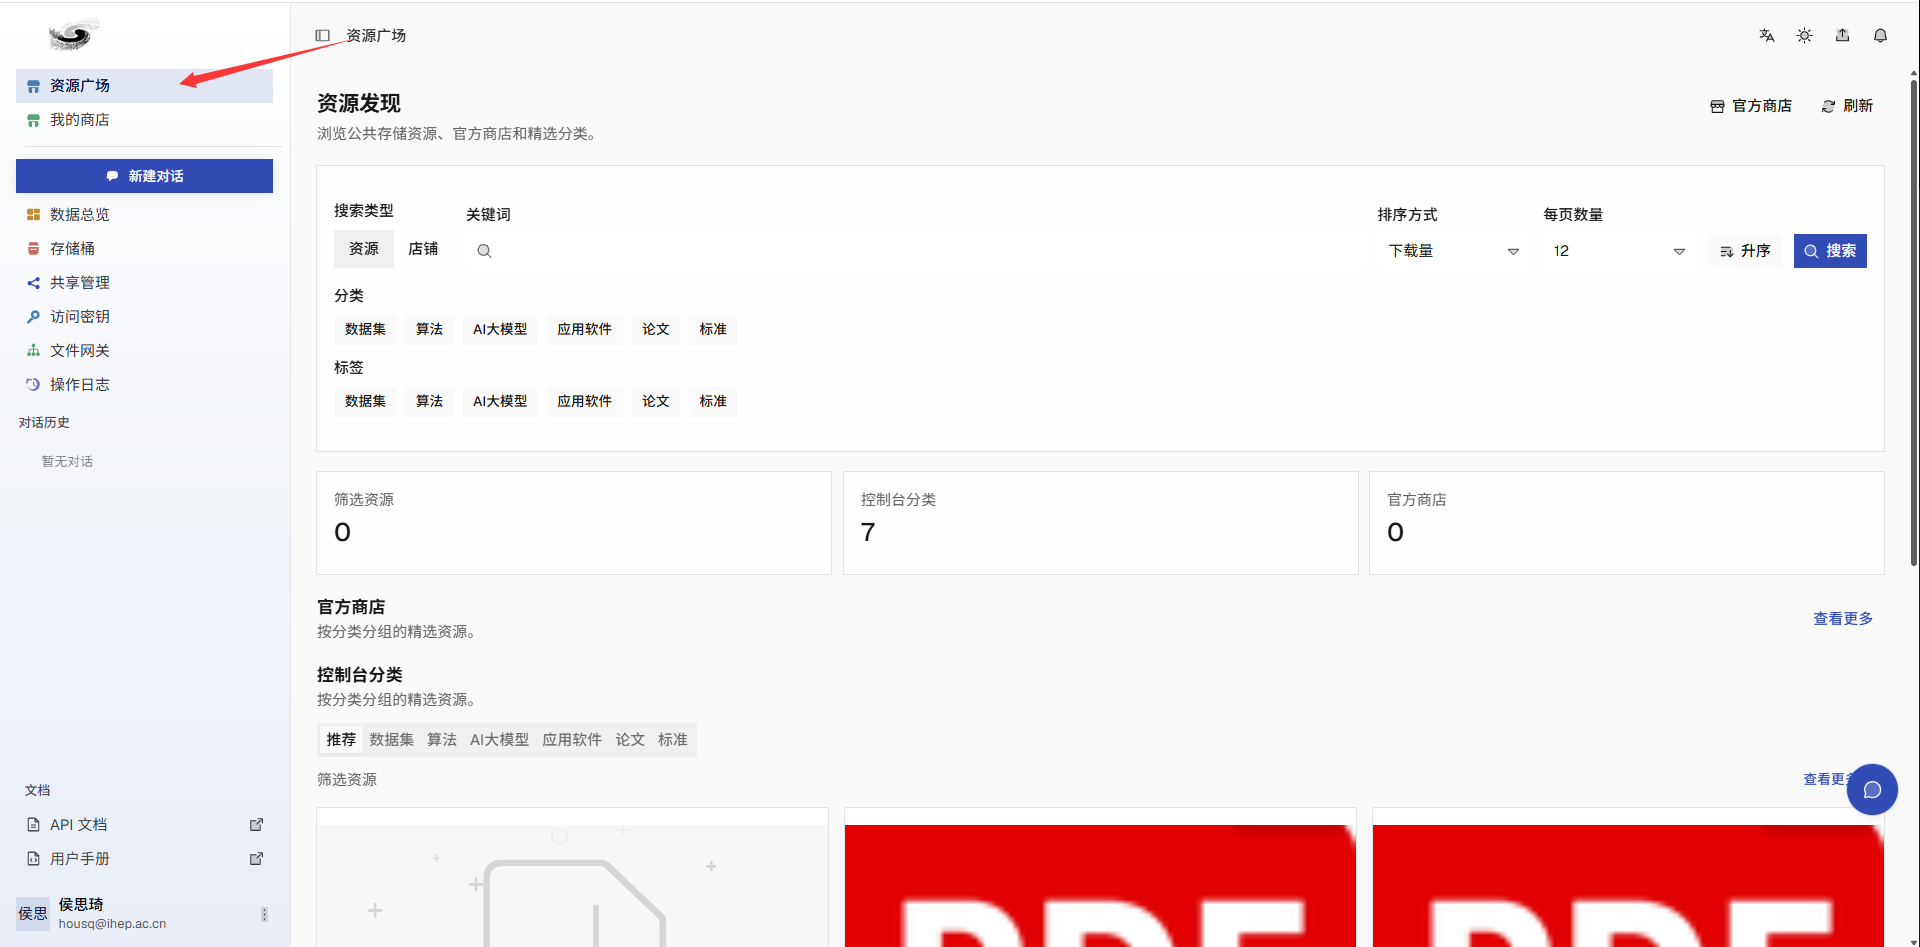
Resources published by users can be viewed in detail and downloaded from here.
To quickly find a specific resource, use the search function. Enter resource keywords in the search box on the resource square page.
2.6 Personal Settings
You can modify your nickname, email, and other information.
3 Official Client
JWanFS provides the official jcli client. Direct access through the official client is recommended. JWanFS also supports the standard S3 interface, so S3 clients can access platform resources directly.
3.1 Software Download
Download links:
| CPU Architecture / OS | Windows | macOS | Linux |
|---|---|---|---|
| Intel/AMD 64-bit (amd64/x86) | Download | Download | Download |
| ARM/Apple Silicon (arm64/aarch64) | Download | Download | Download |
3.2 Configure Environment Variables
-
Linux
-
One-click installation:
-
Manual installation (recommended):
Download the client program.
Copy
jclito the user'sHOME/bindirectory.mkdir $HOME/bin/ cp jcli $HOME/bin/ export PATH=$PATH:$HOME/bin echo "export PATH=$PATH:$HOME/bin" >> ~/.bashrcOr configure it under
/usr/binas root.After installation, run
jcli versionto confirm that installation succeeded.
-
-
Windows
On Windows, download the client executable from the download link and add
jclito the environment variables for global use:- Locate the
jclifile. - Right-click the Windows icon in the lower-left corner and select System.
- Click Advanced system settings on the left.
- In System Properties, click Environment Variables.
- Under System variables, find
Pathand click Edit. - Click New and enter the directory path where
jcliis located. - Click OK to save the change.
- Locate the
3.3 Fill in Authentication Information
3.3.1 Manual Configuration
Copy the AK, SK, and file gateway obtained from the web interface, configure the client, and select the corresponding bucket.
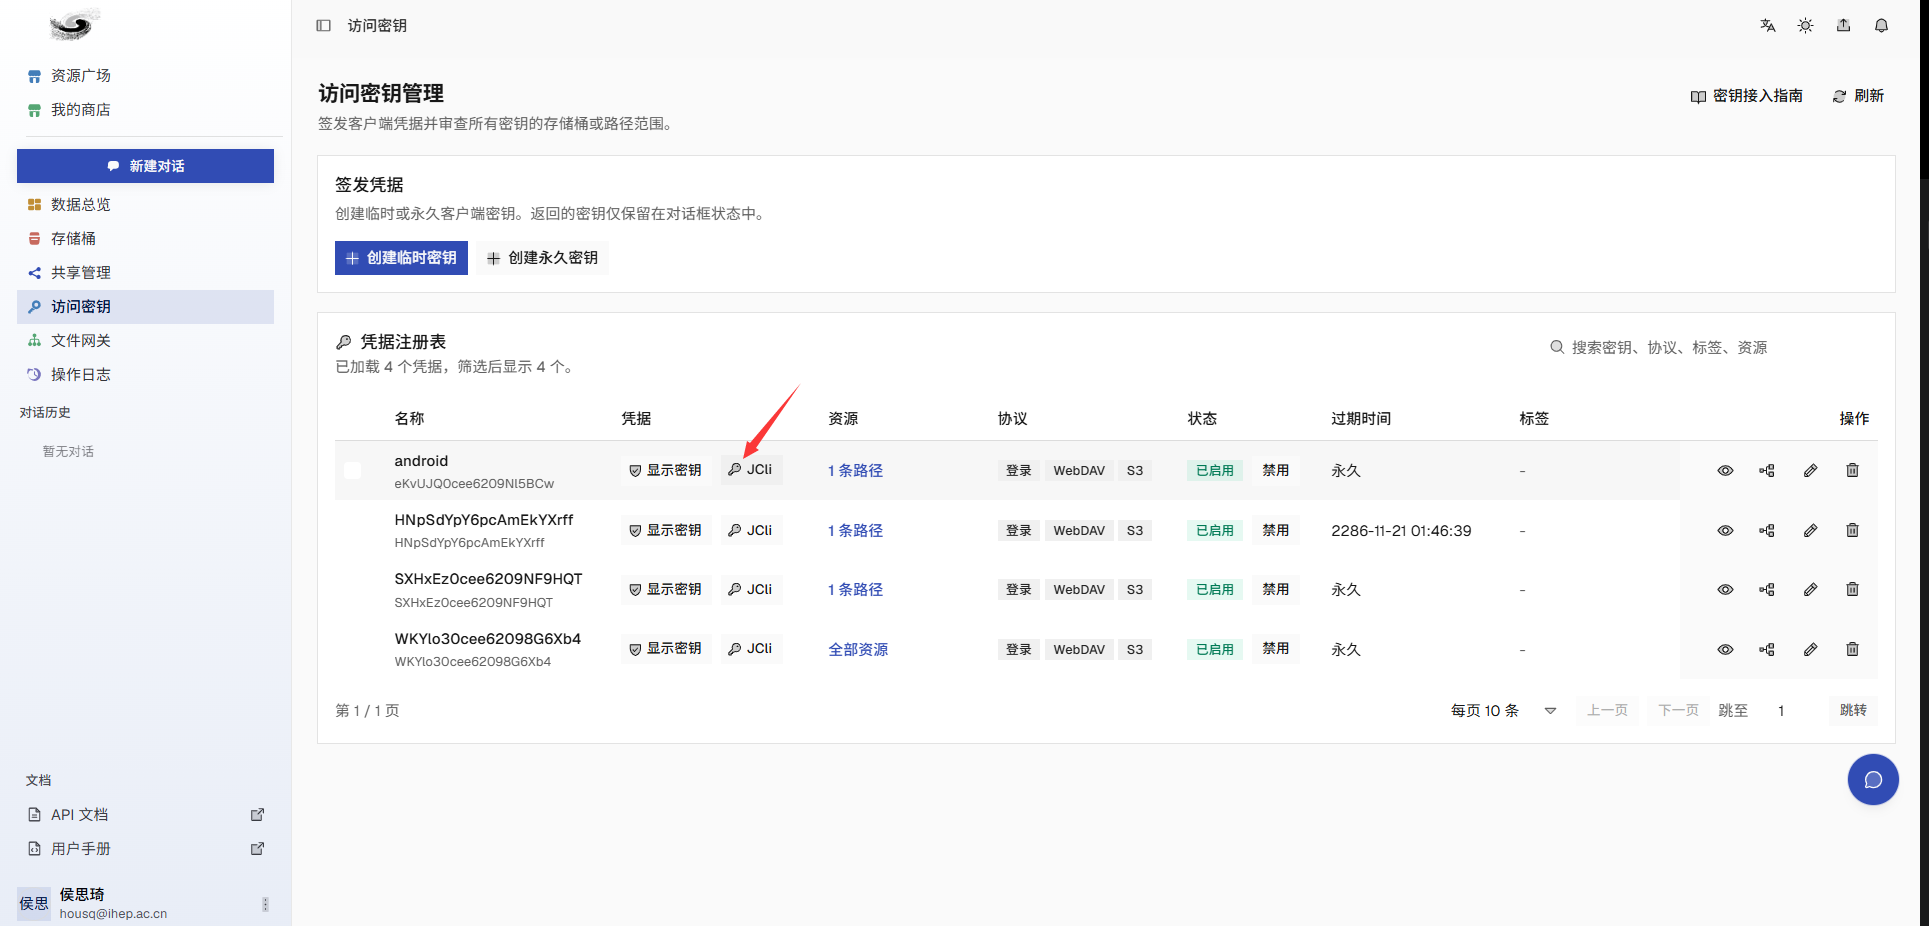
Key information from the web interface:
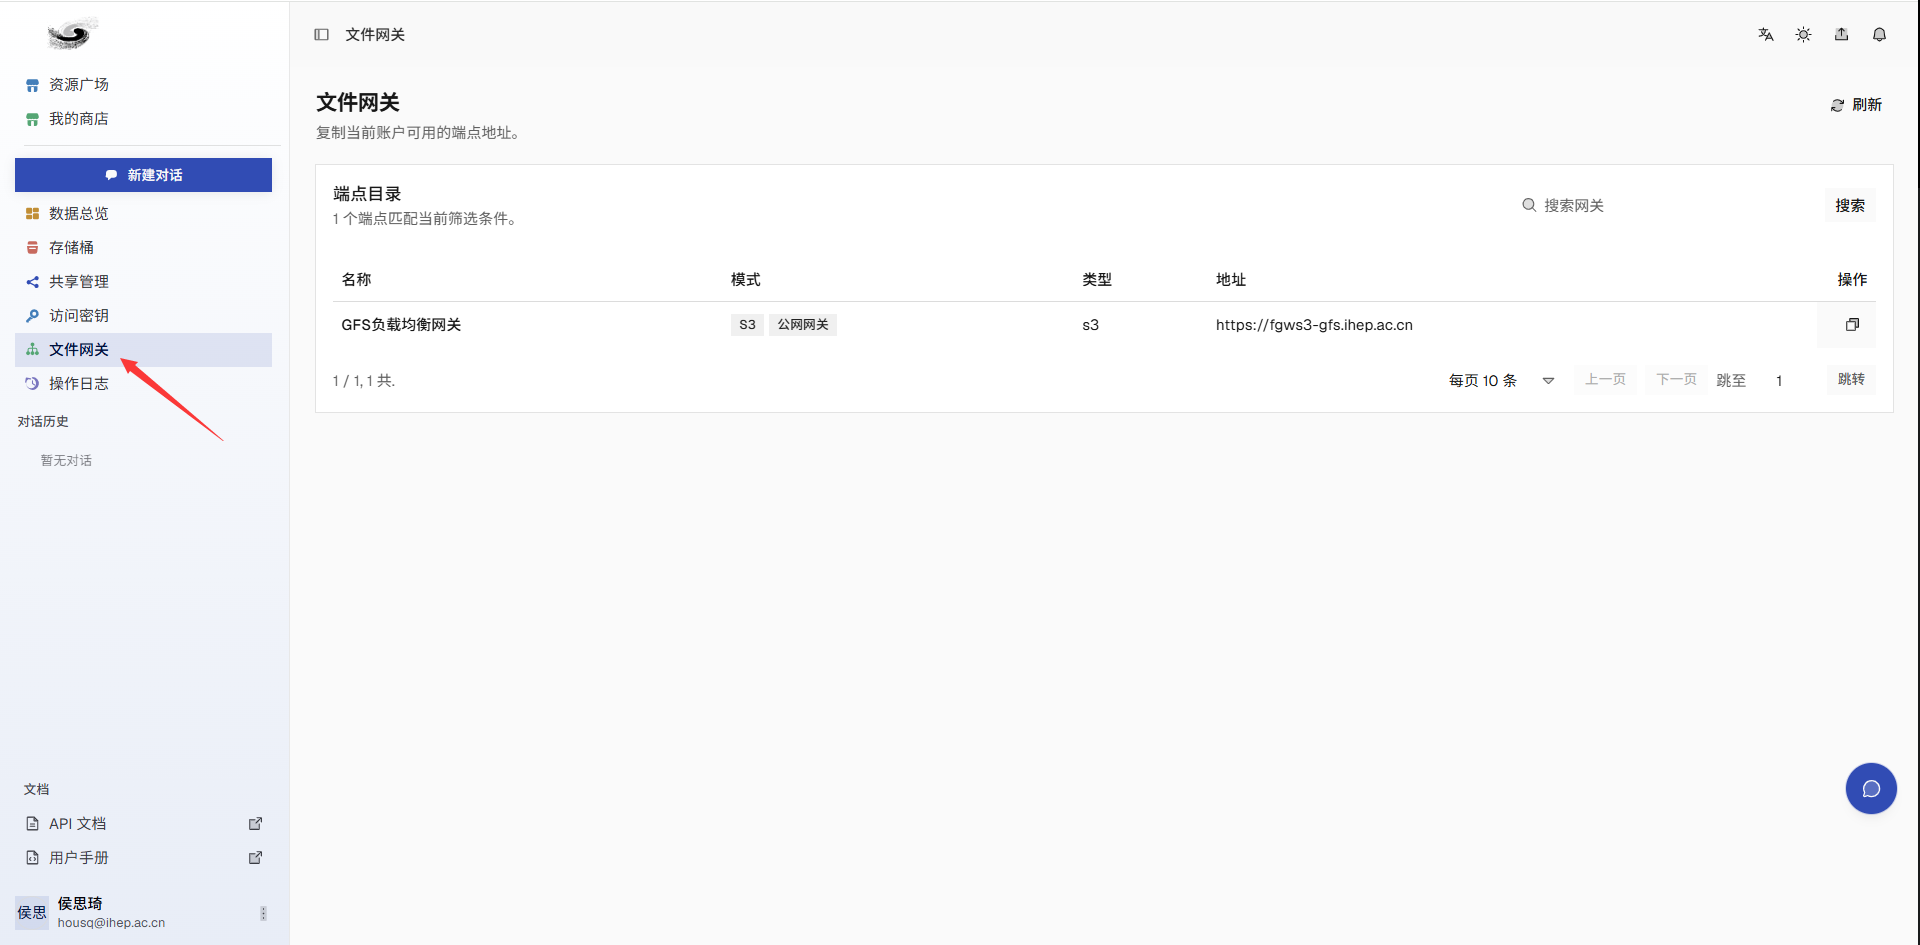
Gateway information from the web interface:
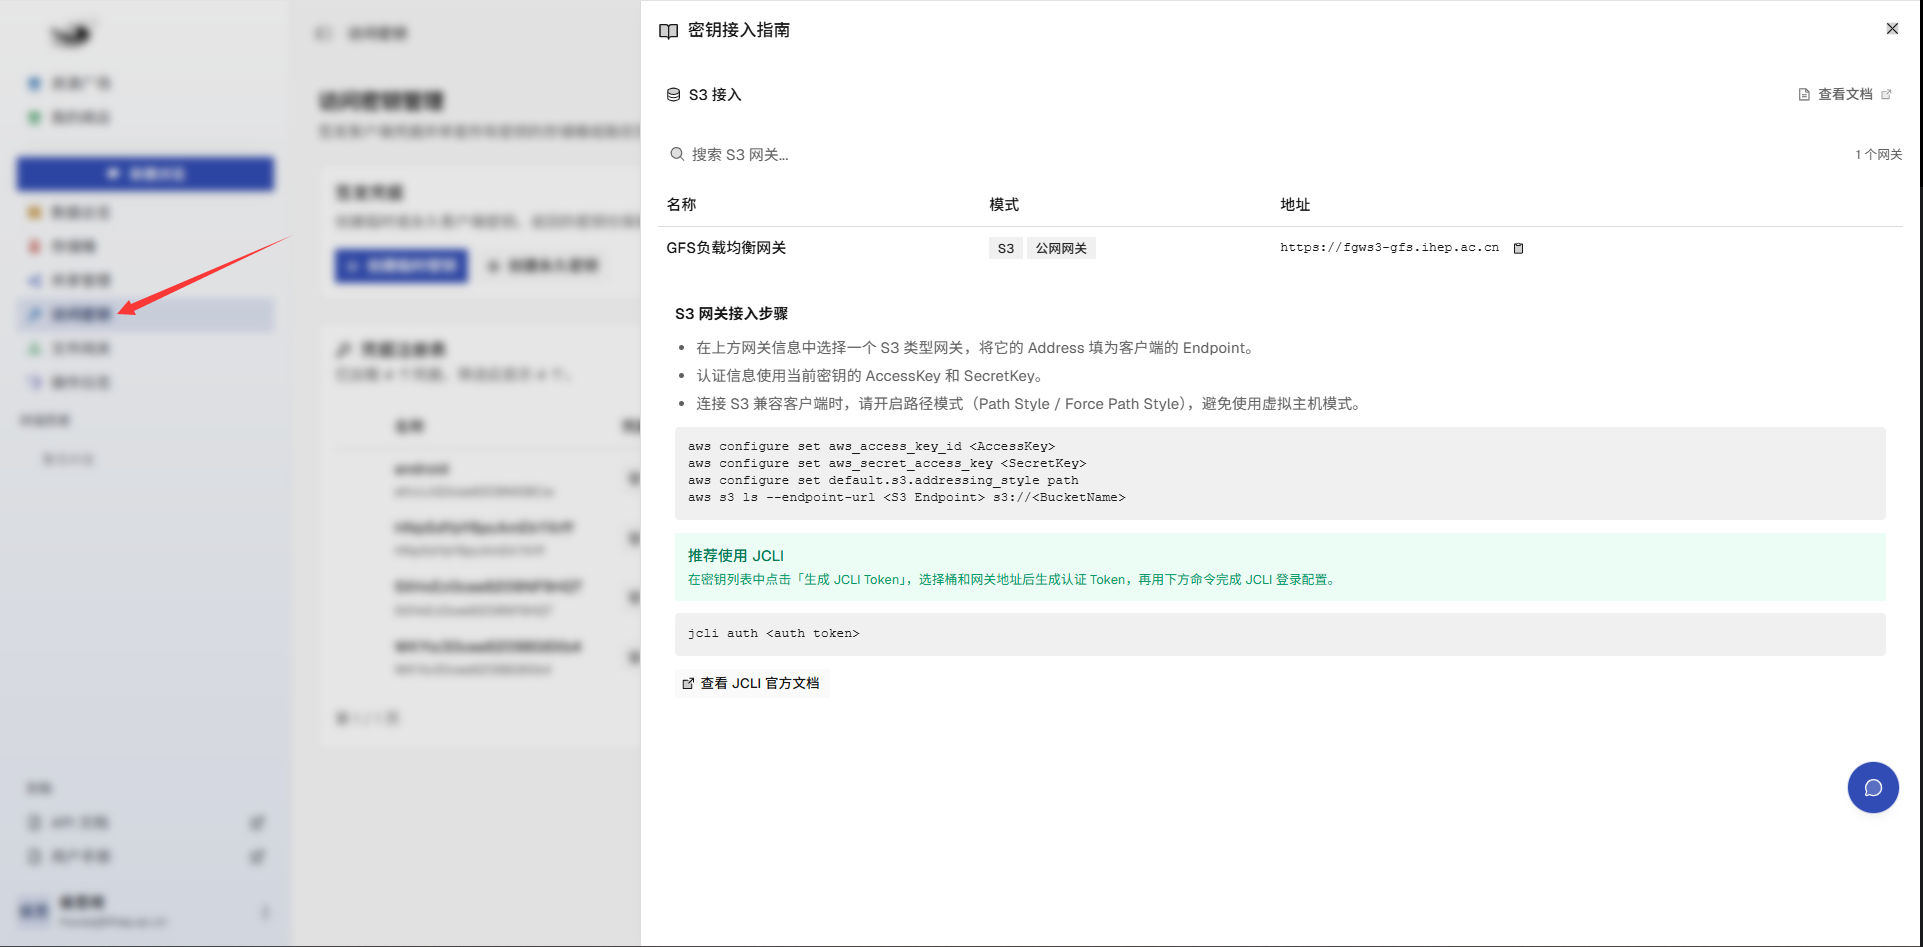
You can also click Access Guide on the key management page to view available gateway nodes.
Command for configuring authentication information:
Parameters:
- AccessKey/SecretKey: Enter the keys obtained from the web interface.
- Endpoint: Enter the gateway selected from the web interface, for example
https://fgws3-gfs.ihep.ac.cn. - Bucket selection: Follow the prompts to select the default bucket.
Note
jcli auth generates the authentication file for the AK/SK pair. Later jcli operations access gfs storage through this authentication file.
You can also use jcli auth -e to reset the configuration and re-enter authentication information.
3.3.2 Generate JCLI Token Configuration
Click Generate JCLI Token on the key management page.
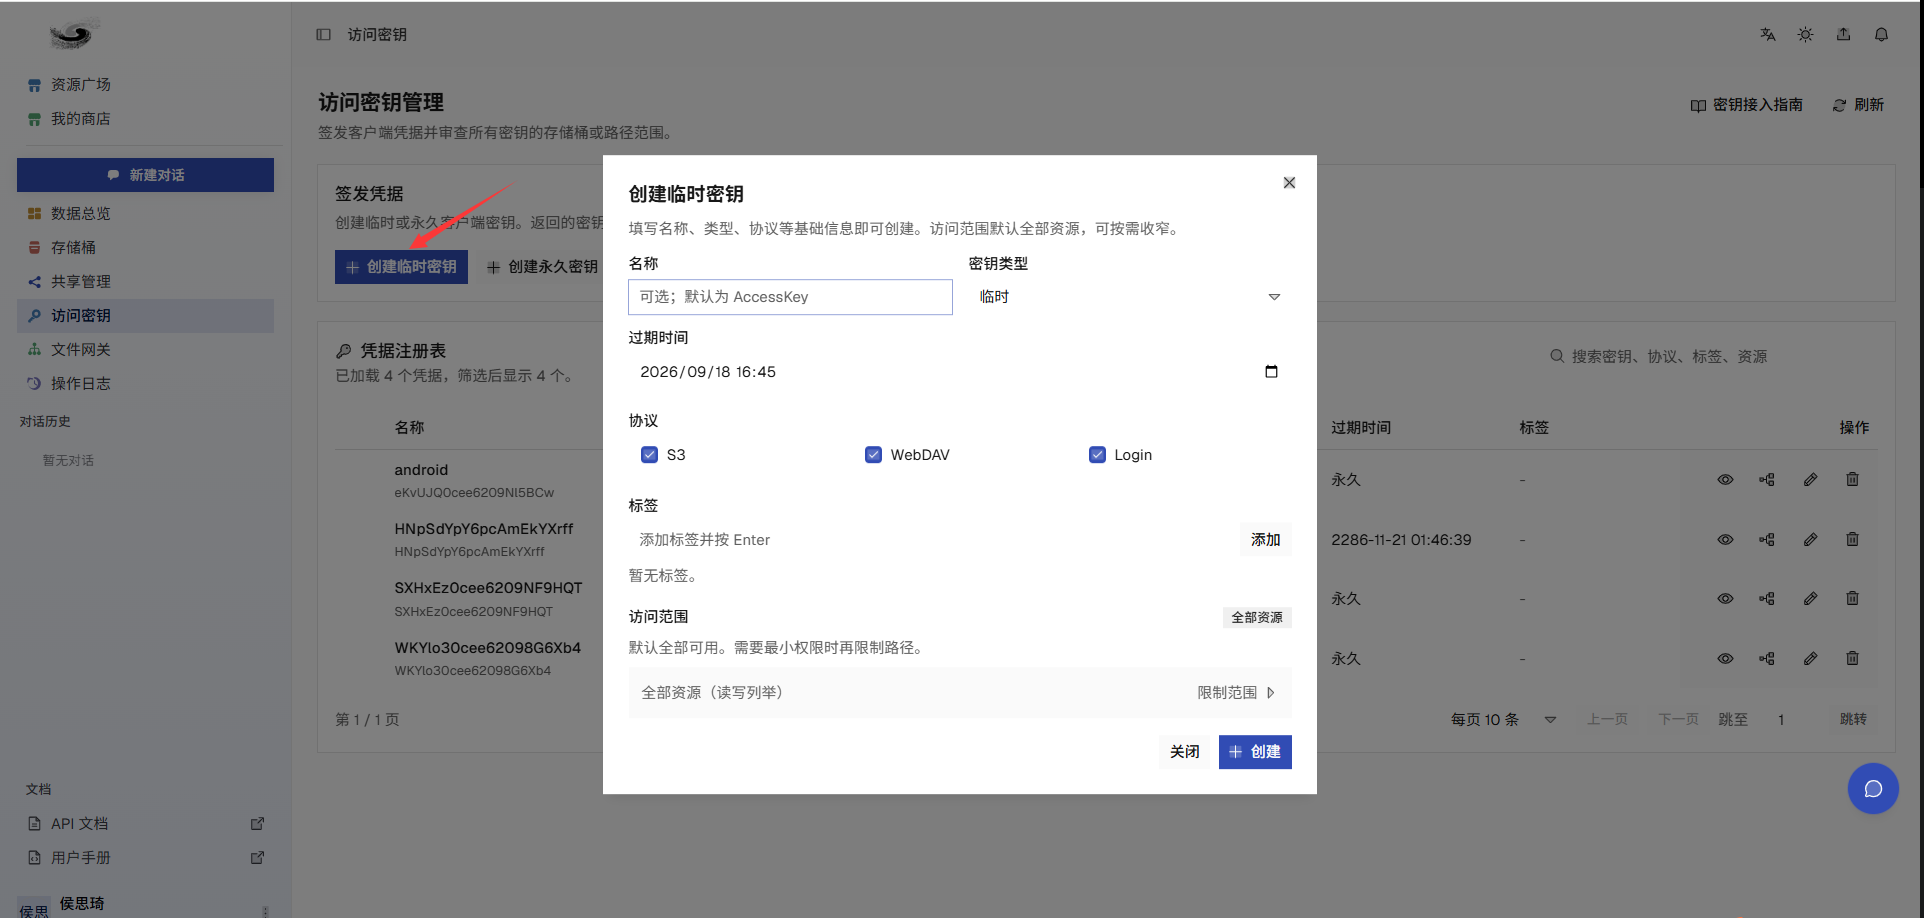
In the expanded tab, select the bucket and gateway in order, copy the generated token or command, and paste it into a console where jcli has been installed to quickly complete jcli authentication configuration.
3.3.3 Configuration File Description
jcli supports specifying the authentication file location. The default location is ~/.jcli/token/auth.
After the authentication file is created, add -auth=/your/path/auth-file-name when operating with this file.
Example:
To set it as the default authentication file, add -default:
3.4 Mount as a Virtual Disk
-
Linux
-
Ensure FUSE is installed. It is usually built in. If not installed, use one of the following commands.
For RPM-based systems such as CentOS/openEuler:
For DEB-based systems such as Ubuntu/Debian:
-
Ensure
jcli authhas been configured.Run
jcli ls. If it correctly lists files without errors, the configuration is correct. -
Mount as a shared directory.
Configure permissions after mounting:
Example 1: Change
/tmp/hostfile permission to0644(rw-r--r--).# Implicit parameters jcli chmod 0644 /tmp/host # Explicit parameters jcli chmod -r /tmp/host -mode 0644Example 2: Change the owner of
/tmp/hostto root.# Implicit parameters jcli chown root /tmp/host # Explicit parameters jcli chown -r /tmp/host -u rootSpecify access permissions when mounting:
jcli mount /lact \
    -bucket 20001-lact \
    -mode-mnt "0770" \
    -mode-mnt-uid 0 \
    -mode-mnt-gid 1000 \
    -mode-uid 0 \
    -mode-gid 1000 \
    --daemon
Parameter description:
-mode-mnt "0770": Only the owner (root) and group (lact) can read and write.-mode-*-gid 1000: Force files to belong to the group with GID1000.
-
-
Windows
- Download WinFSP: download link.
- Ensure
jcli authhas been configured. -
Run the mount command
jcli mount {drive_letter}. The Windows drive letter must be selected from uppercaseA-Z. -
You can then use the JWanFS unified storage space like a local disk.
-
macOS
Mounting on macOS requires MacFUSE. Download and install MacFUSE.
-
Mount path examples
If jcli mount Z: mounts the bucket to This PC, or jcli mount /home/lhaaso/testuser/gfs mounts it to a Linux server, the path mapping is:
| Path in Bucket | Windows | Linux |
|---|---|---|
| Image.jpg | Z:\Image.jpg | /home/lhaaso/testuser/gfs/Image.jpg |
3.5 Unmount
Manual unmounting forces directory contents to be written back to disk and helps ensure data safety.
3.6 Interactive Mode
Run jcli directly to enter interactive mode. It supports common commands such as ls, cd, put, and get, and the usage is similar to a Linux shell.
- Subcommands such as
jcli putperform one-time file upload. jcli mountprovides persistent mounting for long-term reading and writing.jcli helpdisplays detailed command descriptions.
Global parameters:
  --help Value type: bool
        Print help information
  -ak Value type: string
        AccessKey
  -auth Value type: string
        Authentication file path
  -bucket Value type: string
        Default bucket
  -endpoint Value type: string
        Endpoint address
  -sk Value type: string
        SecretKey
Subcommands:
  Command   Alias            Purpose
  auth                       Authentication service
  cat                        View file contents
  chmod                      Modify object permissions
  chown                      Modify object permissions
  config                     Configure authentication information
  cp        copy             Copy object
  cron      crontab,task     Scheduled task management
  rm        delete,del       Delete file
  du        size             Calculate file or directory size
  etag                       Calculate file ETag
  expire                     Get AK/SK expiration time
  file-server                Start file server
  ftp                        Start FTP server for LAN users
  get       pull,download    Download file
  head                       View file head
  list      ls,ll            List files
  md5sum    md5              Calculate file MD5
  mkdir                      Create directory
  mount                      Mount bucket
  mv        move,rename      Move or rename remote file
  put       push,upload      Upload file
  quota                      Get file information
  stat      stats,info       Get file information
  symlink                    Modify object permissions
  sync                       Synchronize objects
  tail                       View file tail
  token                      Create temporary AK/SK
  update                     Update client version
3.7 Client Upgrade
To use new features, update the jcli client with:
4 Third-Party Compatible Clients
4.1 NetMount
NetMount is a simple, easy-to-use, and efficient open-source cloud storage management tool. It integrates cloud storage as a local file system, allowing seamless access to cloud resources. Through virtual file system technology, it enables efficient operations, simplifies data management, and provides a smooth cloud-local interaction experience.
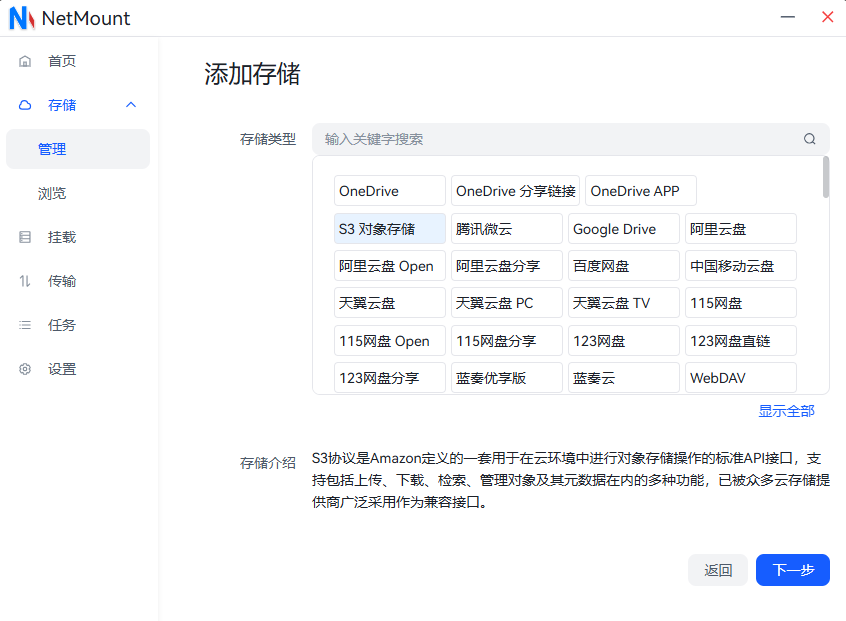
Open NetMount, click Manage, click Add, and select object storage to continue.
Fill in bucket information to add the JWanFS bucket.
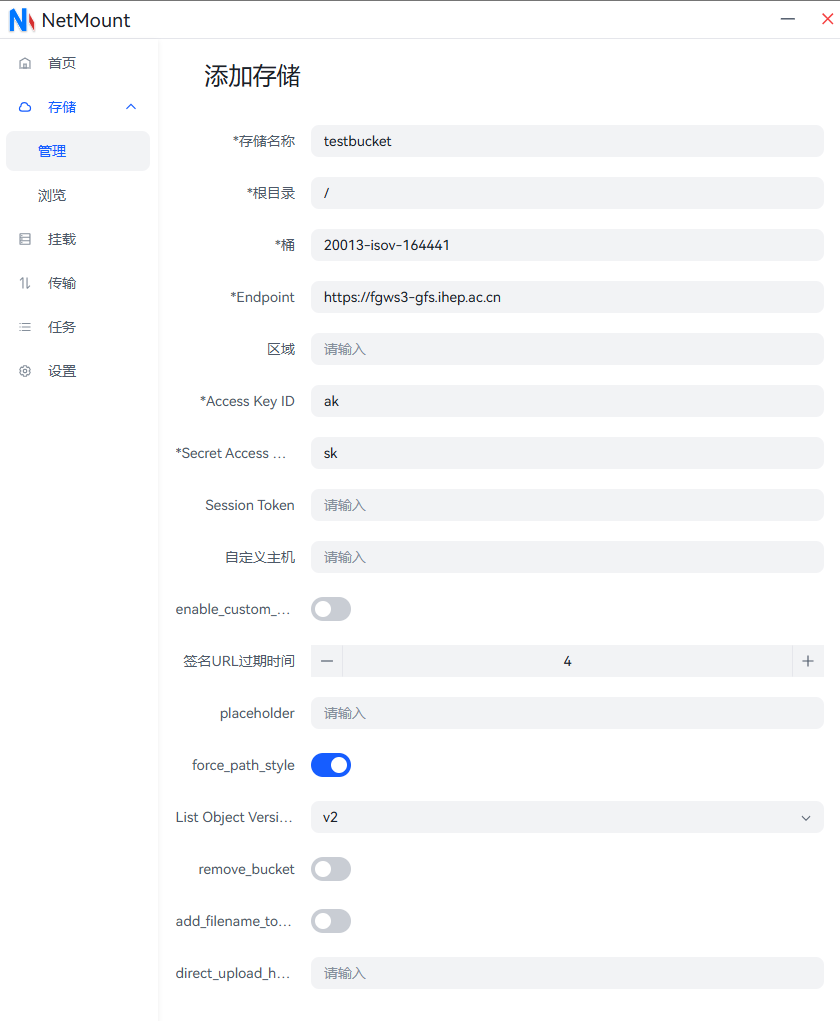
Storage Name is the name shown in NetMount and can be customized.
Bucket is the JWanFS bucket. Endpoint is the S3 gateway address of the file gateway.
Fill Access Key ID and Secret Access with the OSCA authentication AK and SK.
Note
Enable force_path_style, select List Object Version as V2, and then save.
4.2 Cloud Volume
Cloud Volume is a Flutter desktop client for macOS, Windows, and Linux. It can manage S3-compatible object storage, WebDAV, and Baidu Netdisk in one place. It is more than a simple "bucket list + upload/download" tool: it includes local caching, mountable WebDAV views, an application-level recycle bin, sharing-link management, and task queues, making its workflow closer to a desktop file manager.
Cloud Volume project repository and release packages:
Project page: https://github.com/lfhy/cloud-volume
GitHub Release (macOS / Windows / Linux desktop versions + CLI): download the latest version from the repository Releases page.
5 SDK
gfs object storage is compatible with the S3 protocol and can be accessed through AWS S3 SDKs in multiple languages. Program access usually requires four configuration items:
Endpoint: gfs S3 gateway address, for examplehttps://fgws3-gfs.ihep.ac.cnAccessKeyId/AccessKeySecret: access credentialsRegion:us-east-1can be used- Path-Style: path-style access must be enabled to prevent the SDK from resolving the bucket name as a subdomain
5.1 Install SDK
Add the following to pom.xml in a Maven project:
5.2 Initialize Client
Replace AccessKeyId, AccessKeySecret, and your-bucket-name in the examples with actual information.
import (
    "github.com/aws/aws-sdk-go/aws"
    "github.com/aws/aws-sdk-go/aws/credentials"
    "github.com/aws/aws-sdk-go/aws/session"
    "github.com/aws/aws-sdk-go/service/s3"
)

func newS3Client() *s3.S3 {
    conf := &aws.Config{
        Region:           aws.String("us-east-1"),
        Endpoint:         aws.String("https://fgws3-gfs.ihep.ac.cn"),
        Credentials:      credentials.NewStaticCredentials("AccessKeyId", "AccessKeySecret", ""),
        S3ForcePathStyle: aws.Bool(true),
        DisableSSL:       aws.Bool(false),
    }
    sess := session.Must(session.NewSession(conf))
    return s3.New(sess)
}
import boto3
from botocore.config import Config

s3_client = boto3.client(
    's3',
    endpoint_url='https://fgws3-gfs.ihep.ac.cn',
    aws_access_key_id='AccessKeyId',
    aws_secret_access_key='AccessKeySecret',
    region_name='us-east-1',
    use_ssl=True,
    config=Config(s3={'addressing_style': 'path'}),  # Path-style access is required
)
import software.amazon.awssdk.auth.credentials.AwsBasicCredentials;
import software.amazon.awssdk.auth.credentials.StaticCredentialsProvider;
import software.amazon.awssdk.regions.Region;
import software.amazon.awssdk.services.s3.S3Client;
import software.amazon.awssdk.services.s3.S3Configuration;

import java.net.URI;

public class S3ClientFactory {
    public static S3Client create() {
        return S3Client.builder()
                .region(Region.US_EAST_1)
                .endpointOverride(URI.create("https://fgws3-gfs.ihep.ac.cn"))
                .credentialsProvider(StaticCredentialsProvider.create(
                        AwsBasicCredentials.create("AccessKeyId", "AccessKeySecret")))
                .serviceConfiguration(S3Configuration.builder()
                        .pathStyleAccessEnabled(true)
                        .build())
                .build();
    }
}
5.3 Basic Operations
The following examples demonstrate uploading, listing, downloading, and deleting an object. Use an object key in the form directory/file, such as demo/hello.txt. When joining paths, do not let the file name start with /, otherwise // may be generated.
import (
    "bytes"
    "fmt"
    "io"

    "github.com/aws/aws-sdk-go/aws"
    "github.com/aws/aws-sdk-go/service/s3"
)

func demo() {
    svc := newS3Client()
    bucket := "your-bucket-name"
    key := "demo/hello.txt"

    _, err := svc.PutObject(&s3.PutObjectInput{
        Bucket: aws.String(bucket),
        Key:    aws.String(key),
        Body:   bytes.NewReader([]byte("hello gfs")),
    })
    if err != nil {
        fmt.Println("upload failed:", err)
        return
    }

    list, _ := svc.ListObjects(&s3.ListObjectsInput{Bucket: aws.String(bucket)})
    for _, obj := range list.Contents {
        fmt.Printf("%s %d\n", *obj.Key, *obj.Size)
    }

    obj, err := svc.GetObject(&s3.GetObjectInput{
        Bucket: aws.String(bucket),
        Key:    aws.String(key),
    })
    if err != nil {
        fmt.Println("download failed:", err)
        return
    }
    defer obj.Body.Close()
    data, _ := io.ReadAll(obj.Body)
    fmt.Println(string(data))

    _, _ = svc.DeleteObject(&s3.DeleteObjectInput{
        Bucket: aws.String(bucket),
        Key:    aws.String(key),
    })
}
bucket = 'your-bucket-name'
key = 'demo/hello.txt'

s3_client.put_object(Bucket=bucket, Key=key, Body=b'hello gfs')
print('upload complete')

resp = s3_client.list_objects_v2(Bucket=bucket, Prefix='demo/')
for obj in resp.get('Contents', []):
    print(obj['Key'], obj['Size'])

obj = s3_client.get_object(Bucket=bucket, Key=key)
print(obj['Body'].read().decode('utf-8'))

s3_client.delete_object(Bucket=bucket, Key=key)
print('delete complete')
import software.amazon.awssdk.core.sync.RequestBody;
import software.amazon.awssdk.services.s3.S3Client;
import software.amazon.awssdk.services.s3.model.DeleteObjectRequest;
import software.amazon.awssdk.services.s3.model.GetObjectRequest;
import software.amazon.awssdk.services.s3.model.ListObjectsV2Request;
import software.amazon.awssdk.services.s3.model.PutObjectRequest;

import java.nio.charset.StandardCharsets;

public class GfsDemo {
    public static void main(String[] args) {
        String bucket = "your-bucket-name";
        String key = "demo/hello.txt";

        try (S3Client s3 = S3ClientFactory.create()) {
            s3.putObject(
                    PutObjectRequest.builder().bucket(bucket).key(key).build(),
                    RequestBody.fromString("hello gfs")
            );

            s3.listObjectsV2(ListObjectsV2Request.builder()
                    .bucket(bucket)
                    .prefix("demo/")
                    .build())
                    .contents()
                    .forEach(obj -> System.out.println(obj.key() + " " + obj.size()));

            byte[] data = s3.getObjectAsBytes(GetObjectRequest.builder()
                    .bucket(bucket)
                    .key(key)
                    .build()).asByteArray();
            System.out.println(new String(data, StandardCharsets.UTF_8));

            s3.deleteObject(DeleteObjectRequest.builder()
                    .bucket(bucket)
                    .key(key)
                    .build());
        }
    }
}
const {
  PutObjectCommand,
  ListObjectsV2Command,
  GetObjectCommand,
  DeleteObjectCommand,
} = require('@aws-sdk/client-s3');

async function demo() {
  const bucket = 'your-bucket-name';
  const key = 'demo/hello.txt';

  await s3Client.send(new PutObjectCommand({
    Bucket: bucket,
    Key: key,
    Body: 'hello gfs',
  }));

  const list = await s3Client.send(new ListObjectsV2Command({
    Bucket: bucket,
    Prefix: 'demo/',
  }));
  for (const obj of (list.Contents || [])) {
    console.log(obj.Key, obj.Size);
  }

  const file = await s3Client.send(new GetObjectCommand({
    Bucket: bucket,
    Key: key,
  }));
  console.log(await file.Body.transformToString());

  await s3Client.send(new DeleteObjectCommand({
    Bucket: bucket,
    Key: key,
  }));
}

demo().catch(console.error);
<?php
$bucket = 'your-bucket-name';
$key = 'demo/hello.txt';

$s3->putObject([
    'Bucket' => $bucket,
    'Key'    => $key,
    'Body'   => 'hello gfs',
]);
echo "upload complete\n";

$list = $s3->listObjectsV2([
    'Bucket' => $bucket,
    'Prefix' => 'demo/',
]);
foreach ($list['Contents'] ?? [] as $obj) {
    echo $obj['Key'] . ' ' . $obj['Size'] . "\n";
}

$file = $s3->getObject([
    'Bucket' => $bucket,
    'Key'    => $key,
]);
echo $file['Body'] . "\n";

$s3->deleteObject([
    'Bucket' => $bucket,
    'Key'    => $key,
]);
echo "delete complete\n";
5.4 Usage Tips
- AccessKeyId and AccessKeySecret are access credentials. Do not write them into public code repositories.
- A single listing request returns only part of the objects by default. When there are many objects, continue querying with the pagination parameters provided by the SDK.
- For large files, use the multipart upload capability provided by the SDK.
6 Concepts
gfs is a unified object storage instance built on JWanFS. The system implements strict user-level data isolation to ensure that each user has independent and secure storage space. gfs also removes operating system barriers and supports seamless access from Windows, Linux, and macOS, providing a lightweight and convenient network-disk-like data management experience.
6.1 Bucket
A bucket is functionally similar to the root directory of a familiar file system. It is the top-level container for storing data in JWanFS.
Bucket names are globally unique and cannot be changed after creation.
Naming rules: bucket names can contain only lowercase letters, numbers, and hyphens (-), and must start and end with a lowercase letter or number.
6.2 Endpoint / File Gateway
The endpoint is the entry point for user data access, in the format IP + port.
gfs currently provides three gateways with load balancing. You can directly use https://fgws3-gfs.ihep.ac.cn:
6.3 AccessKey and SecretKey
Access keys, consisting of AccessKey and SecretKey, are the core authentication credentials for accessing JWanFS storage services. They are used to validate access permissions and protect data access security. Users can obtain key information from the web management interface.
Appendix
For other usage methods, see the client manual: JWanFS Manual
有问题?输入后跳转到对话页继续交流